Quick Install Guide (pdf)
Page 1
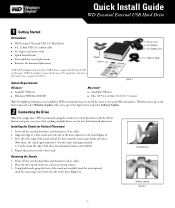
...Apple menu and select Software Update. 2 Connecting the Drive Note: For a single drive, WD recommends using the stands for vertical placement with the Power button on a clean and steady surface. 3. Available USB port ! Align the edge of a drive stand onto the side of the stand and...Placement 1. Note: Space the stands approximately 3-4 inches apart and approximately 2-3 inches from the side of the drive for horizontal placement Stands Feet Power Cord AC Adapter AC Adapter Cord USB 2.0 Cable *USB 2.0 PCI adapter card or built-in file transfer time compared to the Start menu...
...Apple menu and select Software Update. 2 Connecting the Drive Note: For a single drive, WD recommends using the stands for vertical placement with the Power button on a clean and steady surface. 3. Available USB port ! Align the edge of a drive stand onto the side of the stand and...Placement 1. Note: Space the stands approximately 3-4 inches apart and approximately 2-3 inches from the side of the drive for horizontal placement Stands Feet Power Cord AC Adapter AC Adapter Cord USB 2.0 Cable *USB 2.0 PCI adapter card or built-in file transfer time compared to the Start menu...
Quick Install Guide (pdf)
Page 2
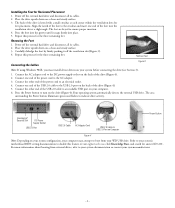
...Placement 1. Connect the AC adapter cord to turn on your system's motherboard BIOS setting documentation to an electrical outlet. 4. The area surrounding the Power button illuminates green and flashes to the AC adapter. 3. Repeat this process for the three remaining feet. Removing the Feet 1. Place the ...the Cables Figure 3 Note: If using Windows 98SE, you must install device drivers on the drive (Figure 4). Connect one end of the power cord to disable this feature or visit support.wdc.com, click Knowledge Base, and search for answer ID 1201. Installing the Feet for feet ...
...Placement 1. Connect the AC adapter cord to turn on your system's motherboard BIOS setting documentation to an electrical outlet. 4. The area surrounding the Power button illuminates green and flashes to the AC adapter. 3. Repeat this process for the three remaining feet. Removing the Feet 1. Place the ...the Cables Figure 3 Note: If using Windows 98SE, you must install device drivers on the drive (Figure 4). Connect one end of the power cord to disable this feature or visit support.wdc.com, click Knowledge Base, and search for answer ID 1201. Installing the Feet for feet ...
Quick Install Guide (pdf)
Page 3
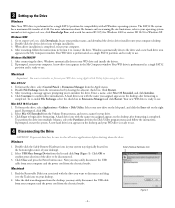
... for your desktop). 2. Mac OS 9.2.2 1. If prompted, click OK. 2. Double-click the Safely Remove Hardware icon in your computer and the power cord from your desktop. 2. Safely Remove Hardware Icon Macintosh 1. Figure 5 - 3 - For more information about file formats and overcoming file size .... To format the drive, select Applications > Utilities > Disk Utility. A new hard drive icon appears on your computer and the power cord from your system tray (typically located on the desktop after formatting is completed. Windows 1. Now you may safely disconnect the USB...
... for your desktop). 2. Mac OS 9.2.2 1. If prompted, click OK. 2. Double-click the Safely Remove Hardware icon in your computer and the power cord from your desktop. 2. Safely Remove Hardware Icon Macintosh 1. Figure 5 - 3 - For more information about file formats and overcoming file size .... To format the drive, select Applications > Utilities > Disk Utility. A new hard drive icon appears on your computer and the power cord from your system tray (typically located on the desktop after formatting is completed. Windows 1. Now you may safely disconnect the USB...


