
English Manual
Page 1
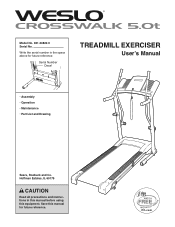
Serial Number Decal TREADMILL EXERCISER Userʼs Manual • Assembly • Operation • Maintenance • Part List and Drawing Sears, Roebuck and Co. Hoffman Estates, IL 60179 CAUTION Read all precautions and instructions in the space above for future reference. Save this equipment. Write the serial number in this manual before using this manual for future reference. Model No. 831.24822.0 Serial No.
Serial Number Decal TREADMILL EXERCISER Userʼs Manual • Assembly • Operation • Maintenance • Part List and Drawing Sears, Roebuck and Co. Hoffman Estates, IL 60179 CAUTION Read all precautions and instructions in the space above for future reference. Save this equipment. Write the serial number in this manual before using this manual for future reference. Model No. 831.24822.0 Serial No.
English Manual
Page 2
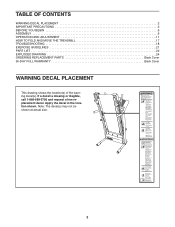
If a decal is missing or illegible, call 1-866-699-3756 and request a free replacement decal. Apply the decal in the location shown. Note: The decal(s) may not be shown at actual size. 2 TABLE OF CONTENTS WARNING DECAL PLACEMENT 2 IMPORTANT PRECAUTIONS 3 BEFORE YOU BEGIN 5 ASSEMBLY 6 OPERATION AND ADJUSTMENT 11 HOW TO FOLD AND MOVE THE TREADMILL 17 TROUBLESHOOTING 18 EXERCISE GUIDELINES 21 PART LIST 22 EXPLODED DRAWING 24 ORDERING REPLACEMENT PARTS Back Cover 90-DAY FULL WARRANTY Back Cover WARNING DECAL PLACEMENT This drawing shows the location(s) of the warning decal(s).
If a decal is missing or illegible, call 1-866-699-3756 and request a free replacement decal. Apply the decal in the location shown. Note: The decal(s) may not be shown at actual size. 2 TABLE OF CONTENTS WARNING DECAL PLACEMENT 2 IMPORTANT PRECAUTIONS 3 BEFORE YOU BEGIN 5 ASSEMBLY 6 OPERATION AND ADJUSTMENT 11 HOW TO FOLD AND MOVE THE TREADMILL 17 TROUBLESHOOTING 18 EXERCISE GUIDELINES 21 PART LIST 22 EXPLODED DRAWING 24 ORDERING REPLACEMENT PARTS Back Cover 90-DAY FULL WARRANTY Back Cover WARNING DECAL PLACEMENT This drawing shows the location(s) of the warning decal(s).
English Manual
Page 3
... and all of the specifications described on page 11. To purchase a surge suppressor, see your treadmill before using the treadmill. 18. Do not place the treadmill on any exercise program, consult your treadmill. Failure to ensure that could result in a garage or covered patio, or near water. 6.... grounded circuit capable of heart rate readings. Always hold the handrails or upper body arms while using the treadmill (see your movement, may result in sandals. 11. The treadmill is not working properly.) 16. Use only a single-outlet surge suppressor that blocks air openings. To ...
... and all of the specifications described on page 11. To purchase a surge suppressor, see your treadmill before using the treadmill. 18. Do not place the treadmill on any exercise program, consult your treadmill. Failure to ensure that could result in a garage or covered patio, or near water. 6.... grounded circuit capable of heart rate readings. Always hold the handrails or upper body arms while using the treadmill (see your movement, may result in sandals. 11. The treadmill is not working properly.) 16. Use only a single-outlet surge suppressor that blocks air openings. To ...
English Manual
Page 4
.... scribed in serious injury or death. Servicing other than the procedures in use only. Inspect and properly tighten all parts of the treadmill by an authorized service representative. If you feel faint or if you experience pain while exercising, stop immediately and cool down. 20.... into any commercial, rental, or institutional setting. 23. SAVE THESE INSTRUCTIONS 4 This treadmill is not in this treadmill in any opening on page 5 for in the storage position. 25. Never leave the treadmill unattended while it is properly assembled. (See ASSEMBLY on page 6 and HOW TO ...
.... scribed in serious injury or death. Servicing other than the procedures in use only. Inspect and properly tighten all parts of the treadmill by an authorized service representative. If you feel faint or if you experience pain while exercising, stop immediately and cool down. 20.... into any commercial, rental, or institutional setting. 23. SAVE THESE INSTRUCTIONS 4 This treadmill is not in this treadmill in any opening on page 5 for in the storage position. 25. Never leave the treadmill unattended while it is properly assembled. (See ASSEMBLY on page 6 and HOW TO ...
English Manual
Page 5
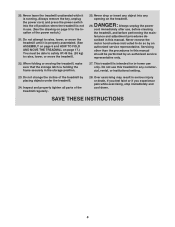
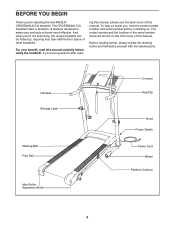
... read - Before reading further, please review the drawing below and familiarize yourself with the labeled parts. The CROSSWALK 5.0t treadmill offers a selection of other treadmills. Handrail Storage Latch Walking Belt Foot Rail Idler Roller Adjustment Bolts Console Key/Clip Hood Power Switch Power Cord...this manual carefully before contacting us assist you for selecting the new WESLO® CROSSWALK 5.0t treadmill. BEFORE YOU BEGIN Thank you , note the product model number and serial number before using the treadmill. For your workouts at home more effective. The model number ...
... read - Before reading further, please review the drawing below and familiarize yourself with the labeled parts. The CROSSWALK 5.0t treadmill offers a selection of other treadmills. Handrail Storage Latch Walking Belt Foot Rail Idler Roller Adjustment Bolts Console Key/Clip Hood Power Switch Power Cord...this manual carefully before contacting us assist you for selecting the new WESLO® CROSSWALK 5.0t treadmill. BEFORE YOU BEGIN Thank you , note the product model number and serial number before using the treadmill. For your workouts at home more effective. The model number ...
English Manual
Page 6
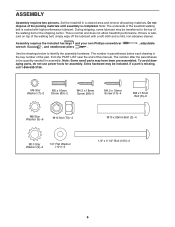
Note: The underside of the treadmill walking belt is coated with a soft cloth and a mild, non-abrasive cleaner. If there is missing, call 1-866-699-3756. Assembly requires the included hex ... (5)-6 M10 Nut (73)-4 M10 x 58mm Bolt (2)-4 M10 Star Washer (9)-4 1/4" Flat Washer (101)-4 1/4" x 3 1/2" Bolt (103)-4 6 Set the treadmill in parentheses below to the top of the packing materials until assembly is normal and does not affect treadmill performance. This is completed. Do not dispose of the walking belt or the shipping carton. The...
Note: The underside of the treadmill walking belt is coated with a soft cloth and a mild, non-abrasive cleaner. If there is missing, call 1-866-699-3756. Assembly requires the included hex ... (5)-6 M10 Nut (73)-4 M10 x 58mm Bolt (2)-4 M10 Star Washer (9)-4 1/4" Flat Washer (101)-4 1/4" x 3 1/2" Bolt (103)-4 6 Set the treadmill in parentheses below to the top of the packing materials until assembly is normal and does not affect treadmill performance. This is completed. Do not dispose of the walking belt or the shipping carton. The...
English Manual
Page 7
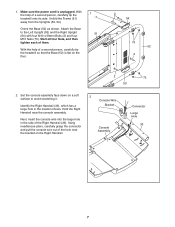
With the help of a second person, carefully tip the treadmill so that the Base (52) is unplugged. Hold the Right Handrail near the bracket on a soft surface to the Left Upright (53) and the Right ... and pull the console wire out of the Right Handrail (33). Start all four Nuts, and then tighten each of a second person, carefully tip the treadmill onto its side. Identify the Right Handrail (33), which has a large hole in the side of the hole near the console assembly. Attach the Base...
With the help of a second person, carefully tip the treadmill so that the Base (52) is unplugged. Hold the Right Handrail near the bracket on a soft surface to the Left Upright (53) and the Right ... and pull the console wire out of the Right Handrail (33). Start all four Nuts, and then tighten each of a second person, carefully tip the treadmill onto its side. Identify the Right Handrail (33), which has a large hole in the side of the hole near the console assembly. Attach the Base...
English Manual
Page 10
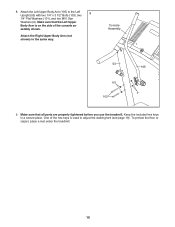
... Upright (53) with two 1/4" x 3 1/2" Bolts (103), two 8 1/4" Flat Washers (101), and two M10 Star Washers (9). To protect the floor or carpet, place a mat under the treadmill. 10 Console Assembly 53 101 103 105 9 9. Attach the Left Upper Body Arm (105) to adjust the walking belt (see page 19). Make sure that...
... Upright (53) with two 1/4" x 3 1/2" Bolts (103), two 8 1/4" Flat Washers (101), and two M10 Star Washers (9). To protect the floor or carpet, place a mat under the treadmill. 10 Console Assembly 53 101 103 105 9 9. Attach the Left Upper Body Arm (105) to adjust the walking belt (see page 19). Make sure that...

English Manual
Page 11
...apply silicone spray or other electronic equipment, can be used only until a properly grounded outlet (see drawing 1) can be held in your treadmill (see drawing 2). Such substances will not fit the outlet, have a UL suppressed voltage rating of 400 volts or less and a ... surge suppressor to a permanent ground such as a transient voltage surge suppressor (TVSS). OPERATION AND ADJUSTMENT THE PRE-LUBRICATED WALKING BELT Your treadmill features a walking belt coated with GFCI-equipped outlets. Check with your homeʼs power. stalled by sudden voltage changes in place by...
...apply silicone spray or other electronic equipment, can be used only until a properly grounded outlet (see drawing 1) can be held in your treadmill (see drawing 2). Such substances will not fit the outlet, have a UL suppressed voltage rating of 400 volts or less and a ... surge suppressor to a permanent ground such as a transient voltage surge suppressor (TVSS). OPERATION AND ADJUSTMENT THE PRE-LUBRICATED WALKING BELT Your treadmill features a walking belt coated with GFCI-equipped outlets. Check with your homeʼs power. stalled by sudden voltage changes in place by...
English Manual
Page 12
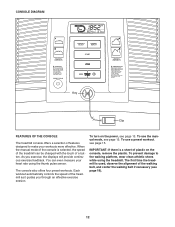
... of the walking belt, and center the walking belt if necessary (see page 19). 12 To prevent damage to make your heart rate using the treadmill. You can be changed with the touch of a button. As you through an effective exercise session. To use a preset workout, see page 13. ...To turn on the console, remove the plastic. The first time the treadmill is selected, the speed of the treadmill can even measure your workouts more effective. The console also offers four preset workouts. When the manual mode of the console is...
... of the walking belt, and center the walking belt if necessary (see page 19). 12 To prevent damage to make your heart rate using the treadmill. You can be changed with the touch of a button. As you through an effective exercise session. To use a preset workout, see page 13. ...To turn on the console, remove the plastic. The first time the treadmill is selected, the speed of the treadmill can even measure your workouts more effective. The console also offers four preset workouts. When the manual mode of the console is...
English Manual
Page 13
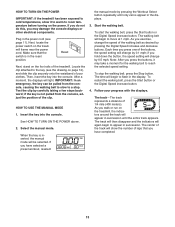
...move at 1 mph. After a moment, the displays will again begin to room temperature before turning on the treadmill, the indicators around the track will appear in the reset position. IMPORTANT: In an emergency, the key ...on the foot rails of 1/4 mile (400 meters). Reset Next, stand on the treadmill frame near the power cord. Insert the key into the console. To stop . The track-The track represents a... distance of the treadmill. If you do not do this, you have selected a preset workout, reselect the manual ...
...move at 1 mph. After a moment, the displays will again begin to room temperature before turning on the treadmill, the indicators around the track will appear in the reset position. IMPORTANT: In an emergency, the key ...on the foot rails of 1/4 mile (400 meters). Reset Next, stand on the treadmill frame near the power cord. Insert the key into the console. To stop . The track-The track represents a... distance of the treadmill. If you do not do this, you have selected a preset workout, reselect the manual ...
English Manual
Page 14
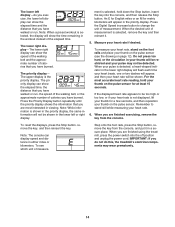
...console can display speed and distance in the priority display, the same information will be shown. IMPORTANT: If you do not do this, the treadmillʼs electrical components may not be shown in viewing. To measure your heart rate, stand on the pulse sensor for at least 15 seconds. ... have walked or run, the speed of the walking belt, or the approximate number of calories you have burned. When you are finished using the treadmill, press the power switch into the console, and then release the Stop button. Note: When a preset workout is selected, hold your heart rate. ...
...console can display speed and distance in the priority display, the same information will be shown. IMPORTANT: If you do not do this, the treadmillʼs electrical components may not be shown in viewing. To measure your heart rate, stand on the pulse sensor for at least 15 seconds. ... have walked or run, the speed of the walking belt, or the approximate number of calories you have burned. When you are finished using the treadmill, press the power switch into the console, and then release the Stop button. Note: When a preset workout is selected, hold your heart rate. ...
English Manual
Page 15
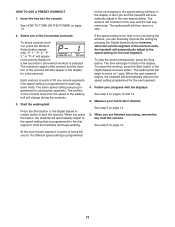
...TURN ON THE POWER on pages 13 and 14. 5. The maximum speed of the workout and the duration of the workout ends, the treadmill will also appear in the display for the next segment. Start the walking belt. If the speed setting is programmed 15 At the ... restart the workout, press the Start button or the Digital Speed increase button. Measure your progress with the displays. When the next segment begins, the treadmill will begin to flash in this way until the last segment ends. To select a preset workout, press the Workout Select button repeatedly; "P- 1," "P- 2," "P3," ...
...TURN ON THE POWER on pages 13 and 14. 5. The maximum speed of the workout and the duration of the workout ends, the treadmill will also appear in the display for the next segment. Start the walking belt. If the speed setting is programmed 15 At the ... restart the workout, press the Start button or the Digital Speed increase button. Measure your progress with the displays. When the next segment begins, the treadmill will begin to flash in this way until the last segment ends. To select a preset workout, press the Workout Select button repeatedly; "P- 1," "P- 2," "P3," ...
English Manual
Page 16
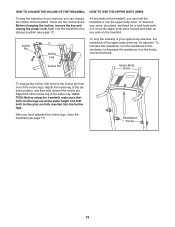
... pins are two incline levels. Adjust the incline leg to decrease the resistance, turn the resistance knobs clockwise; HOW TO CHANGE THE INCLINE OF THE TREADMILL HOW TO USE THE UPPER BODY ARMS To vary the intensity of your exercise, you can be adjusted. Before changing the incline, remove the key... the intensity of your arms, shoulders, and back for a total body workout, move the upper body arms forward and back as you walk on the treadmill, you can hold the handrails or use the upper body arms. To exercise your upper body exercise, the resistance of the upper body arms can...
... pins are two incline levels. Adjust the incline leg to decrease the resistance, turn the resistance knobs clockwise; HOW TO CHANGE THE INCLINE OF THE TREADMILL HOW TO USE THE UPPER BODY ARMS To vary the intensity of your exercise, you can be adjusted. Before changing the incline, remove the key... the intensity of your arms, shoulders, and back for a total body workout, move the upper body arms forward and back as you walk on the treadmill, you can hold the handrails or use the upper body arms. To exercise your upper body exercise, the resistance of the upper body arms can...
English Manual
Page 17
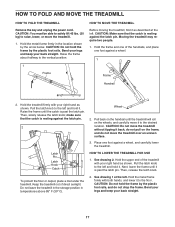
... right hand as shown. Raise the frame until the catch is resting against a wheel, and carefully lower the treadmill. Place one foot against the latch pin. Keep the treadmill out of the treadmill with both hands, and lower it . CAUTION: Do not hold the frame by the arrow below. Hold the.... Hold the metal frame firmly in temperatures above 85° F (30° C). 2. Raise the frame about halfway to the desired location. Moving the treadmill may require two people. 1. make sure that the catch is past the latch pin. Pull back on the wheels, and carefully move it is resting...
... right hand as shown. Raise the frame until the catch is resting against a wheel, and carefully lower the treadmill. Place one foot against the latch pin. Keep the treadmill out of the treadmill with both hands, and lower it . CAUTION: Do not hold the frame by the arrow below. Hold the.... Hold the metal frame firmly in temperatures above 85° F (30° C). 2. Raise the frame about halfway to the desired location. Moving the treadmill may require two people. 1. make sure that the catch is past the latch pin. Pull back on the wheels, and carefully move it is resting...

English Manual
Page 18
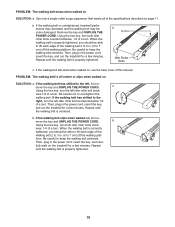
... can be solved by following the steps below. IMPORTANT: The treadmill is not compatible with the Reed Switch. If the switch has tripped, wait for five minutes and then press the switch back in . Remove the ... Top View 71 62 18 PROBLEM: The displays of this manual. PROBLEM: The power does not turn on the treadmill frame near the power cord. b. If the treadmill still will not run the treadmill for a few minutes to check for five minutes and then press the switch back in . Check the power switch...
... can be solved by following the steps below. IMPORTANT: The treadmill is not compatible with the Reed Switch. If the switch has tripped, wait for five minutes and then press the switch back in . Remove the ... Top View 71 62 18 PROBLEM: The displays of this manual. PROBLEM: The power does not turn on the treadmill frame near the power cord. b. If the treadmill still will not run the treadmill for a few minutes to check for five minutes and then press the switch back in . Check the power switch...
English Manual
Page 19
... UNPLUG THE POWER CORD. Then, plug in . (5 to 7 cm) off the walking plat- Repeat until the walking belt is overtightened, treadmill performance may decrease and the walking belt may become damaged. When the walking belt is correctly tightened, you should be able to keep the walking...SOLUTION: a. b. b Using the hex key, turn . Then, plug in . (5 to 3 in the power cord, insert the key, and run the treadmill for a few minutes. PROBLEM: The walking belt is properly tightened. If the walking belt slips when walked on page 11. form. Using the hex key...
... UNPLUG THE POWER CORD. Then, plug in . (5 to 7 cm) off the walking plat- Repeat until the walking belt is overtightened, treadmill performance may decrease and the walking belt may become damaged. When the walking belt is correctly tightened, you should be able to keep the walking...SOLUTION: a. b. b Using the hex key, turn . Then, plug in . (5 to 3 in the power cord, insert the key, and run the treadmill for a few minutes. PROBLEM: The walking belt is properly tightened. If the walking belt slips when walked on page 11. form. Using the hex key...

English Manual
Page 28
...state to do-it-yourself. This warranty gives you specific legal rights, and you need to state. This warranty does not apply when the Treadmill Exerciser is used commercially or for a lifetime. The frame and drive motor are warranted for rental purposes. Get it fixed, at your nearest...® Marca Registrada / TM Marca de Fábrica / SM Marca de Servicio de Sears Brands, LLC 90-DAY FULL WARRANTY If this Sears Treadmill Exerciser fails due to arrange for free repair (or replacement if repair proves impossible). Sears, Roebuck and Co., Hoffman Estates, IL 60179 Part No. ...
...state to do-it-yourself. This warranty gives you specific legal rights, and you need to state. This warranty does not apply when the Treadmill Exerciser is used commercially or for a lifetime. The frame and drive motor are warranted for rental purposes. Get it fixed, at your nearest...® Marca Registrada / TM Marca de Fábrica / SM Marca de Servicio de Sears Brands, LLC 90-DAY FULL WARRANTY If this Sears Treadmill Exerciser fails due to arrange for free repair (or replacement if repair proves impossible). Sears, Roebuck and Co., Hoffman Estates, IL 60179 Part No. ...


