
English Manual
Page 2
... 12 14 Back Cover Back Cover Note: An EXPLODED DRAWING and a PART LIST are attached to ;ensure that blocks any air :11 NeVer move the walking belt while the po opening& To protect the floor or carpet from mois- IMPORTANT PRECAUTIONS "' A WARNING::To reduce the risk of burns, fire,electric shock, or...
... 12 14 Back Cover Back Cover Note: An EXPLODED DRAWING and a PART LIST are attached to ;ensure that blocks any air :11 NeVer move the walking belt while the po opening& To protect the floor or carpet from mois- IMPORTANT PRECAUTIONS "' A WARNING::To reduce the risk of burns, fire,electric shock, or...

English Manual
Page 3
... Never 8. everylbree:montri*., VatibUSlactOrsinbbrOing:tire,u.. ho.m. Pra eadMiltuntirltSprOopOrlyassartible&(See ineroial,.:..rental,.or:institutional setting. Ilittakt-vo„ The decals shown below have been placed on walking belt when starting treadmill. • Read User's Manual and follow warnings and operating instructions. • To prevent electrical shock and damage to raise, lower, or move...
... Never 8. everylbree:montri*., VatibUSlactOrsinbbrOing:tire,u.. ho.m. Pra eadMiltuntirltSprOopOrlyassartible&(See ineroial,.:..rental,.or:institutional setting. Ilittakt-vo„ The decals shown below have been placed on walking belt when starting treadmill. • Read User's Manual and follow warnings and operating instructions. • To prevent electrical shock and damage to raise, lower, or move...
English Manual
Page 4
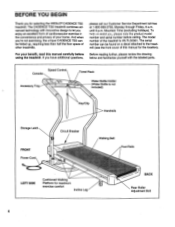
... carefully before calling. BEFORE YOU BEGIN Thank you for maximum exercise comfort Incline Leg -41 4 BACK Rear Roller Adjustment Bolt 4 Walking Belt Foot Rails LEFT SIDE Cushioned Walking Platform for selecting the WESLO° CADENCE TS5 treadmill. ynu, wane note the product model number and serial number before using the treadmill. Before reading further, please review...
... carefully before calling. BEFORE YOU BEGIN Thank you for maximum exercise comfort Incline Leg -41 4 BACK Rear Roller Adjustment Bolt 4 Walking Belt Foot Rails LEFT SIDE Cushioned Walking Platform for selecting the WESLO° CADENCE TS5 treadmill. ynu, wane note the product model number and serial number before using the treadmill. Before reading further, please review...
English Manual
Page 7
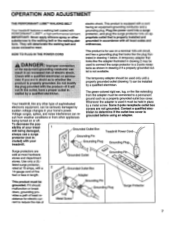
... and plug the surge protector Into an appropriate outlet that looks like extending from other grounding plug. They will deteriorate the walking belt and ordinances. ittkOtttlet;:ijaVe.tiPOOPOr.:O-: Utletle . Some 2-pole receptacle outlet box covers are sold at 15 amps, with your...equipped with a cord having an equipment-grounding conductor and a Your treadmill features a walking belt coated with all local codes and form. Contact a qualified electrician to the walking belt or the walking plat- To decrease the pos- The temporary adapter should malfunction or break down,...
... and plug the surge protector Into an appropriate outlet that looks like extending from other grounding plug. They will deteriorate the walking belt and ordinances. ittkOtttlet;:ijaVe.tiPOOPOr.:O-: Utletle . Some 2-pole receptacle outlet box covers are sold at 15 amps, with your...equipped with a cord having an equipment-grounding conductor and a Your treadmill features a walking belt coated with all local codes and form. Contact a qualified electrician to the walking belt or the walking plat- To decrease the pos- The temporary adapter should malfunction or break down,...

English Manual
Page 9
... I CAL/FAT CAL burned. (See BURN- Next, find the clip attached to the other. UT pressed or when the walking belt is MIMI. Note: Each time the walking belt Is stopped, the speed control must RCM be turned to operate the console. I -"1OP- Follow the steps below to the.... El Reset the speed control. oos tion. After you just installed batteries, the displays will already be restarted. Carefully step onto the walking belt and begin exercising. This display shows the approximate numbers of your progress with the monitor displays. • CALJFAT CAL. Slide the clip ...
... I CAL/FAT CAL burned. (See BURN- Next, find the clip attached to the other. UT pressed or when the walking belt is MIMI. Note: Each time the walking belt Is stopped, the speed control must RCM be turned to operate the console. I -"1OP- Follow the steps below to the.... El Reset the speed control. oos tion. After you just installed batteries, the displays will already be restarted. Carefully step onto the walking belt and begin exercising. This display shows the approximate numbers of your progress with the monitor displays. • CALJFAT CAL. Slide the clip ...
English Manual
Page 10
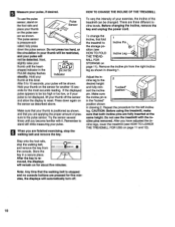
... down the pulse sensor. Remove the incline pin from the right incline leg as shown, and that both Incline pins are finished exercising, stop the walking belt, and remove the key from ATION - 0 IlUtli REP • the console. Adjust the incline leg to 1 Incline Pin the storage po- Make sure ...is positioned as shown in - After the key Is re- fully press down again on page 11). Step onto the foot rails, stop the walking belt and remove the key. CAUTION: Before using the treadmill, make sure that you are fully Inserted at this level. To vary the intensity of ...
... down the pulse sensor. Remove the incline pin from the right incline leg as shown, and that both Incline pins are finished exercising, stop the walking belt, and remove the key from ATION - 0 IlUtli REP • the console. Adjust the incline leg to 1 Incline Pin the storage po- Make sure ...is positioned as shown in - After the key Is re- fully press down again on page 11). Step onto the foot rails, stop the walking belt and remove the key. CAUTION: Before using the treadmill, make sure that you are fully Inserted at this level. To vary the intensity of ...

English Manual
Page 13
... adjustment bolt counterclockwise 1/4 of a turn the left side of drained batteries. Using the alien wrench, turn . Repeat until the walking belt is centered. 6. If the walking belt has shifted to check for a few minutes. SYMPTOM: THE TREADMILL SITS UNEVENLY ON THE FLOOR a. Check the batteries in length....the Magnet (39) on pages 5 and 6). 13 If necessary, loosen the Screw (19) and move the Reed Switch slightly. If the walking belt still slows when walked on page 8). Using the allen wrench, turn . Carefully remove the hood. Use only a UL-listed surge protector, rated at 15 amps...
... adjustment bolt counterclockwise 1/4 of a turn the left side of drained batteries. Using the alien wrench, turn . Repeat until the walking belt is centered. 6. If the walking belt has shifted to check for a few minutes. SYMPTOM: THE TREADMILL SITS UNEVENLY ON THE FLOOR a. Check the batteries in length....the Magnet (39) on pages 5 and 6). 13 If necessary, loosen the Screw (19) and move the Reed Switch slightly. If the walking belt still slows when walked on page 8). Using the allen wrench, turn . Carefully remove the hood. Use only a UL-listed surge protector, rated at 15 amps...

English Manual
Page 19
...Console Console Plate Screw Battery Cover Left Handrail Console Plate Speed Knob Speed Potentiometer Right Console Attachment Warning Decal Key/Clip Motor Belt Power Cord Motor Tension Washer Star Washer Roller Guard Motor Tension Nut Motor Hood Small Screw Motor Pivot Bolt Choke Ground ...Bolt Allen Wrench Adhesive Clip Rear Roller Cover Rear Roller Roller Tension Spring Spring Sleeve Incline Leg Washer Left Foot Rail Walking Belt Walking Platform Platform Screw Isolator Left Console Attachment Shock Front Roller/Pulley Releasable Cable Tie Storage Latch Bracket Controller Electronics Bracket ...
...Console Console Plate Screw Battery Cover Left Handrail Console Plate Speed Knob Speed Potentiometer Right Console Attachment Warning Decal Key/Clip Motor Belt Power Cord Motor Tension Washer Star Washer Roller Guard Motor Tension Nut Motor Hood Small Screw Motor Pivot Bolt Choke Ground ...Bolt Allen Wrench Adhesive Clip Rear Roller Cover Rear Roller Roller Tension Spring Spring Sleeve Incline Leg Washer Left Foot Rail Walking Belt Walking Platform Platform Screw Isolator Left Console Attachment Shock Front Roller/Pulley Releasable Cable Tie Storage Latch Bracket Controller Electronics Bracket ...


