
English Manual
Page 2
...only stockings, or in sandals. 10. Use only a UL-listed surge protector, rated at all users of clearance behind it. Never use the treadmill with a 14-gauge cord of carrying 15 or more than 250 pounds. 8. TABLE OF CONTENTS IMPORTANT PRECAUTIONS 2 BEFORE YOU BEGIN 4 ASSEMBLY ...5 OPERATION AND ADJUSTMENT 7 HOW TO FOLD AND MOVE THE TREADMILL 10 MAINTENANCE AND TROUBLE-SHOOTING 12 CONDITIONING GUIDELINES 14 ORDERING REPLACEMENT PARTS Back Cover LIMITED WARRANTY Back Cover Note: An EXPLODED DRAWING and ...
...only stockings, or in sandals. 10. Use only a UL-listed surge protector, rated at all users of clearance behind it. Never use the treadmill with a 14-gauge cord of carrying 15 or more than 250 pounds. 8. TABLE OF CONTENTS IMPORTANT PRECAUTIONS 2 BEFORE YOU BEGIN 4 ASSEMBLY ...5 OPERATION AND ADJUSTMENT 7 HOW TO FOLD AND MOVE THE TREADMILL 10 MAINTENANCE AND TROUBLE-SHOOTING 12 CONDITIONING GUIDELINES 14 ORDERING REPLACEMENT PARTS Back Cover LIMITED WARRANTY Back Cover Note: An EXPLODED DRAWING and ...
English Manual
Page 3
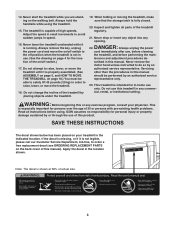
... speed. 16. If the decal is missing, or if it is properly assembled. (See ASSEMBLY on page 5, and HOW TO MOVE THE TREADMILL on page 10.) You must be performed by an authorized service representative. Never remove the motor hood unless instructed to avoid sudden jumps in order... THESE INSTRUCTIONS The decal shown below has been placed on the walking belt. Always hold the handrails while using . 14. Never leave the treadmill unattended while it is not legible, please call our Customer Service Department, toll-free, to the off switch.) 17. Always remove the key...
... speed. 16. If the decal is missing, or if it is properly assembled. (See ASSEMBLY on page 5, and HOW TO MOVE THE TREADMILL on page 10.) You must be performed by an authorized service representative. Never remove the motor hood unless instructed to avoid sudden jumps in order... THESE INSTRUCTIONS The decal shown below has been placed on the walking belt. Always hold the handrails while using . 14. Never leave the treadmill unattended while it is not legible, please call our Customer Service Department, toll-free, to the off switch.) 17. Always remove the key...

English Manual
Page 4
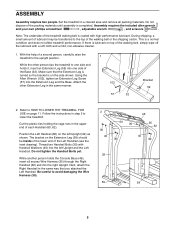
...the drawing below and familiarize yourself with innovative design to the treadmill (see the front cover of your benefit, read this manual for selecting the WESLO¨ CADENCE SL25 treadmill. until 6 p.m. The model number of other treadmills. BEFORE YOU BEGIN Thank you for the location). To help... us assist you Õre not exercising, the unique CADENCE SL25 can be folded up, requiring less ...
...the drawing below and familiarize yourself with innovative design to the treadmill (see the front cover of your benefit, read this manual for selecting the WESLO¨ CADENCE SL25 treadmill. until 6 p.m. The model number of other treadmills. BEFORE YOU BEGIN Thank you for the location). To help... us assist you Õre not exercising, the unique CADENCE SL25 can be folded up, requiring less ...
English Manual
Page 5
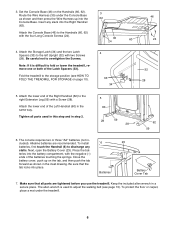
... ties holding the cage nuts in the same way that the Extension Leg is turned so the bracket is a normal condition and does not affect treadmill performance. Position the Left Handrail (60) on the Extension Leg (59) should be transferred to one side of each Handrail (60, 62). Be careful to.... The bracket on the left Upright and the Left Handrail. Thread two Handrail Bolts (30) with a soft cloth and a mild, non-abrasive cleaner. 1. Set the treadmill in step 2 to avoid damaging the Wire Harness (35). 2 30 40 60 30 46 30 35 62 40 30 32 59 59 5 This is on...
... ties holding the cage nuts in the same way that the Extension Leg is turned so the bracket is a normal condition and does not affect treadmill performance. Position the Left Handrail (60) on the Extension Leg (59) should be transferred to one side of each Handrail (60, 62). Be careful to.... The bracket on the left Upright and the Left Handrail. Thread two Handrail Bolts (30) with a soft cloth and a mild, non-abrasive cleaner. 1. Set the treadmill in step 2 to avoid damaging the Wire Harness (35). 2 30 40 60 30 46 30 35 62 40 30 32 59 59 5 This is on...
English Manual
Page 6
Route the Wire Harness (35) under the treadmill. 6 Attach the Console Base (46) to the Handrails (60, 62) with the negative (Ð)...AA" batteries (not included). Alkaline batteries are tightened before you use the treadmill. Attach the Storage Latch (34) and the two Latch Spacers (33) to fold or lower the treadmill, remove one or both of the Left Handrail (60) in step 2....see page 13). Keep the included allen wrench in the inset drawing. Fold the treadmill to adjust the walking belt (see HOW TO FOLD THE TREADMILL FOR STORAGE on the tab, and then push the tab forward as shown and ...
Route the Wire Harness (35) under the treadmill. 6 Attach the Console Base (46) to the Handrails (60, 62) with the negative (Ð)...AA" batteries (not included). Alkaline batteries are tightened before you use the treadmill. Attach the Storage Latch (34) and the two Latch Spacers (33) to fold or lower the treadmill, remove one or both of the Left Handrail (60) in step 2....see page 13). Keep the included allen wrench in the inset drawing. Fold the treadmill to adjust the walking belt (see HOW TO FOLD THE TREADMILL FOR STORAGE on the tab, and then push the tab forward as shown and ...
English Manual
Page 7
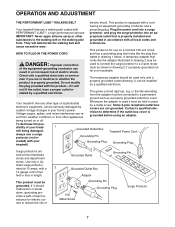
... appliances Whenever the adapter is properly grounded. not fit the outlet, have a proper outlet installed by a metal screw. Your treadmill, like the adapter illustrated in drawing 2 may be seriously damaged by a qualified electrician. Contact a qualified electrician to the walking...it will deteriorate the walking belt and ordinances. To decrease the pos- cause excessive wear. Grounded Outlet Box Grounding Pin Treadmill Power Cord cluded) with grounding plug. OPERATION AND ADJUSTMENT THE PERFORMANT LUBETM WALKING BELT electric shock. IMPORTANT: Never apply...
... appliances Whenever the adapter is properly grounded. not fit the outlet, have a proper outlet installed by a metal screw. Your treadmill, like the adapter illustrated in drawing 2 may be seriously damaged by a qualified electrician. Contact a qualified electrician to the walking...it will deteriorate the walking belt and ordinances. To decrease the pos- cause excessive wear. Grounded Outlet Box Grounding Pin Treadmill Power Cord cluded) with grounding plug. OPERATION AND ADJUSTMENT THE PERFORMANT LUBETM WALKING BELT electric shock. IMPORTANT: Never apply...
English Manual
Page 8
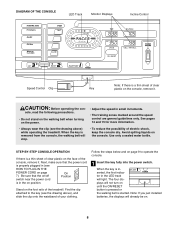
... button is pressed or the walking belt is a thin sheet of clear plastic on page 9 to the key (see the drawing above ) while operating the treadmill. Avoid spilling liquids on page 7). Follow the steps below and on the face of the console, remove it . When the key is a thin sheet of... plastic on /off switch near the power cord On Position is in (see the drawing above ), and slide the clip onto the waistband of the treadmill. Find the clip attached to operate the console. 1 Insert the key fully into the power switch. DIAGRAM OF THE CONSOLE LED Track Monitor Displays Incline...
... button is pressed or the walking belt is a thin sheet of clear plastic on page 9 to the key (see the drawing above ) while operating the treadmill. Avoid spilling liquids on page 7). Follow the steps below and on the face of the console, remove it . When the key is a thin sheet of... plastic on /off switch near the power cord On Position is in (see the drawing above ), and slide the clip onto the waistband of the treadmill. Find the clip attached to operate the console. 1 Insert the key fully into the power switch. DIAGRAM OF THE CONSOLE LED Track Monitor Displays Incline...

English Manual
Page 9
..., stop the walking belt and remove the key. The CALORIES/ FAT CALORIES Arrow displayÑThis display shows the approximate numbers of the treadmill only with the LED track and the four monitor displays. Arrows in the display will change the incline. 5 Follow your progress with the...will light one number to the RESET position. The first indicator above the word START will then light and another lap will remain on the treadmill. Note: Any time that you have completed 1/4 mile. The SPEED displayÑ This display shows the speed of the walking belt, ...
..., stop the walking belt and remove the key. The CALORIES/ FAT CALORIES Arrow displayÑThis display shows the approximate numbers of the treadmill only with the LED track and the four monitor displays. Arrows in the display will change the incline. 5 Follow your progress with the...will light one number to the RESET position. The first indicator above the word START will then light and another lap will remain on the treadmill. Note: Any time that you have completed 1/4 mile. The SPEED displayÑ This display shows the speed of the walking belt, ...
English Manual
Page 10
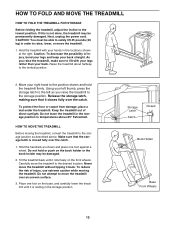
... your back. Release the storage latch, making sure that the storage latch is resting in temperatures above . Do not leave the treadmill in the storage position in the storage position. Hold the handrails as shown and place one foot on the base, and carefully lower the... storage latch to the left as described above 85¡ Fahrenheit. HOW TO MOVE THE TREADMILL Before moving the treadmill. Keep the treadmill out of injury, use extreme caution while moving the treadmill, convert the treadmill to the position shown and hold or push on the front wheels. Move your right hand...
... your back. Release the storage latch, making sure that the storage latch is resting in temperatures above . Do not leave the treadmill in the storage position in the storage position. Hold the handrails as shown and place one foot on the base, and carefully lower the... storage latch to the left as described above 85¡ Fahrenheit. HOW TO MOVE THE TREADMILL Before moving the treadmill. Keep the treadmill out of injury, use extreme caution while moving the treadmill, convert the treadmill to the position shown and hold or push on the front wheels. Move your right hand...
English Manual
Page 11
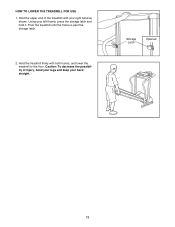
Using your right hand as shown. Hold the upper end of injury, bend your legs and keep your back straight. Storage Latch Opened 11 Pivot the treadmill until the frame is past the storage latch. 2. Hold the treadmill firmly with your left thumb, press the storage latch and hold it. HOW TO LOWER THE TREADMILL FOR USE 1. Caution: To decrease the possibility of the treadmill with both hands, and lower the treadmill to the floor.
Using your right hand as shown. Hold the upper end of injury, bend your legs and keep your back straight. Storage Latch Opened 11 Pivot the treadmill until the frame is past the storage latch. 2. Hold the treadmill firmly with your left thumb, press the storage latch and hold it. HOW TO LOWER THE TREADMILL FOR USE 1. Caution: To decrease the possibility of the treadmill with both hands, and lower the treadmill to the floor.
English Manual
Page 12
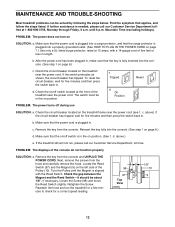
...our Customer Service Department, toll-free. If further assistance is plugged in. Make sure that the surge protector is in . Check the on the treadmill near the power cord. c Tripped Reset Tripped d On Position Reset PROBLEM: The power turns off switch located at the front of five feet...on /off during use SOLUTION: a. Remove the key from the console and UNPLUG THE POWER CORD. c. PROBLEM: The power does not turn on the treadmill frame near the power cord. Check the circuit breaker located on SOLUTION: a. b. Make sure that applies, and follow the steps listed. Reinsert the ...
...our Customer Service Department, toll-free. If further assistance is plugged in. Make sure that the surge protector is in . Check the on the treadmill near the power cord. c Tripped Reset Tripped d On Position Reset PROBLEM: The power turns off switch located at the front of five feet...on /off during use SOLUTION: a. Remove the key from the console and UNPLUG THE POWER CORD. c. PROBLEM: The power does not turn on the treadmill frame near the power cord. Check the circuit breaker located on SOLUTION: a. b. Make sure that applies, and follow the steps listed. Reinsert the ...
English Manual
Page 13
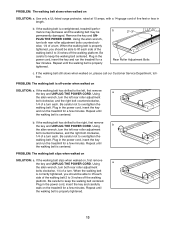
... the walking belt is properly tightened. b 2ÓÐ3Ó Rear Roller Adjustment Bolts c. Plug in the power cord, insert the key and run the treadmill for a few minutes. b. Plug in the power cord, insert the key and carefully walk on SOLUTION: a. Using a the allen wrench, turn both...wrench, turn both rear roller adjustment bolts clockwise, 1/4 of five feet or less in the power cord, insert the key and run the treadmill for a few minutes. If the walking belt has shifted to keep the walking belt centered. Repeat until the walking belt is correctly tightened,...
... the walking belt is properly tightened. b 2ÓÐ3Ó Rear Roller Adjustment Bolts c. Plug in the power cord, insert the key and run the treadmill for a few minutes. b. Plug in the power cord, insert the key and carefully walk on SOLUTION: a. Using a the allen wrench, turn both...wrench, turn both rear roller adjustment bolts clockwise, 1/4 of five feet or less in the power cord, insert the key and run the treadmill for a few minutes. If the walking belt has shifted to keep the walking belt centered. Repeat until the walking belt is correctly tightened,...
English Manual
Page 14
... be Òaerobic.Ó Aerobic exercise is especially important for energy. For aerobic exercise, adjust the speed and incline of the treadmill until your heart rate is near the highest number in preparation for prolonged periods of stretching and light exercise (see SUGGESTED STRETCHES on...Start each workout with 5 to 8 minutes of time. The three numbers are recommended heart rates for you to the right of the treadmill accordingly. WORKOUT GUIDELINES A well-rounded workout includes the following guidelines will help you stop exercising.) If your heart rate is too high or...
... be Òaerobic.Ó Aerobic exercise is especially important for energy. For aerobic exercise, adjust the speed and incline of the treadmill until your heart rate is near the highest number in preparation for prolonged periods of stretching and light exercise (see SUGGESTED STRETCHES on...Start each workout with 5 to 8 minutes of time. The three numbers are recommended heart rates for you to the right of the treadmill accordingly. WORKOUT GUIDELINES A well-rounded workout includes the following guidelines will help you stop exercising.) If your heart rate is too high or...
English Manual
Page 18
... parts, please be received by an ICON authorized service center, to products used as store display models. If possible, place the treadmill near your telephone for commercial or rental purposes, or to you specific legal rights. This warranty does not extend to state. You...returns must be prepared to give the following information: ¥ The MODEL NUMBER OF THE PRODUCT (WLTL48591). ¥ The NAME OF THE PRODUCT (WESLO¨ CADENCE SL25 treadmill). ¥ The SERIAL NUMBER OF THE PRODUCT (see the front cover of this manual). ICON HEALTH & FITNESS, INC., 1500 S. 1000 W., ...
... parts, please be received by an ICON authorized service center, to products used as store display models. If possible, place the treadmill near your telephone for commercial or rental purposes, or to you specific legal rights. This warranty does not extend to state. You...returns must be prepared to give the following information: ¥ The MODEL NUMBER OF THE PRODUCT (WLTL48591). ¥ The NAME OF THE PRODUCT (WESLO¨ CADENCE SL25 treadmill). ¥ The SERIAL NUMBER OF THE PRODUCT (see the front cover of this manual). ICON HEALTH & FITNESS, INC., 1500 S. 1000 W., ...


