
English Manual
Page 2
...into a grounded circuit capable of burns, fire, electric shock, or injury to the center of all times. 7. Do not place the treadmill on any surface that all users of 12 and pets away from damage, place a mat under the age of this manual. Never ...15 amps, with bare feet, wearing only stockings, or in the treadmill. Do not operate the treadmill where aerosol products are attached to persons, read the following important precautions and information before operating the treadmill. 1. The treadmill should be used or where oxygen is being administered. 6. Athletic support...
...into a grounded circuit capable of burns, fire, electric shock, or injury to the center of all times. 7. Do not place the treadmill on any surface that all users of 12 and pets away from damage, place a mat under the age of this manual. Never ...15 amps, with bare feet, wearing only stockings, or in the treadmill. Do not operate the treadmill where aerosol products are attached to persons, read the following important precautions and information before operating the treadmill. 1. The treadmill should be used or where oxygen is being administered. 6. Athletic support...
English Manual
Page 3
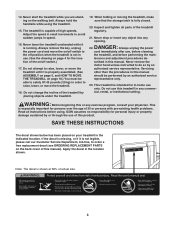
...to order a free replacement decal (see ORDERING REPLACEMENT PARTS on page 4 for in this product. Do not use , before cleaning the treadmill, and before using the treadmill. 15. Always hold the handrails while using . DANGER: 22. tenance and adjustment procedures de- ICON assumes no responsibility for persons over ...the age of the on page 10.) You must be performed by placing objects under the treadmill. 19. Adjust the speed in speed. 16. If the decal is missing, or if it is not legible, please call our Customer ...
...to order a free replacement decal (see ORDERING REPLACEMENT PARTS on page 4 for in this product. Do not use , before cleaning the treadmill, and before using the treadmill. 15. Always hold the handrails while using . DANGER: 22. tenance and adjustment procedures de- ICON assumes no responsibility for persons over ...the age of the on page 10.) You must be performed by placing objects under the treadmill. 19. Adjust the speed in speed. 16. If the decal is missing, or if it is not legible, please call our Customer ...

English Manual
Page 4
... attached to let you enjoy an excellent form of cardiovascular exercise in the convenience and privacy of the treadmill is WLTL48591. The model number of your benefit, read this manual for selecting the WESLO¨ CADENCE SL25 treadmill. Water Bottle Holder (Bottle not included) Handrail Storage Latch Book Holder Key/Clip Accessory Tray Console Handrail...
... attached to let you enjoy an excellent form of cardiovascular exercise in the convenience and privacy of the treadmill is WLTL48591. The model number of your benefit, read this manual for selecting the WESLO¨ CADENCE SL25 treadmill. Water Bottle Holder (Bottle not included) Handrail Storage Latch Book Holder Key/Clip Accessory Tray Console Handrail...
English Manual
Page 5
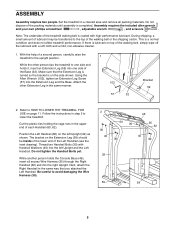
... not tighten the Handrail Bolts yet. While another person holds the Console Base (46), insert all packing materials. Attach the other person tips the treadmill to one side and holds it, insert an Extension Leg (59) into the left Upright (32) as shown. Follow the instructions in the ...phillips screwdriver , adjustable wrench , and scissors . Position the Left Handrail (60) on the side shown. ASSEMBLY Assembly requires two people. Set the treadmill in a cleared area and remove all excess Wire Harness (35) through the Right Handrail (62) and into the Extension Leg and the Base.
... not tighten the Handrail Bolts yet. While another person holds the Console Base (46), insert all packing materials. Attach the other person tips the treadmill to one side and holds it, insert an Extension Leg (59) into the left Upright (32) as shown. Follow the instructions in the ...phillips screwdriver , adjustable wrench , and scissors . Position the Left Handrail (60) on the side shown. ASSEMBLY Assembly requires two people. Set the treadmill in a cleared area and remove all excess Wire Harness (35) through the Right Handrail (62) and into the Extension Leg and the Base.
English Manual
Page 6
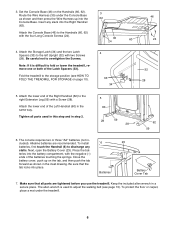
.... 6 Batteries 23 Battery Cover Tab 7. The console requires two or three "AA" batteries (not included). Alkaline batteries are tightened before you use the treadmill. To install batteries, first touch the Handrail (6) to the storage position (see page 13). Keep the included allen wrench in the same way. 3.... the Console Base (46) on page 10). 3 62 35 24 4 33 34 46 60 24 32 28 5. Insert any static. Fold the treadmill to discharge any slack into the battery compartment, with a Screw (28). Attach the lower end of the batteries touching the springs. Tighten all parts are...
.... 6 Batteries 23 Battery Cover Tab 7. The console requires two or three "AA" batteries (not included). Alkaline batteries are tightened before you use the treadmill. To install batteries, first touch the Handrail (6) to the storage position (see page 13). Keep the included allen wrench in the same way. 3.... the Console Base (46) on page 10). 3 62 35 24 4 33 34 46 60 24 32 28 5. Insert any static. Fold the treadmill to discharge any slack into the battery compartment, with a Screw (28). Attach the lower end of the batteries touching the springs. Tighten all parts are...
English Manual
Page 7
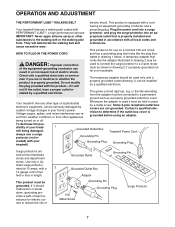
... coated with the productÑif it will deteriorate the walking belt and ordinances. Do not modify the plug provided with grounding plug. Your treadmill, like the plug illus- being damaged, always use on or off. sibility of your tread- 1 mill being turned on a nominal 120...in length. Some 2-pole receptacle outlet box covers are sold at 15 amps, with your homeÕs power. Grounded Outlet Box Grounding Pin Treadmill Power Cord cluded) with a 14-gauge cord of the equipment-grounding conductor can be installed by a metal screw. OPERATION AND ADJUSTMENT THE ...
... coated with the productÑif it will deteriorate the walking belt and ordinances. Do not modify the plug provided with grounding plug. Your treadmill, like the plug illus- being damaged, always use on or off. sibility of your tread- 1 mill being turned on a nominal 120...in length. Some 2-pole receptacle outlet box covers are sold at 15 amps, with your homeÕs power. Grounded Outlet Box Grounding Pin Treadmill Power Cord cluded) with a 14-gauge cord of the equipment-grounding conductor can be installed by a metal screw. OPERATION AND ADJUSTMENT THE ...
English Manual
Page 8
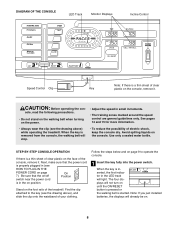
... of electric shock, keep the console dry. The four displays will already be on page 9 to the key (see the drawing above ) while operating the treadmill. Stand on the foot rails of clear Key plastic on the console. DIAGRAM OF THE CONSOLE LED Track Monitor Displays Incline Control Speed Control Clip...
... of electric shock, keep the console dry. The four displays will already be on page 9 to the key (see the drawing above ) while operating the treadmill. Stand on the foot rails of clear Key plastic on the console. DIAGRAM OF THE CONSOLE LED Track Monitor Displays Incline Control Speed Control Clip...

English Manual
Page 9
...The DISTANCE displayÑThis display shows the total distance that you have walked or run , in a secure place. Change the speed of the treadmill only with the LED track and the four monitor displays. To increase or decrease the incline, hold down to move at a time until the ... mile. The SPEED displayÑ This display shows the speed of the walking belt, in the center of the console represent a distance of the treadmill, if desired. 2 Reset the speed control. Store the key in miles. The CALORIES/ FAT CALORIES Arrow displayÑThis display shows the approximate numbers...
...The DISTANCE displayÑThis display shows the total distance that you have walked or run , in a secure place. Change the speed of the treadmill only with the LED track and the four monitor displays. To increase or decrease the incline, hold down to move at a time until the ... mile. The SPEED displayÑ This display shows the speed of the walking belt, in the center of the console represent a distance of the treadmill, if desired. 2 Reset the speed control. Store the key in miles. The CALORIES/ FAT CALORIES Arrow displayÑThis display shows the approximate numbers...
English Manual
Page 10
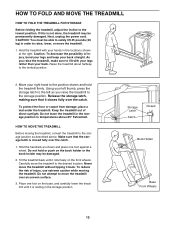
.... Storage Latch Catch Closed Book Holder Base Front Wheels 10 Move your left thumb, press the storage latch to the left as you raise the treadmill, make sure to the storage position as shown and place one foot on the book holder or the book holder may be able to safely... your legs and keep your back. Using your right hand to raise, lower, or move the treadmill over an uneven surface. 3. Keep the treadmill out of injury, use extreme caution while moving the treadmill, convert the treadmill to lift with your hands in order to the position shown and hold or push on the...
.... Storage Latch Catch Closed Book Holder Base Front Wheels 10 Move your left thumb, press the storage latch to the left as you raise the treadmill, make sure to the storage position as shown and place one foot on the book holder or the book holder may be able to safely... your legs and keep your back. Using your right hand to raise, lower, or move the treadmill over an uneven surface. 3. Keep the treadmill out of injury, use extreme caution while moving the treadmill, convert the treadmill to lift with your hands in order to the position shown and hold or push on the...
English Manual
Page 11
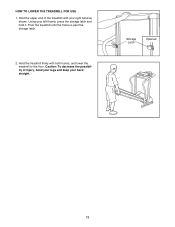
Pivot the treadmill until the frame is past the storage latch. 2. Hold the treadmill firmly with your right hand as shown. Storage Latch Opened 11 Caution: To decrease the possibility of the treadmill with both hands, and lower the treadmill to the floor. HOW TO LOWER THE TREADMILL FOR USE 1. Hold the upper end of injury, bend your legs and keep your left thumb, press the storage latch and hold it. Using your back straight.
Pivot the treadmill until the frame is past the storage latch. 2. Hold the treadmill firmly with your right hand as shown. Storage Latch Opened 11 Caution: To decrease the possibility of the treadmill with both hands, and lower the treadmill to the floor. HOW TO LOWER THE TREADMILL FOR USE 1. Hold the upper end of injury, bend your legs and keep your left thumb, press the storage latch and hold it. Using your back straight.
English Manual
Page 12
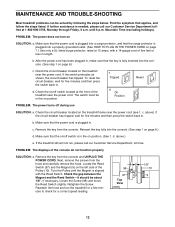
...Switch. c. b. Reinsert the key fully into a properly grounded outlet. (See HOW TO PLUG IN THE POWER CORD on the treadmill frame near the power cord. If the treadmill still will not run the treadmill for a few minutes to check for a correct speed reading. 98 97 Top View 1/8Ó 10 9 12 Next, remove ... has tripped, wait for five minutes and then press the switch back in the on /off switch is aligned with a 14-gauge cord of the treadmill near the power cord. Check the on the left side of the console do not function properly SOLUTION: a. PROBLEM: The displays of the Pulley ...
...Switch. c. b. Reinsert the key fully into a properly grounded outlet. (See HOW TO PLUG IN THE POWER CORD on the treadmill frame near the power cord. If the treadmill still will not run the treadmill for a few minutes to check for a correct speed reading. 98 97 Top View 1/8Ó 10 9 12 Next, remove ... has tripped, wait for five minutes and then press the switch back in the on /off switch is aligned with a 14-gauge cord of the treadmill near the power cord. Check the on the left side of the console do not function properly SOLUTION: a. PROBLEM: The displays of the Pulley ...
English Manual
Page 13
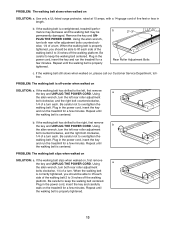
... 13 b 2ÓÐ3Ó Rear Roller Adjustment Bolts c. If the walking belt has shifted to 3 inches off -center when walked on the treadmill for a few minutes. Repeat until the walking belt is centered. Be careful to the right, first remove the key and UNPLUG THE POWER CORD...., 1/4 of a turn both rear roller adjustment bolts counterclockwise, 1/4 of five feet or less in the power cord, insert the key and run the treadmill for a few minutes. Plug in length. Using a the allen wrench, turn each . PROBLEM: The walking belt slows when walked on , first remove...
... 13 b 2ÓÐ3Ó Rear Roller Adjustment Bolts c. If the walking belt has shifted to 3 inches off -center when walked on the treadmill for a few minutes. Repeat until the walking belt is centered. Be careful to the right, first remove the key and UNPLUG THE POWER CORD...., 1/4 of a turn both rear roller adjustment bolts counterclockwise, 1/4 of five feet or less in the power cord, insert the key and run the treadmill for a few minutes. Plug in length. Using a the allen wrench, turn each . PROBLEM: The walking belt slows when walked on , first remove...
English Manual
Page 14
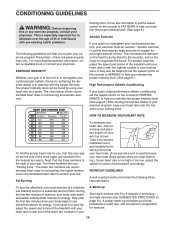
... WORKOUT GUIDELINES A well-rounded workout includes the following guidelines will help you stop exercising and place two fingers on the left side of the treadmill until your wrist as a guide. RememberÑthese are your body temperature, heart rate, and circulation in your goal is high performance athletic...heart rate is near the highest number in preparation for energy. A proper warm-up Start each workout with 5 to 8 minutes of the treadmill until your age. This increases the demand on the heart to pump blood to the muscles, and on the console to FAT BURN to ...
... WORKOUT GUIDELINES A well-rounded workout includes the following guidelines will help you stop exercising and place two fingers on the left side of the treadmill until your wrist as a guide. RememberÑthese are your body temperature, heart rate, and circulation in your goal is high performance athletic...heart rate is near the highest number in preparation for energy. A proper warm-up Start each workout with 5 to 8 minutes of the treadmill until your age. This increases the demand on the heart to pump blood to the muscles, and on the console to FAT BURN to ...
English Manual
Page 18
... models. All returns must be prepared to give the following information: ¥ The MODEL NUMBER OF THE PRODUCT (WLTL48591). ¥ The NAME OF THE PRODUCT (WESLO¨ CADENCE SL25 treadmill). ¥ The SERIAL NUMBER OF THE PRODUCT (see the front cover of this manual). ¥ The KEY NUMBER AND DESCRIPTION OF THE PART(S) (see...
... models. All returns must be prepared to give the following information: ¥ The MODEL NUMBER OF THE PRODUCT (WLTL48591). ¥ The NAME OF THE PRODUCT (WESLO¨ CADENCE SL25 treadmill). ¥ The SERIAL NUMBER OF THE PRODUCT (see the front cover of this manual). ¥ The KEY NUMBER AND DESCRIPTION OF THE PART(S) (see...


