

English Manual
Page 3
Always remove the key and unplug the power cord when the treadmill is not in use only. Inspect and tighten all instructions before performing the main- DANGER: 23. SAVE ...
Always remove the key and unplug the power cord when the treadmill is not in use only. Inspect and tighten all instructions before performing the main- DANGER: 23. SAVE ...

English Manual
Page 4
... to the treadmill (see the front cover of this manual carefully before calling. until 6 p.m. Mountain Time (excluding holidays). The CADENCE DX9 treadmill combines advanced technology with the labeled parts. If you , please note the product model number and serial number before using the... exercise in the convenience and privacy of your benefit, read this manual for selecting the WESLO® CADENCE DX9 treadmill. Accessory Tray Handrail Storage Latch LEFT SIDE Towel Rack Key/Clip Console Water Bottle Holder (Bottle not included) Handrail RIGHT SIDE Walking Belt Foot Rails...
... to the treadmill (see the front cover of this manual carefully before calling. until 6 p.m. Mountain Time (excluding holidays). The CADENCE DX9 treadmill combines advanced technology with the labeled parts. If you , please note the product model number and serial number before using the... exercise in the convenience and privacy of your benefit, read this manual for selecting the WESLO® CADENCE DX9 treadmill. Accessory Tray Handrail Storage Latch LEFT SIDE Towel Rack Key/Clip Console Water Bottle Holder (Bottle not included) Handrail RIGHT SIDE Walking Belt Foot Rails...

English Manual
Page 8
...installed batteries, the display will turn on the tab, pulled from the console, the walking belt will not turn on .) If the key is removed from the console, adjust the position of the treadmill. Alkaline batteries are general guidelines only. Close the battery cover, push up... on the dis- DIAGRAM OF THE CONSOLE Monitor Display Speed Control Clip Key Pulse Sensor CAUTION: Before operating the console, read the following precautions. • Do not stand on the walking belt when turning on...
...installed batteries, the display will turn on the tab, pulled from the console, the walking belt will not turn on .) If the key is removed from the console, adjust the position of the treadmill. Alkaline batteries are general guidelines only. Close the battery cover, push up... on the dis- DIAGRAM OF THE CONSOLE Monitor Display Speed Control Clip Key Pulse Sensor CAUTION: Before operating the console, read the following precautions. • Do not stand on the walking belt when turning on...

English Manual
Page 9
... as shown, and that you are finished exercising, stop the walking belt, step onto the foot rails and turn off about six minutes after the key is Mode Indicator currently displayed. sole will turn the speed control to be restricted, and your thumb is not displayed, lift your pulse. 5 When... you stop the walking belt and remove the key from the console. A flashing mode indicator will not be shown. To measure your pulse, stand on Pulse Sensor the foot rails and place your ...
... as shown, and that you are finished exercising, stop the walking belt, step onto the foot rails and turn off about six minutes after the key is Mode Indicator currently displayed. sole will turn the speed control to be restricted, and your thumb is not displayed, lift your pulse. 5 When... you stop the walking belt and remove the key from the console. A flashing mode indicator will not be shown. To measure your pulse, stand on Pulse Sensor the foot rails and place your ...

English Manual
Page 10
... the position shown and hold it. Caution: You must be changed. Adjust the incline leg to the vertical position. 2. Before changing the incline, remove the key and unplug the power cord. Next, fold the treadmill to safely lift 45 pounds (20 kg) in temperatures above 85° Fahrenheit. 10 Storage Latch...
... the position shown and hold it. Caution: You must be changed. Adjust the incline leg to the vertical position. 2. Before changing the incline, remove the key and unplug the power cord. Next, fold the treadmill to safely lift 45 pounds (20 kg) in temperatures above 85° Fahrenheit. 10 Storage Latch...
English Manual
Page 12
... that is fully inserted into the console. (See step 1 on page 8.) d. Make sure that the power cord is plugged into a surge suppressor, and that the key is UL 1449 listed as shown, the circuit breaker has tripped. b. After the power cord has been plugged in, make sure that the surge suppressor... that applies, and follow the steps listed. To reset the circuit breaker, wait for five minutes and then press the switch back in . Remove the key from the hood. b. Locate the Reed Switch (82) and the Magnet (74) on the treadmill near the power cord (see page 7). If necessary, loosen ...
... that is fully inserted into the console. (See step 1 on page 8.) d. Make sure that the power cord is plugged into a surge suppressor, and that the key is UL 1449 listed as shown, the circuit breaker has tripped. b. After the power cord has been plugged in, make sure that the surge suppressor... that applies, and follow the steps listed. To reset the circuit breaker, wait for five minutes and then press the switch back in . Remove the key from the hood. b. Locate the Reed Switch (82) and the Magnet (74) on the treadmill near the power cord (see page 7). If necessary, loosen ...

English Manual
Page 13
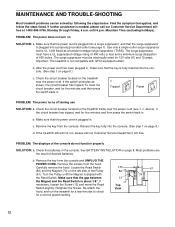
...walked on the treadmill for 120 volts AC and 15 amps.. b 2"-3" Rear Roller Adjustment Bolts c. b. Plug in the power cord, insert the key and run the treadmill for a few minutes. Using the allen wrench, turn both rear roller adjustment bolts counterclockwise, 1/4 of the walking belt 2 ...bolt counterclockwise, and the right bolt clockwise, 1/4 of a turn . PROBLEM: The walking belt slips when walked on , first remove a the key and UNPLUG THE POWER CORD. The surge suppressor must have a UL suppressed voltage rating of 400 volts or less and a minimum surge dissipation of...
...walked on the treadmill for 120 volts AC and 15 amps.. b 2"-3" Rear Roller Adjustment Bolts c. b. Plug in the power cord, insert the key and run the treadmill for a few minutes. Using the allen wrench, turn both rear roller adjustment bolts counterclockwise, 1/4 of the walking belt 2 ...bolt counterclockwise, and the right bolt clockwise, 1/4 of a turn . PROBLEM: The walking belt slips when walked on , first remove a the key and UNPLUG THE POWER CORD. The surge suppressor must have a UL suppressed voltage rating of 400 volts or less and a minimum surge dissipation of...

English Manual
Page 14
... or to strengthen your body begin to use the pulse sensor on the console. Note: During the first few minutes does your cardiovascular system, the key to achieving the desired results is too high or too low, adjust the speed of heart rate readings. To measure your training zone. If your...
... or to strengthen your body begin to use the pulse sensor on the console. Note: During the first few minutes does your cardiovascular system, the key to achieving the desired results is too high or too low, adjust the speed of heart rate readings. To measure your training zone. If your...
English Manual
Page 15
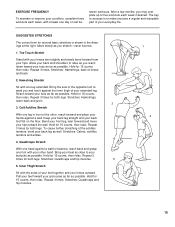
... possible. Stretches: Calves, achilles tendons and ankles. 4. EXERCISE FREQUENCY To maintain or improve your condition, complete three workouts each week if desired. tween workouts. The key to success is shown in front of your extended leg. Hold for 15 counts, then relax. Keep your back leg straight and your knees outward...
... possible. Stretches: Calves, achilles tendons and ankles. 4. EXERCISE FREQUENCY To maintain or improve your condition, complete three workouts each week if desired. tween workouts. The key to success is shown in front of your extended leg. Hold for 15 counts, then relax. Keep your back leg straight and your knees outward...
English Manual
Page 16
...FITNESS, INC., 1500 S. 1000 W., LOGAN, UT 84321-9813 Part No. 174579 R0501A Printed in the center of this manual). • The KEY NUMBER and DESCRIPTION of the desired part(s) (see the PART LIST and the EXPLODED DRAW- Mountain Time (excluding holidays). This warranty does not extend... not apply to give the following information: • The MODEL NUMBER of the product (WLTL21191). • The NAME of the product (WESLO® CADENCE DX9 treadmill). • The SERIAL NUMBER of the product (see the front cover of this manual). ICON's obligation under normal use and service ...
...FITNESS, INC., 1500 S. 1000 W., LOGAN, UT 84321-9813 Part No. 174579 R0501A Printed in the center of this manual). • The KEY NUMBER and DESCRIPTION of the desired part(s) (see the PART LIST and the EXPLODED DRAW- Mountain Time (excluding holidays). This warranty does not extend... not apply to give the following information: • The MODEL NUMBER of the product (WLTL21191). • The NAME of the product (WESLO® CADENCE DX9 treadmill). • The SERIAL NUMBER of the product (see the front cover of this manual). ICON's obligation under normal use and service ...

English Manual
Page 18
... Isolator Incline Pin Incline Leg Incline Leg Washer Incline Leg Cap Frame Pivot Washer Ground Wire Extension Leg Endcap Frame Rear Roller Adj. WLTL21191 R0501A Key No. Qty. 1 1 2 1 3 2 4* 2 5 2 6 1 7 1 8 1 9 1 10 2 11* 1 12 1 13 16 14 1 15 4 16 7 17 1 18 1 19* 1 20 1 ... 32 1 33 2 34 2 35 10 36 6 37 2 38 2 39 4 40 1 41 2 42 1 43 1 44 1 Description Key/Clip Left Handrail Cage Nut Extension Leg Assembly Rear Isolator Screw Console Base Speed Control Knob Speed Potentiometer Console Plug Isolator Spacer Console Assembly Storage...
... Isolator Incline Pin Incline Leg Incline Leg Washer Incline Leg Cap Frame Pivot Washer Ground Wire Extension Leg Endcap Frame Rear Roller Adj. WLTL21191 R0501A Key No. Qty. 1 1 2 1 3 2 4* 2 5 2 6 1 7 1 8 1 9 1 10 2 11* 1 12 1 13 16 14 1 15 4 16 7 17 1 18 1 19* 1 20 1 ... 32 1 33 2 34 2 35 10 36 6 37 2 38 2 39 4 40 1 41 2 42 1 43 1 44 1 Description Key/Clip Left Handrail Cage Nut Extension Leg Assembly Rear Isolator Screw Console Base Speed Control Knob Speed Potentiometer Console Plug Isolator Spacer Console Assembly Storage...


