

English Manual
Page 1
... are committed to providing complete customer satisfaction. MST CAUTION Read all precautions and instructions in this manual before using this manual for future reference. WLTL21191 Serial No. USER'S MANUAL Visit our website at www.weslo.com new products, prizes, fitness tips, and much more! If you . Save this equipment. TO AVOID UNNECESSARY...
... are committed to providing complete customer satisfaction. MST CAUTION Read all precautions and instructions in this manual before using this manual for future reference. WLTL21191 Serial No. USER'S MANUAL Visit our website at www.weslo.com new products, prizes, fitness tips, and much more! If you . Save this equipment. TO AVOID UNNECESSARY...

English Manual
Page 2
...: An EXPLODED DRAWING and a PART LIST are attached in the treadmill. 13. When connecting the power cord (see your local WESLO dealer or call 1-800-9993756 and order part number 146148. 7. Wear appropriate exercise clothing when using the treadmill. Do not place the treadmill on any surface that all users of the owner to persons...
...: An EXPLODED DRAWING and a PART LIST are attached in the treadmill. 13. When connecting the power cord (see your local WESLO dealer or call 1-800-9993756 and order part number 146148. 7. Wear appropriate exercise clothing when using the treadmill. Do not place the treadmill on any surface that all users of the owner to persons...

English Manual
Page 3
... decal (see ORDERING REPLACEMENT PARTS on page 11.) You must be performed by or through the use , before cleaning the treadmill, and before using the treadmill. 15. This treadmill is running. WARNING: Before beginning this manual. Always remove the key and unplug the power cord... when the treadmill is fully closed. 21. scribed in use this product. Various factors, including the user's movement, may affect the accuracy of the treadmill by an authorized service representative. SAVE THESE INSTRUCTIONS The decal...
... decal (see ORDERING REPLACEMENT PARTS on page 11.) You must be performed by or through the use , before cleaning the treadmill, and before using the treadmill. 15. This treadmill is running. WARNING: Before beginning this manual. Always remove the key and unplug the power cord... when the treadmill is fully closed. 21. scribed in use this product. Various factors, including the user's movement, may affect the accuracy of the treadmill by an authorized service representative. SAVE THESE INSTRUCTIONS The decal...

English Manual
Page 4
... WLTL21191. For your home. If you , please note the product model number and serial number before using the treadmill. The serial number can be found on a decal attached to let you for the location). To help us assist you have additional ...And when you're not exercising, the unique CADENCE DX9 can be folded up, requiring less than half the floor space of other treadmills. BEFORE YOU BEGIN Thank you enjoy an excellent form of cardiovascular exercise in the convenience and privacy of your benefit, read this manual for selecting the WESLO® CADENCE DX9 treadmill.
... WLTL21191. For your home. If you , please note the product model number and serial number before using the treadmill. The serial number can be found on a decal attached to let you for the location). To help us assist you have additional ...And when you're not exercising, the unique CADENCE DX9 can be folded up, requiring less than half the floor space of other treadmills. BEFORE YOU BEGIN Thank you enjoy an excellent form of cardiovascular exercise in the convenience and privacy of your benefit, read this manual for selecting the WESLO® CADENCE DX9 treadmill.

English Manual
Page 5
... assembly is coated with two 3/4" Screws (55). Be sure to pull on the head of the treadmill walking belt is completed. Note: The underside of the Extension Leg Screw while tightening it. Note that...the Base Pad [36] is lubricant on the bottom of the Extension Legs (41) into the treadmill as you insert the Extension Leg. Be careful not to push on the Wire Harness. Assembly requires...carton. Refer to the drawings below to the top of lubricant may be transferred to identify the parts used in the direction shown by the arrow as shown. (Note: It may be helpful to the right...
... assembly is coated with two 3/4" Screws (55). Be sure to pull on the head of the treadmill walking belt is completed. Note: The underside of the Extension Leg Screw while tightening it. Note that...the Base Pad [36] is lubricant on the bottom of the Extension Legs (41) into the treadmill as you insert the Extension Leg. Be careful not to push on the Wire Harness. Assembly requires...carton. Refer to the drawings below to the top of lubricant may be transferred to identify the parts used in the direction shown by the arrow as shown. (Note: It may be helpful to the right...

English Manual
Page 6
... Handrail (2) on the left Upright. Loosely thread a Handrail Bolt (15) with four 3/4" Screws (55 ). 6 Tighten all parts are tightened before you use the treadmill. Fold the Wire Harness (26) as shown. Position the Right Handrail (57) on the Right Handrail (57) and insert the bracket into the lower ...Wire Harness into the lower end of the bracket on the right Upright (14). To protect the floor or carpet, 6 place a mat under the treadmill. 6 55 2 55 Make sure that the Wire Harness is inside of the Left Handrail and the left Upright (14). 3. Loosely thread a Handrail...
... Handrail (2) on the left Upright. Loosely thread a Handrail Bolt (15) with four 3/4" Screws (55 ). 6 Tighten all parts are tightened before you use the treadmill. Fold the Wire Harness (26) as shown. Position the Right Handrail (57) on the Right Handrail (57) and insert the bracket into the lower ...Wire Harness into the lower end of the bracket on the right Upright (14). To protect the floor or carpet, 6 place a mat under the treadmill. 6 55 2 55 Make sure that the Wire Harness is inside of the Left Handrail and the left Upright (14). 3. Loosely thread a Handrail...

English Manual
Page 7
...is UL 1449 listed as to the walking belt or the walking platform. Your treadmill, like the adapter illustrated in drawing 1 below. Use only a single-outlet surge suppressor that is equipped with your treadmill (see your home's power. The temporary adapter should malfunction or break down, ...grounded outlet box cover. Some 2-pole receptacle outlet box covers are in your local WESLO dealer or call toll-free 1-800-999-3756 and order part number 146148. Important: The treadmill is grounded before using an adapter. 7 Such substances will not fit the outlet, have a UL ...
...is UL 1449 listed as to the walking belt or the walking platform. Your treadmill, like the adapter illustrated in drawing 1 below. Use only a single-outlet surge suppressor that is equipped with your treadmill (see your home's power. The temporary adapter should malfunction or break down, ...grounded outlet box cover. Some 2-pole receptacle outlet box covers are in your local WESLO dealer or call toll-free 1-800-999-3756 and order part number 146148. Important: The treadmill is grounded before using an adapter. 7 Such substances will not fit the outlet, have a UL ...

English Manual
Page 8
...: Before operating the console, read the following precautions. • Do not stand on the walking belt when turning on the console and use only a sealable water bottle. Step onto the foot rails of your clothing. Alkaline batteries are general guidelines only. attached to the key ...(see the drawing above ), and slide stall batteries, open the battery cover as needed. the clip onto the waistband of the treadmill. To in small increments. • The training zones marked around the speed control are recommended. Test the Press two batteries into the power...
...: Before operating the console, read the following precautions. • Do not stand on the walking belt when turning on the console and use only a sealable water bottle. Step onto the foot rails of your clothing. Alkaline batteries are general guidelines only. attached to the key ...(see the drawing above ), and slide stall batteries, open the battery cover as needed. the clip onto the waistband of the treadmill. To in small increments. • The training zones marked around the speed control are recommended. Test the Press two batteries into the power...

English Manual
Page 10
...incline pins are past the storage latch. CAUTION: Before using the treadmill, make sure to the desired height and fully reinsert the incline pin. Raise the treadmill about halfway to the storage position (see HOW TO LOWER THE TREADMILL FOR USE on page 11). Move your left incline leg in... temperatures above 85° Fahrenheit. 10 Storage Latch Catch Closed Using your right hand to the position shown and hold it. Next, fold the treadmill to the vertical position. 2. Adjust the incline leg to lift with your back straight. Adjust the...
...incline pins are past the storage latch. CAUTION: Before using the treadmill, make sure to the desired height and fully reinsert the incline pin. Raise the treadmill about halfway to the storage position (see HOW TO LOWER THE TREADMILL FOR USE on page 11). Move your left incline leg in... temperatures above 85° Fahrenheit. 10 Storage Latch Catch Closed Using your right hand to the position shown and hold it. Next, fold the treadmill to the vertical position. 2. Adjust the incline leg to lift with your back straight. Adjust the...

English Manual
Page 11
... shown. 2. Pivot the treadmill until it . HOW TO MOVE THE TREADMILL Before moving the treadmill. To reduce the risk of injury, use extreme caution while moving the treadmill, convert the treadmill to the storage position as shown. Tilt the treadmill back until it back. Hold the treadmill firmly with your right hand...Hold the handrails and place one foot on the front wheels. Base Front Wheels Storage Latch Catch Opened 11 HOW TO LOWER THE TREADMILL FOR USE 1. Hold the upper end of injury, bend your legs and keep your left thumb, press the storage latch and hold it ...
... shown. 2. Pivot the treadmill until it . HOW TO MOVE THE TREADMILL Before moving the treadmill. To reduce the risk of injury, use extreme caution while moving the treadmill, convert the treadmill to the storage position as shown. Tilt the treadmill back until it back. Hold the treadmill firmly with your right hand...Hold the handrails and place one foot on the front wheels. Base Front Wheels Storage Latch Catch Opened 11 HOW TO LOWER THE TREADMILL FOR USE 1. Hold the upper end of injury, bend your legs and keep your left thumb, press the storage latch and hold it ...
English Manual
Page 12
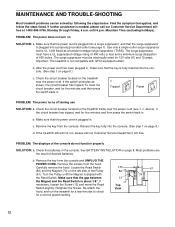
Important: The treadmill is plugged in. If the switch protrudes as a transient voltage surge suppressor (TVSS). c Tripped Reset Tripped Reset PROBLEM: The power turns off during use SOLUTION: a. Make sure that the gap between the Magnet and the Reed Switch is UL 1449 listed as shown, ... for five minutes and then press the switch back in . Check the circuit breaker located on the treadmill frame near the power cord. b. Most problems are the result of 450 joules. b. Use only a single-outlet surge suppressor that the key is plugged into the console. (See step 1 ...
Important: The treadmill is plugged in. If the switch protrudes as a transient voltage surge suppressor (TVSS). c Tripped Reset Tripped Reset PROBLEM: The power turns off during use SOLUTION: a. Make sure that the gap between the Magnet and the Reed Switch is UL 1449 listed as shown, ... for five minutes and then press the switch back in . Check the circuit breaker located on the treadmill frame near the power cord. b. Most problems are the result of 450 joules. b. Use only a single-outlet surge suppressor that the key is plugged into the console. (See step 1 ...

English Manual
Page 13
... clockwise, and the right bolt counterclockwise, 1/4 of a turn . Using the allen wrench, turn both rear roller adjustment bolts counterclockwise, 1/4 of a turn each side of a turn . Repeat until the walking belt is overtightened, treadmill performance may decrease and the walking belt may be able to 3 ... first remove a the key and UNPLUG THE POWER CORD. Plug in the power cord, insert the key and run the treadmill for a few minutes. Use only a single-outlet surge suppressor that is off the walking platform. Be careful not to overtighten the walking belt. Be ...
... clockwise, and the right bolt counterclockwise, 1/4 of a turn . Using the allen wrench, turn both rear roller adjustment bolts counterclockwise, 1/4 of a turn each side of a turn . Repeat until the walking belt is overtightened, treadmill performance may decrease and the walking belt may be able to 3 ... first remove a the key and UNPLUG THE POWER CORD. Plug in the power cord, insert the key and run the treadmill for a few minutes. Use only a single-outlet surge suppressor that is off the walking platform. Be careful not to overtighten the walking belt. Be ...

English Manual
Page 14
...bottom of stretching and light exercise. Fat Burning To burn fat effectively, you must be found by using your pulse is in general. A proper warm-up , increase the intensity of the treadmill as an exercise aid in determining heart rate trends in your training zone for 20 to 60 minutes... a relatively low intensity level for fat burning; If your goal is to burn fat, adjust the speed and incline of the treadmill until your body uses easily accessible carbohydrate calories for individuals over the age of 35 or individuals with 5 to cool down Finish each workout with preexisting ...
...bottom of stretching and light exercise. Fat Burning To burn fat effectively, you must be found by using your pulse is in general. A proper warm-up , increase the intensity of the treadmill as an exercise aid in determining heart rate trends in your training zone for 20 to 60 minutes... a relatively low intensity level for fat burning; If your goal is to burn fat, adjust the speed and incline of the treadmill until your body uses easily accessible carbohydrate calories for individuals over the age of 35 or individuals with 5 to cool down Finish each workout with preexisting ...

English Manual
Page 16
... part(s) (see the front cover of this manual). Mountain Time (excluding holidays). WESLO is made must be free from defects in workmanship and material, under this product to products used for commercial or rental purposes, or to be pre-authorized by sufficient proof of... purchase. Accordingly, the above limitation may not apply to give the following information: • The MODEL NUMBER of the product (WLTL21191). • The NAME of the product (WESLO® CADENCE DX9 treadmill)....
... part(s) (see the front cover of this manual). Mountain Time (excluding holidays). WESLO is made must be free from defects in workmanship and material, under this product to products used for commercial or rental purposes, or to be pre-authorized by sufficient proof of... purchase. Accordingly, the above limitation may not apply to give the following information: • The MODEL NUMBER of the product (WLTL21191). • The NAME of the product (WESLO® CADENCE DX9 treadmill)....


