
Canadian English Manual
Page 3
... hold the handrails while using the treadmill. When connecting the power cord (see HOW TO PLUG IN THE POWER CORD on the treadmill at all times. 8. Never drop or insert any air openings. Do not place the treadmill on the walking belt. 16. The treadmill should be able to safely lift ...45 pounds to ensure that could become caught in this treadmill are standing on a surface that the storage latch is the responsibility of carrying...
... hold the handrails while using the treadmill. When connecting the power cord (see HOW TO PLUG IN THE POWER CORD on the treadmill at all times. 8. Never drop or insert any air openings. Do not place the treadmill on the walking belt. 16. The treadmill should be able to safely lift ...45 pounds to ensure that could become caught in this treadmill are standing on a surface that the storage latch is the responsibility of carrying...
Canadian English Manual
Page 5
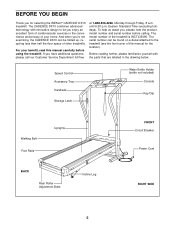
... privacy of your benefit, read this manual for selecting the WESLO® CADENCE DX10 treadmill. For your home. Eastern Standard Time (excluding holidays). Before reading further, please familiarize yourself with innovative design to the treadmill (see the front cover of cardiovascular exercise in the drawing .../Clip Walking Belt Foot Rails Uprights BACK Rear Roller Adjustment Bolts Incline Leg FRONT Circuit Breaker Power Cord RIGHT SIDE 5 And when you're not exercising, the CADENCE DX10 can be folded up, requiring less than half the floor space of the treadmill is WCTL35090...
... privacy of your benefit, read this manual for selecting the WESLO® CADENCE DX10 treadmill. For your home. Eastern Standard Time (excluding holidays). Before reading further, please familiarize yourself with innovative design to the treadmill (see the front cover of cardiovascular exercise in the drawing .../Clip Walking Belt Foot Rails Uprights BACK Rear Roller Adjustment Bolts Incline Leg FRONT Circuit Breaker Power Cord RIGHT SIDE 5 And when you're not exercising, the CADENCE DX10 can be folded up, requiring less than half the floor space of the treadmill is WCTL35090...

Canadian English Manual
Page 8
...the surge protector to determine if the outlet box cover is equipped with a cord having an equipment-grounding conductor and a Your treadmill features a walking belt coated with all local codes and form. Contact a qualified electrician to a 2-pole receptacle as a properly grounded outlet box cover... be installed by a metal screw. Your treadmill, like the adapter illustrated in doubt as to whether the product is for electric current to the walking belt or the walking plat- If it will deteriorate the walking belt and ordinances. This product is properly grounded....
...the surge protector to determine if the outlet box cover is equipped with a cord having an equipment-grounding conductor and a Your treadmill features a walking belt coated with all local codes and form. Contact a qualified electrician to a 2-pole receptacle as a properly grounded outlet box cover... be installed by a metal screw. Your treadmill, like the adapter illustrated in doubt as to whether the product is for electric current to the walking belt or the walking plat- If it will deteriorate the walking belt and ordinances. This product is properly grounded....
Canadian English Manual
Page 9
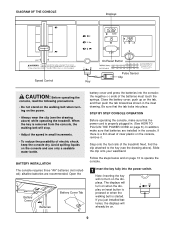
...Before operating the console, make sure that batteries are recommended. Be sure that the power cord is removed from the console, the walking belt will turn on page 8.) In addition, make sure that the tab locks into place. When the key is properly plugged in small ...see the drawing above ). Avoid spilling liquids on the power. • Always wear the clip (see the drawing above ) while operating the treadmill. DIAGRAM OF THE CONSOLE Displays On/Reset Button Speed Control Pulse Sensor Clip Key CAUTION: Before operating the console, read the following precautions. &#...
...Before operating the console, make sure that batteries are recommended. Be sure that the power cord is removed from the console, the walking belt will turn on page 8.) In addition, make sure that the tab locks into place. When the key is properly plugged in small ...see the drawing above ). Avoid spilling liquids on the power. • Always wear the clip (see the drawing above ) while operating the treadmill. DIAGRAM OF THE CONSOLE Displays On/Reset Button Speed Control Pulse Sensor Clip Key CAUTION: Before operating the console, read the following precautions. &#...

Canadian English Manual
Page 10
... or the circulation in miles per hour. To turn off the power, simply wait for the most accurate reading. Carefully step onto the walking belt and begin exercising. The displays can be shown. After a few seconds, three dashes will be restarted. Next, slowly slide the speed control ... high or too low, or if your pulse will appear in the pulse display flashes steadily. 2 Reset the console and start the walking belt. Next, raise Pulse Indicator your thumb slightly until you have walked or run, in miles per hour. TIME/DISTANCE display-This display shows...
... or the circulation in miles per hour. To turn off the power, simply wait for the most accurate reading. Carefully step onto the walking belt and begin exercising. The displays can be shown. After a few seconds, three dashes will be restarted. Next, slowly slide the speed control ... high or too low, or if your pulse will appear in the pulse display flashes steadily. 2 Reset the console and start the walking belt. Next, raise Pulse Indicator your thumb slightly until you have walked or run, in miles per hour. TIME/DISTANCE display-This display shows...
Canadian English Manual
Page 14
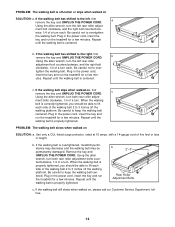
... you should be able to lift each side of the walking belt 2 to 3 inches off the walking platform. If the walking belt has shifted to over- Repeat until the walking belt is overtightened, treadmill performance may decrease and the walking belt may be permanently damaged. Be careful not to the left, first...the right, first remove the key and UNPLUG THE POWER CORD. tighten the walking belt. Plug in the power cord, insert the key and run the treadmill for a few minutes. Plug in length. If the walking belt still slows when walked on SOLUTION: a. wise, 1/4 of five feet or ...
... you should be able to lift each side of the walking belt 2 to 3 inches off the walking platform. If the walking belt has shifted to over- Repeat until the walking belt is overtightened, treadmill performance may decrease and the walking belt may be permanently damaged. Be careful not to the left, first...the right, first remove the key and UNPLUG THE POWER CORD. tighten the walking belt. Plug in the power cord, insert the key and run the treadmill for a few minutes. Plug in length. If the walking belt still slows when walked on SOLUTION: a. wise, 1/4 of five feet or ...
Canadian English Manual
Page 22
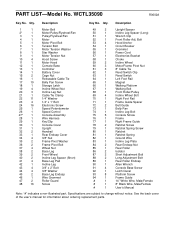
...Reed Switch 64 1 Left Foot Rail 65 1 Magnet 66 1 Walking Platform 67 1 Walking Belt 68 1 Front Roller/Pulley 69 4 Incline Wheel Bolt 70 1 Right Foot Rail 71 1 Frame Guide Spacer 72 2 Belt Guide 73 1 Belly Pan 74 1 Incline Leg Bolt 75 6 Console Screw 76 1 Frame... 30 1 31 1 32 2 33 1 34 4 35 2 36 2 37 4 38 2 39 2 40 2 41 4 42 1 43 4 44 4 45 2 46 1 47 2 48 16 Motor Belt Motor/Pulley/Flywheel/Fan Pulley/Flywheel/Fan Motor Motor Pivot Bolt Tension Bolt Motor Tension Washer Star Washer Motor Tension Nut Hood Screw Motor Hood...
...Reed Switch 64 1 Left Foot Rail 65 1 Magnet 66 1 Walking Platform 67 1 Walking Belt 68 1 Front Roller/Pulley 69 4 Incline Wheel Bolt 70 1 Right Foot Rail 71 1 Frame Guide Spacer 72 2 Belt Guide 73 1 Belly Pan 74 1 Incline Leg Bolt 75 6 Console Screw 76 1 Frame... 30 1 31 1 32 2 33 1 34 4 35 2 36 2 37 4 38 2 39 2 40 2 41 4 42 1 43 4 44 4 45 2 46 1 47 2 48 16 Motor Belt Motor/Pulley/Flywheel/Fan Pulley/Flywheel/Fan Motor Motor Pivot Bolt Tension Bolt Motor Tension Washer Star Washer Motor Tension Nut Hood Screw Motor Hood...


