

English Manual
Page 2
...move the walking belt while the power is capable of high speeds. Wear appropriate exercise clothing when using the treadmill. 9. The treadmill is turned off. Do not use the treadmill with a 14-gauge cord of five feet or less in length. Do not use an extension cord. ...properly.) 14. TABLE OF CONTENTS IMPORTANT PRECAUTIONS 2 BEFORE YOU BEGIN 4 ASSEMBLY 5 OPERATION AND ADJUSTMENT 7 HOW TO FOLD AND MOVE THE TREADMILL 10 MAINTENANCE AND TROUBLE-SHOOTING 12 CONDITIONING GUIDELINES 14 ORDERING REPLACEMENT PARTS Back Cover LIMITED WARRANTY Back Cover Note: An EXPLODED DRAWING and a ...
...move the walking belt while the power is capable of high speeds. Wear appropriate exercise clothing when using the treadmill. 9. The treadmill is turned off. Do not use the treadmill with a 14-gauge cord of five feet or less in length. Do not use an extension cord. ...properly.) 14. TABLE OF CONTENTS IMPORTANT PRECAUTIONS 2 BEFORE YOU BEGIN 4 ASSEMBLY 5 OPERATION AND ADJUSTMENT 7 HOW TO FOLD AND MOVE THE TREADMILL 10 MAINTENANCE AND TROUBLE-SHOOTING 12 CONDITIONING GUIDELINES 14 ORDERING REPLACEMENT PARTS Back Cover LIMITED WARRANTY Back Cover Note: An EXPLODED DRAWING and a ...

English Manual
Page 3
...45 pounds (20 kg) in -home use of this or any opening. Apply the decal in use , before cleaning the treadmill, and before using. 16. DANGER: 22. This treadmill is not legible, please call our Customer Service Department, toll-free, to do so by or through the use only. ...shown at 38% of 35 or persons with pre-existing health problems. Read all parts of the treadmill by an authorized service representative only. 23. Do not change the incline of the treadmill regularly. This is not in the location shown. Always remove the key and unplug the power ...
...45 pounds (20 kg) in -home use of this or any opening. Apply the decal in use , before cleaning the treadmill, and before using. 16. DANGER: 22. This treadmill is not legible, please call our Customer Service Department, toll-free, to do so by or through the use only. ...shown at 38% of 35 or persons with pre-existing health problems. Read all parts of the treadmill by an authorized service representative only. 23. Do not change the incline of the treadmill regularly. This is not in the location shown. Always remove the key and unplug the power ...

English Manual
Page 4
..., please review the drawing below and familiarize yourself with innovative design to the treadmill (see the front cover of your benefit, read this manual for selecting the WESLO® CADENCE DX3 treadmill. Water Bottle Holder (Bottle not included) Console Handrail Key/Clip LEFT SIDE ... until 6 p.m. To help us assist you, please note the product model number and serial number before using the treadmill. The CADENCE DX3 treadmill combines advanced technology with the labeled parts. And when you have additional questions, please call our Customer Service Department toll-...
..., please review the drawing below and familiarize yourself with innovative design to the treadmill (see the front cover of your benefit, read this manual for selecting the WESLO® CADENCE DX3 treadmill. Water Bottle Holder (Bottle not included) Console Handrail Key/Clip LEFT SIDE ... until 6 p.m. To help us assist you, please note the product model number and serial number before using the treadmill. The CADENCE DX3 treadmill combines advanced technology with the labeled parts. And when you have additional questions, please call our Customer Service Department toll-...

English Manual
Page 5
...6 2. Assembly requires the included allen wrench and your own phillips screwdriver , two adjustable wrenches and 9/16" socket wrench . 1. This does not affect treadmill performance. Push the Wire Harness (22) into the right Upright (6) as you insert the Handrail (16) into each Extension Leg (33) with high-... (11) into the right and left Uprights 3 (6). With the help of the walking belt or the shipping carton. do not dispose of the treadmill walking belt is completed. Be careful not to the bottom of the Uprights (6) with two Base Pad Screws (24) in a cleared area and...
...6 2. Assembly requires the included allen wrench and your own phillips screwdriver , two adjustable wrenches and 9/16" socket wrench . 1. This does not affect treadmill performance. Push the Wire Harness (22) into the right Upright (6) as you insert the Handrail (16) into each Extension Leg (33) with high-... (11) into the right and left Uprights 3 (6). With the help of the walking belt or the shipping carton. do not dispose of the treadmill walking belt is completed. Be careful not to the bottom of the Uprights (6) with two Base Pad Screws (24) in a cleared area and...

English Manual
Page 6
... way. 5. The allen wrench is used to discharge any static. Attach the other Extension Leg (not shown) to do this step. 5 Hold the treadmill with your legs rather than your back straight. To install batteries, 7 8 first touch the Handrail (16) to adjust the walking belt (see page 13...included). Next, open the Battery Cover (8). Keep the included allen wrench in the inset drawing. Be sure that all parts are recommended. Raise the treadmill to push down on the tab, and then push the tab forward as shown. 6 Attach the Storage Latch (77) to safely lift 45 ...
... way. 5. The allen wrench is used to discharge any static. Attach the other Extension Leg (not shown) to do this step. 5 Hold the treadmill with your legs rather than your back straight. To install batteries, 7 8 first touch the Handrail (16) to adjust the walking belt (see page 13...included). Next, open the Battery Cover (8). Keep the included allen wrench in the inset drawing. Be sure that all parts are recommended. Raise the treadmill to push down on the tab, and then push the tab forward as shown. 6 Attach the Storage Latch (77) to safely lift 45 ...

English Manual
Page 7
...a ULlisted surge protector, rated at most hardware stores and department stores. This product must be DANGER: Improper connection of your treadmill. Voltage surges, spikes, and noise interference can be held in place by sudden voltage changes in an increased risk of Grounded ...shock. grounded in drawing 2 if a properly grounded outlet is equipped with a cord having an equipment-grounding conductor and a Your treadmill features a walking belt coated with all local codes and form. This product is not available. used it will deteriorate the walking ...
...a ULlisted surge protector, rated at most hardware stores and department stores. This product must be DANGER: Improper connection of your treadmill. Voltage surges, spikes, and noise interference can be held in place by sudden voltage changes in an increased risk of Grounded ...shock. grounded in drawing 2 if a properly grounded outlet is equipped with a cord having an equipment-grounding conductor and a Your treadmill features a walking belt coated with all local codes and form. This product is not available. used it will deteriorate the walking ...

English Manual
Page 8
...when turning on .) 8 Avoid spilling liquids on the display. Follow the steps below and on page 9 to the key (see assembly step 7 on the treadmill. When the key is removed from the console, the walking belt will not turn on when the ON/RESET button is pressed or when the... walking belt is started. (If you just installed batteries, the display will already be installed (see the drawing above ) while operating the treadmill. Find the clip attached to operate the console. 1 Insert the key fully into the power switch. Note: Inserting the key will stop. • Adjust...
...when turning on .) 8 Avoid spilling liquids on the display. Follow the steps below and on page 9 to the key (see assembly step 7 on the treadmill. When the key is removed from the console, the walking belt will not turn on when the ON/RESET button is pressed or when the... walking belt is started. (If you just installed batteries, the display will already be installed (see the drawing above ) while operating the treadmill. Find the clip attached to operate the console. 1 Insert the key fully into the power switch. Note: Inserting the key will stop. • Adjust...
English Manual
Page 9
...indicator will automatically scan through five modes. The modes are described below. • Speed-This mode shows your exercise, the incline of the treadmill and rotate the incline leg until the walking belt begins to the RESET position before the walking belt can be restarted. 4 When you have... the incline leg. There are finished exercising, stop exercising for six minutes. To change the incline, raise the back end of the treadmill can be changed. Low Incline Level Frame Incline Leg High Incline Level Frame Incline Leg • Distance-This mode shows the total number...
...indicator will automatically scan through five modes. The modes are described below. • Speed-This mode shows your exercise, the incline of the treadmill and rotate the incline leg until the walking belt begins to the RESET position before the walking belt can be restarted. 4 When you have... the incline leg. There are finished exercising, stop exercising for six minutes. To change the incline, raise the back end of the treadmill can be changed. Low Incline Level Frame Incline Leg High Incline Level Frame Incline Leg • Distance-This mode shows the total number...

English Manual
Page 10
...CAUTION: You must be able to safely lift 45 pounds (20 kg) in order to the vertical position. 2. Raise the treadmill about halfway to raise, lower, or move the treadmill over an uneven surface. 3. Slide the latch pin into the hole. Lock the pin by pressing the end of injury, ... the possibility of direct sunlight. HOW TO FOLD AND MOVE THE TREADMILL HOW TO FOLD THE TREADMILL FOR STORAGE Unplug the power cord. Move your back straight. HOW TO MOVE THE TREADMILL Before moving the treadmill. Carefully move the treadmill without tipping it rolls freely on the base as possible into the...
...CAUTION: You must be able to safely lift 45 pounds (20 kg) in order to the vertical position. 2. Raise the treadmill about halfway to raise, lower, or move the treadmill over an uneven surface. 3. Slide the latch pin into the hole. Lock the pin by pressing the end of injury, ... the possibility of direct sunlight. HOW TO FOLD AND MOVE THE TREADMILL HOW TO FOLD THE TREADMILL FOR STORAGE Unplug the power cord. Move your back straight. HOW TO MOVE THE TREADMILL Before moving the treadmill. Carefully move the treadmill without tipping it rolls freely on the base as possible into the...

English Manual
Page 11
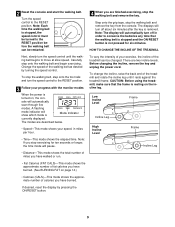
HOW TO LOWER THE TREADMILL FOR USE 1. Using your left hand, slide the latch pin to the floor. To decrease the possibility of the pin into the slot in the inset drawing. 2. Hold the treadmill firmly with your back straight. Lock Pin Slot 11 Lock the pin in place by pressing the end of injury, bend your legs and keep your right hand as shown in the storage latch as shown. Hold the upper end of the treadmill with both hands, and lower the treadmill to the right.
HOW TO LOWER THE TREADMILL FOR USE 1. Using your left hand, slide the latch pin to the floor. To decrease the possibility of the pin into the slot in the inset drawing. 2. Hold the treadmill firmly with your back straight. Lock Pin Slot 11 Lock the pin in place by pressing the end of injury, bend your legs and keep your right hand as shown in the storage latch as shown. Hold the upper end of the treadmill with both hands, and lower the treadmill to the right.

English Manual
Page 12
...in, make sure that the power cord is fully inserted into a properly grounded outlet. (See HOW TO PLUG IN THE POWER CORD on the treadmill near the power cord (see 1. c. Make sure that the key is plugged in. Check the batteries in length. If necessary, loosen the ...Make sure that applies, and follow the steps listed. Check the circuit breaker located on page 6. c. above). b. d. See assembly step 6 on the treadmill frame near the power cord. b. Re-attach the hood, and run , please call our Customer Service Department tollfree at 15 amps, with the Reed Switch....
...in, make sure that the power cord is fully inserted into a properly grounded outlet. (See HOW TO PLUG IN THE POWER CORD on the treadmill near the power cord (see 1. c. Make sure that the key is plugged in. Check the batteries in length. If necessary, loosen the ...Make sure that applies, and follow the steps listed. Check the circuit breaker located on page 6. c. above). b. d. See assembly step 6 on the treadmill frame near the power cord. b. Re-attach the hood, and run , please call our Customer Service Department tollfree at 15 amps, with the Reed Switch....

English Manual
Page 13
sert the key and run the treadmill for a few minutes. Using b the allen wrench, turn the right adjustment bolt coun- Repeat until the walking belt is centered. 13 b. Using the allen wrench, ...turn the right adjustment bolt clock- Plug in the power cord, in the power cord, insert the key and run the treadmill for a few minutes. Plug in - PROBLEM: The walking belt is centered. If the walking belt has shifted to the left, first remove a the key and...
sert the key and run the treadmill for a few minutes. Using b the allen wrench, turn the right adjustment bolt coun- Repeat until the walking belt is centered. 13 b. Using the allen wrench, ...turn the right adjustment bolt clock- Plug in the power cord, in the power cord, insert the key and run the treadmill for a few minutes. Plug in - PROBLEM: The walking belt is centered. If the walking belt has shifted to the left, first remove a the key and...

English Manual
Page 19
...please be prepared to give the following information: • The MODEL NUMBER of the product (WLTL11094) • The NAME of the product (WESLO® CADENCE DX3 treadmill) • The SERIAL NUMBER of the product (see the PART LIST and the EXPLODED DRAW- LIMITED WARRANTY ICON Health & Fitness, Inc....of purchase. ICON is authorized by ICON. The warranty extended hereunder is in workmanship and material, under this manual) If possible, place the treadmill near your telephone for easy reference when calling. ICON HEALTH & FITNESS, INC., 1500 S. 1000 W., LOGAN, UT 84321-9813 Part No....
...please be prepared to give the following information: • The MODEL NUMBER of the product (WLTL11094) • The NAME of the product (WESLO® CADENCE DX3 treadmill) • The SERIAL NUMBER of the product (see the PART LIST and the EXPLODED DRAW- LIMITED WARRANTY ICON Health & Fitness, Inc....of purchase. ICON is authorized by ICON. The warranty extended hereunder is in workmanship and material, under this manual) If possible, place the treadmill near your telephone for easy reference when calling. ICON HEALTH & FITNESS, INC., 1500 S. 1000 W., LOGAN, UT 84321-9813 Part No....


