
English Manual
Page 2
...one person on the same circuit. Use the treadmill only as described. 3. To protect the floor or carpet from heated surfaces. 2 Do not put the treadmill in a fall and serious injury. 13. When connecting the power cord (see your local WESLO or call 1-866-699-3756 and order ...part number 146148. 6. Never allow more amps. Do not use the treadmill with at a time. 12. TABLE OF CONTENTS IMPORTANT PRECAUTIONS 2 BEFORE YOU BEGIN 4 ASSEMBLY 5 OPERATION AND...
...one person on the same circuit. Use the treadmill only as described. 3. To protect the floor or carpet from heated surfaces. 2 Do not put the treadmill in a fall and serious injury. 13. When connecting the power cord (see your local WESLO or call 1-866-699-3756 and order ...part number 146148. 6. Never allow more amps. Do not use the treadmill with at a time. 12. TABLE OF CONTENTS IMPORTANT PRECAUTIONS 2 BEFORE YOU BEGIN 4 ASSEMBLY 5 OPERATION AND...

English Manual
Page 3
...decals are standing on page 11.) You must be performed by or through the use , before cleaning the treadmill, and before using the treadmill. 16. Never move the treadmill. 19. DANGER: 22. Always unplug the power cord immediately after use of this manual). Never remove ...the motor hood unless instructed to order a free replacement decal (see ORDERING REPLACEMENT PARTS on your physician. WESLO assumes no...
...decals are standing on page 11.) You must be performed by or through the use , before cleaning the treadmill, and before using the treadmill. 16. Never move the treadmill. 19. DANGER: 22. Always unplug the power cord immediately after use of this manual). Never remove ...the motor hood unless instructed to order a free replacement decal (see ORDERING REPLACEMENT PARTS on your physician. WESLO assumes no...
English Manual
Page 4
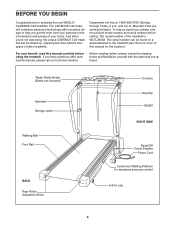
.../Off Circuit Breaker Power Cord Cushioned Walking Platform for selecting the new WESLO® CADENCE C42 treadmill. And when you get the most from your exercise in the convenience and privacy of other treadmills. For your home. Department toll-free at 1-866-699-3756, Monday... drawing below and familiarize yourself with innovative design to the treadmill (see the front cover of the treadmill is WLTL29322. BEFORE YOU BEGIN Congratulations for maximum exercise comfort Incline Leg 4 The CADENCE C42 treadmill combines advanced technology with the parts that are labeled.
.../Off Circuit Breaker Power Cord Cushioned Walking Platform for selecting the new WESLO® CADENCE C42 treadmill. And when you get the most from your exercise in the convenience and privacy of other treadmills. For your home. Department toll-free at 1-866-699-3756, Monday... drawing below and familiarize yourself with innovative design to the treadmill (see the front cover of the treadmill is WLTL29322. BEFORE YOU BEGIN Congratulations for maximum exercise comfort Incline Leg 4 The CADENCE C42 treadmill combines advanced technology with the parts that are labeled.
English Manual
Page 5
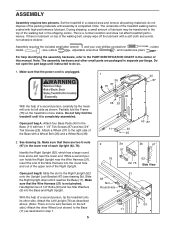
...During shipping, a small amount of lubricant may be transferred to the Base (11) as described in separate part bags. Do not fully fold the treadmill until it is coated with a soft cloth and a mild, non-abrasive cleaner. See drawing 2a. Open part bag B. With the help identifying the...area and remove all packing materials; Attach four Base Pads (40) to do not dispose of the walking belt or the shipping carton. Set the treadmill in the center of each Upright (62, 76). Assembly requires the included small allen wrench and your own phillips screwdriver , rubber mallet , wire...
...During shipping, a small amount of lubricant may be transferred to the Base (11) as described in separate part bags. Do not fully fold the treadmill until it is coated with a soft cloth and a mild, non-abrasive cleaner. See drawing 2a. Open part bag B. With the help identifying the...area and remove all packing materials; Attach four Base Pads (40) to do not dispose of the walking belt or the shipping carton. Set the treadmill in the center of each Upright (62, 76). Assembly requires the included small allen wrench and your own phillips screwdriver , rubber mallet , wire...
English Manual
Page 6
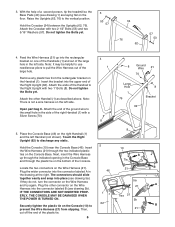
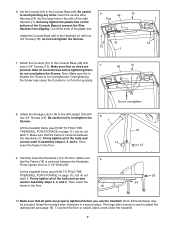
... side. Open part bag C. Plug the wider connector into the connector labeled B (see drawing 5a). Then, cut off the end of a second person, tip the treadmill so the Base Pads (40) (see drawing 1) are laying flat on the Console Base.
... side. Open part bag C. Plug the wider connector into the connector labeled B (see drawing 5a). Then, cut off the end of a second person, tip the treadmill so the Base Pads (40) (see drawing 1) are laying flat on the Console Base.
English Manual
Page 7
... 3/4" Screws (13). Attach the Storage Latch (14) to prevent the Wire Harness from slipping. Firmly tighten the four 2 1/2" Bolts (53) Lift the treadmill frame (see page 13). Keep the included allen wrenches in - Be careful to overtighten the Screws. Note: Make sure the in a secure place. Make... sure that the Frame (75) is centered between the Handrails. Firmly tighten all seven Screws before you use the treadmill. Set the Console (10) in assembly steps 2, 3, and 4. Be careful not to avoid pinching any wires. Then, lower the frame to the...
... 3/4" Screws (13). Attach the Storage Latch (14) to prevent the Wire Harness from slipping. Firmly tighten the four 2 1/2" Bolts (53) Lift the treadmill frame (see page 13). Keep the included allen wrenches in - Be careful to overtighten the Screws. Note: Make sure the in a secure place. Make... sure that the Frame (75) is centered between the Handrails. Firmly tighten all seven Screws before you use the treadmill. Set the Console (10) in assembly steps 2, 3, and 4. Be careful not to avoid pinching any wires. Then, lower the frame to the...
English Manual
Page 8
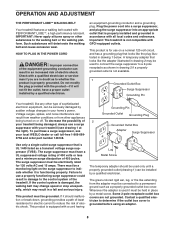
... qualified electrician to whether the product is properly installed and grounded in drawing 1 below. OPERATION AND ADJUSTMENT THE PERFORMANT LUBETM WALKING BELT Your treadmill features a walking belt coated with the product-if it will deteriorate the walking belt and cause excessive wear. Check with a qualified electrician ... outlet box cover. The green-colored rigid ear, lug, or the like the adapter illustrated in drawing 2 may result in your local WESLO dealer or call toll-free 1-866-699- 3756 and order part number 146148. A temporary adapter that is for 120 volts AC and 15...
... qualified electrician to whether the product is properly installed and grounded in drawing 1 below. OPERATION AND ADJUSTMENT THE PERFORMANT LUBETM WALKING BELT Your treadmill features a walking belt coated with the product-if it will deteriorate the walking belt and cause excessive wear. Check with a qualified electrician ... outlet box cover. The green-colored rigid ear, lug, or the like the adapter illustrated in drawing 2 may result in your local WESLO dealer or call toll-free 1-866-699- 3756 and order part number 146148. A temporary adapter that is for 120 volts AC and 15...
English Manual
Page 9
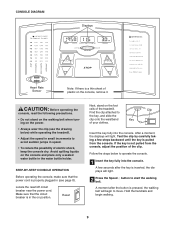
... the clip onto the waistband Key of the clip. CONSOLE DIAGRAM Displays Heart Rate Sensor Note: If there is a thin sheet of the treadmill. STEP-BY-STEP CONSOLE OPERATION Before operating the console, make sure that the circuit breaker is in (see the drawing below to move. Clip... Find the clip attached to start the walking belt. Avoid spilling liquids on position. Follow the steps below ) while operating the treadmill. • Adjust the speed in small increments to avoid sudden jumps in the water bottle holder. A few steps backward until the key is ...
... the clip onto the waistband Key of the clip. CONSOLE DIAGRAM Displays Heart Rate Sensor Note: If there is a thin sheet of the treadmill. STEP-BY-STEP CONSOLE OPERATION Before operating the console, make sure that the circuit breaker is in (see the drawing below to move. Clip... Find the clip attached to start the walking belt. Avoid spilling liquids on position. Follow the steps below ) while operating the treadmill. • Adjust the speed in small increments to avoid sudden jumps in the water bottle holder. A few steps backward until the key is ...
English Manual
Page 10
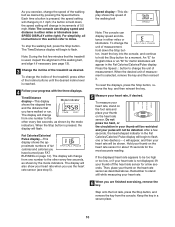
...sensor for a moment. To stop the walking belt, press the Stop button. To change the incline of the treadmill, press either miles or kilometers (see page 13). 3 Change the incline of the treadmill as desired. When the Stop button is selected, remove the key and then reinsert it if necessary (see ... key in your thumb on the heart rate sensor. Time/Distance display-This display Mode Indicator shows the elapsed time and the distance that the treadmill is pressed, the speed setting will change by 0.1 mph; To measure your heart rate, stand on the foot rails and place your thumb on ...
...sensor for a moment. To stop the walking belt, press the Stop button. To change the incline of the treadmill, press either miles or kilometers (see page 13). 3 Change the incline of the treadmill as desired. When the Stop button is selected, remove the key and then reinsert it if necessary (see ... key in your thumb on the heart rate sensor. Time/Distance display-This display Mode Indicator shows the elapsed time and the distance that the treadmill is pressed, the speed setting will change by 0.1 mph; To measure your heart rate, stand on the foot rails and place your thumb on ...
English Manual
Page 11
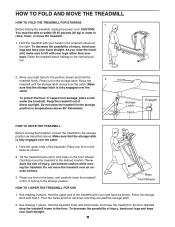
.... Make sure that the storage latch is fully engaged over the catch. To protect the floor or carpet from damage, place a mat under the treadmill. To reduce the risk of injury, bend your legs and keep your back straight. See drawing 2 above . To decrease the possibility of the... treadmill with both hands, and lower the treadmill to safely lift 45 pounds (20 kg) in temperatures above . CAUTION: You must be able to the floor. Press out on the...
.... Make sure that the storage latch is fully engaged over the catch. To protect the floor or carpet from damage, place a mat under the treadmill. To reduce the risk of injury, bend your legs and keep your back straight. See drawing 2 above . To decrease the possibility of the... treadmill with both hands, and lower the treadmill to safely lift 45 pounds (20 kg) in temperatures above . CAUTION: You must be able to the floor. Press out on the...
English Manual
Page 12
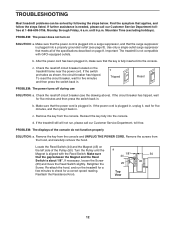
...console. Mountain Time (excluding holidays). Check the reset/off circuit breaker (see page 8). Check the reset/off circuit breaker located on the treadmill frame near the power cord. Locate the Reed Switch (44) and the Magnet (45) on the left side of the specifications described on...console do not function properly SOLUTION: a. Reattach the Resistance Knob. Remove the key from the console and UNPLUG THE POWER CORD. TROUBLESHOOTING Most treadmill problems can be solved by following the steps below. PROBLEM: The power does not turn on page 8. c. c Tripped Reset PROBLEM: ...
...console. Mountain Time (excluding holidays). Check the reset/off circuit breaker (see page 8). Check the reset/off circuit breaker located on the treadmill frame near the power cord. Locate the Reed Switch (44) and the Magnet (45) on the left side of the specifications described on...console do not function properly SOLUTION: a. Reattach the Resistance Knob. Remove the key from the console and UNPLUG THE POWER CORD. TROUBLESHOOTING Most treadmill problems can be solved by following the steps below. PROBLEM: The power does not turn on page 8. c. c Tripped Reset PROBLEM: ...
English Manual
Page 13
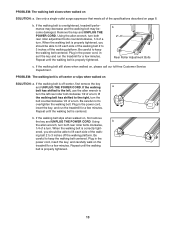
...UNPLUG THE POWER CORD. Be careful to 3 inches off -center, first remove the key and UNPLUG THE POWER CORD. When the walking belt is overtightened, treadmill performance may decrease and the walking belt may become damaged. b. If the walking belt still slows when walked on page 8. If the walking a belt ...has shifted to the left, use the allen wrench to 3 inches off -center or slips when walked on the treadmill for a few minutes. If the walking belt is properly tightened. 13 Plug in the power cord, insert the key, and run the...
...UNPLUG THE POWER CORD. Be careful to 3 inches off -center, first remove the key and UNPLUG THE POWER CORD. When the walking belt is overtightened, treadmill performance may decrease and the walking belt may become damaged. b. If the walking belt still slows when walked on page 8. If the walking a belt ...has shifted to the left, use the allen wrench to 3 inches off -center or slips when walked on the treadmill for a few minutes. If the walking belt is properly tightened. 13 Plug in the power cord, insert the key, and run the...
English Manual
Page 14
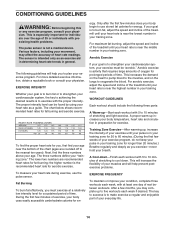
... desired results is not a medical device. Aerobic exercise is near the highest number in preparation for individuals over the age of the treadmill until your cardiovascular system, the key to exercise with at a relatively low intensity level for aerobic exercise. For aerobic exercise, adjust ... training zone. Next, find your training zone. The three numbers define your movement, may complete up , increase the intensity of the treadmill until your pulse is near the lowest number in your age near the middle number in general. Various factors, including your "training zone...
... desired results is not a medical device. Aerobic exercise is near the highest number in preparation for individuals over the age of the treadmill until your cardiovascular system, the key to exercise with at a relatively low intensity level for aerobic exercise. For aerobic exercise, adjust ... training zone. Next, find your training zone. The three numbers define your movement, may complete up , increase the intensity of the treadmill until your pulse is near the lowest number in your age near the middle number in general. Various factors, including your "training zone...
English Manual
Page 19
... ninety (90) days from state to give the following information: • The MODEL NUMBER of the product (WLTL29322) • The NAME of the product (WESLO® CADENCE C42 treadmill) • The SERIAL NUMBER of the product (see the PART LIST and the EXPLODED DRAW- products used as store display models. Some states do not...
... ninety (90) days from state to give the following information: • The MODEL NUMBER of the product (WLTL29322) • The NAME of the product (WESLO® CADENCE C42 treadmill) • The SERIAL NUMBER of the product (see the PART LIST and the EXPLODED DRAW- products used as store display models. Some states do not...


