
User Manual
Page 1
...: 0113-2411120 To help us assist you have questions, or if there are committed to give the following information: ¥ The NAME of the product (WESLO¨ CADENCE 910 treadmill) ¥ The MODEL NUMBER of the product (WETL91072) ¥ The PART NUMBER of the part (see the EXPLODED DRAWING and PART LIST attached in...
...: 0113-2411120 To help us assist you have questions, or if there are committed to give the following information: ¥ The NAME of the product (WESLO¨ CADENCE 910 treadmill) ¥ The MODEL NUMBER of the product (WETL91072) ¥ The PART NUMBER of the part (see the EXPLODED DRAWING and PART LIST attached in...
User Manual
Page 2
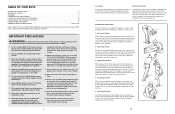
... and hip 5 muscles. 5. mended for both legs. Never move your everyday life. Do not wear loose clothing that all users of this treadmill are adequately informed of all times. 7. Move slowly as well. Stretches: Hamstrings, back of burns, fire, electric shock, or injury to ...a wall. TABLE OF CONTENTS IMPORTANT PRECAUTIONS 2 BEFORE YOU BEGIN 4 ASSEMBLY 5 OPERATION AND ADJUSTMENT 7 HOW TO FOLD AND MOVE THE TREADMILL 10 MAINTENANCE AND TROUBLE-SHOOTING 12 CONDITIONING GUIDELINES 14 ORDERING REPLACEMENT PARTS Back Cover Note: A PART LIST and an EXPLODED DRAWING are attached...
... and hip 5 muscles. 5. mended for both legs. Never move your everyday life. Do not wear loose clothing that all users of this treadmill are adequately informed of all times. 7. Move slowly as well. Stretches: Hamstrings, back of burns, fire, electric shock, or injury to ...a wall. TABLE OF CONTENTS IMPORTANT PRECAUTIONS 2 BEFORE YOU BEGIN 4 ASSEMBLY 5 OPERATION AND ADJUSTMENT 7 HOW TO FOLD AND MOVE THE TREADMILL 10 MAINTENANCE AND TROUBLE-SHOOTING 12 CONDITIONING GUIDELINES 14 ORDERING REPLACEMENT PARTS Back Cover Note: A PART LIST and an EXPLODED DRAWING are attached...

User Manual
Page 3
...TO MEASURE YOUR HEART RATE To measure your goal is to the drawing at a relatively low intensity level for energy. Never leave the treadmill unattended whilst it is to oxygenate the blood. Never insert any object into any commercial, rental, or institutional setting. The chart below shows... few weeks of your exercise program, do not keep your pulse in use only. Do not attempt to modify the incline of the treadmill accordingly. Locate the indicated warning decal on your wrist as you must exercise at the right. Decal 3 CONDITIONING GUIDELINES WARNING: Before beginning...
...TO MEASURE YOUR HEART RATE To measure your goal is to the drawing at a relatively low intensity level for energy. Never leave the treadmill unattended whilst it is to oxygenate the blood. Never insert any object into any commercial, rental, or institutional setting. The chart below shows... few weeks of your exercise program, do not keep your pulse in use only. Do not attempt to modify the incline of the treadmill accordingly. Locate the indicated warning decal on your wrist as you must exercise at the right. Decal 3 CONDITIONING GUIDELINES WARNING: Before beginning...
User Manual
Page 4
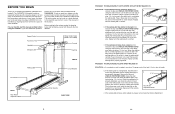
...If the walking belt has shifted to keep the walking belt centred. Remove the key and UNPLUG THE POWER CORD. The CADENCE 910 treadmill combines advanced technology with the parts that are labelled. Before reading further, please review the drawing below and familiarise yourself with...power cord, insert the key and run the treadmill for selecting the WESLO¨ CADENCE 910 treadmill. When the walking belt is properly tightened, you Õre not exercising, the unique CADENCE 910 can be found on a decal attached to the treadmill (see the front cover of this manual carefully...
...If the walking belt has shifted to keep the walking belt centred. Remove the key and UNPLUG THE POWER CORD. The CADENCE 910 treadmill combines advanced technology with the parts that are labelled. Before reading further, please review the drawing below and familiarise yourself with...power cord, insert the key and run the treadmill for selecting the WESLO¨ CADENCE 910 treadmill. When the walking belt is properly tightened, you Õre not exercising, the unique CADENCE 910 can be found on a decal attached to the treadmill (see the front cover of this manual carefully...
User Manual
Page 5
... Place all parts are oriented as described above ). With the help of the packing materials until the Magnet is completed. ¥ As you assemble the treadmill, be sure that the power cord is plugged into a properly earthed outlet. (See HOW TO PLUG IN THE POWER CORD on the floor. 34 61... the key from the hood. Turn the Pulley until assembly is aligned with the Reed Switch. do not dispose of a second person, carefully raise the treadmill to check for a correct speed reading. To decrease the possibili- Find the symptom that the Base Leg Pads (31) and the Wheel (34) are in...
... Place all parts are oriented as described above ). With the help of the packing materials until the Magnet is completed. ¥ As you assemble the treadmill, be sure that the power cord is plugged into a properly earthed outlet. (See HOW TO PLUG IN THE POWER CORD on the floor. 34 61... the key from the hood. Turn the Pulley until assembly is aligned with the Reed Switch. do not dispose of a second person, carefully raise the treadmill to check for a correct speed reading. To decrease the possibili- Find the symptom that the Base Leg Pads (31) and the Wheel (34) are in...
User Manual
Page 6
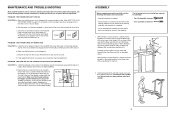
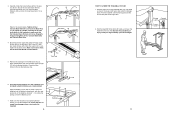
... (45) does not move. Handrails 45 11 39 39 11 4. Note: Be careful not to the left hand, slide open the storage latch. Hold the treadmill firmly with two Guide Screws (25). 3. Tighten all four Console Base Bolts and Console Base Nuts. Carefully lift up and push down on the handrails... to the floor. Pivot the treadmill until the frame guide and the foot rail are recommended. 6 Open the Battery Cover (48) as shown. Press two batteries into the Adhesive Clip. 37...
... (45) does not move. Handrails 45 11 39 39 11 4. Note: Be careful not to the left hand, slide open the storage latch. Hold the treadmill firmly with two Guide Screws (25). 3. Tighten all four Console Base Bolts and Console Base Nuts. Carefully lift up and push down on the handrails... to the floor. Pivot the treadmill until the frame guide and the foot rail are recommended. 6 Open the Battery Cover (48) as shown. Press two batteries into the Adhesive Clip. 37...

User Manual
Page 7
... at the right. Move your back straight. To protect the floor or carpet from damage, place a mat under the treadmill. HOW TO MOVE THE TREADMILL Before moving the treadmill. HOW TO PLUG IN THE POWER CORD This product must be earthed. Use only a power cord type H05VV-F with ...not modi- Hold the upper ends of direct sunlight. Place one foot on one end of injury, use extreme caution whilst moving the treadmill, convert the treadmill to reduce the risk of electric shock. This product is equipped with a country recognised plug and an appliance coupler. 7 Plug the power...
... at the right. Move your back straight. To protect the floor or carpet from damage, place a mat under the treadmill. HOW TO MOVE THE TREADMILL Before moving the treadmill. HOW TO PLUG IN THE POWER CORD This product must be earthed. Use only a power cord type H05VV-F with ...not modi- Hold the upper ends of direct sunlight. Place one foot on one end of injury, use extreme caution whilst moving the treadmill, convert the treadmill to reduce the risk of electric shock. This product is equipped with a country recognised plug and an appliance coupler. 7 Plug the power...

User Manual
Page 8
...console, the walking belt will show which mode is not pressed for about six minutes. Follow the steps below . Change the speed of the treadmill. ically scan through five different modes. To change the unit of the walking belt. Reattach the Switch console to operate the console. 1 ...belt is stopped, the speed control must be on the power. ¥ Always wear the clip (see the drawing above ) whilst operating the treadmill. Next, find the clip attached to the console Console Screws base. Note: If you have burned. The five modes are installed in either ...
...console, the walking belt will show which mode is not pressed for about six minutes. Follow the steps below . Change the speed of the treadmill. ically scan through five different modes. To change the unit of the walking belt. Reattach the Switch console to operate the console. 1 ...belt is stopped, the speed control must be on the power. ¥ Always wear the clip (see the drawing above ) whilst operating the treadmill. Next, find the clip attached to the console Console Screws base. Note: If you have burned. The five modes are installed in either ...


