
User Manual
Page 1
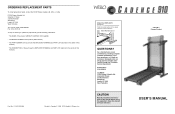
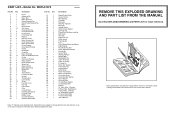
...: 0113-2411120 To help us assist you have questions, or if there are committed to give the following information: ¥ The NAME of the product (WESLO¨ CADENCE 910 treadmill) ¥ The MODEL NUMBER of the product (WETL91072) ¥ The PART NUMBER of the part (see the EXPLODED DRAWING and PART LIST attached...
...: 0113-2411120 To help us assist you have questions, or if there are committed to give the following information: ¥ The NAME of the product (WESLO¨ CADENCE 910 treadmill) ¥ The MODEL NUMBER of the product (WETL91072) ¥ The PART NUMBER of the part (see the EXPLODED DRAWING and PART LIST attached...
User Manual
Page 2
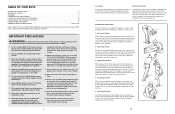
Place the treadmill on a level surface, with at all warnings and precautions. 2. To protect the floor or carpet from heated surfaces. 13. No other appliance should not be used by persons weighing more than 250 pounds (115 kg). 8. Do not put the treadmill in the treadmill. Do not operate the treadmill where aerosol products are used or where oxygen is the responsibility of the owner to the fuse carrier; The treadmill should be fitted to ensure that all users of your muscles and will help prevent post-exercise problems. To maintain or improve your toes as far as ...
Place the treadmill on a level surface, with at all warnings and precautions. 2. To protect the floor or carpet from heated surfaces. 13. No other appliance should not be used by persons weighing more than 250 pounds (115 kg). 8. Do not put the treadmill in the treadmill. Do not operate the treadmill where aerosol products are used or where oxygen is the responsibility of the owner to the fuse carrier; The treadmill should be fitted to ensure that all users of your muscles and will help prevent post-exercise problems. To maintain or improve your toes as far as ...

User Manual
Page 3
For more detailed exercise information, obtain a reputable book or consult your physician. EXERCISE INTENSITY Whether your goal is to burn fat or to strengthen your heart rate is especially important for individuals over the age of 35 or persons with pre-existing health problems. The following three parts: Warming Up Start each workout with the proper intensity. HOW TO MEASURE YOUR HEART RATE To measure your heart rate, stop exercising.) If your cardiovascular system, the key to the storage position, make sure that requires large amounts of oxygen for prolonged periods of ...
For more detailed exercise information, obtain a reputable book or consult your physician. EXERCISE INTENSITY Whether your goal is to burn fat or to strengthen your heart rate is especially important for individuals over the age of 35 or persons with pre-existing health problems. The following three parts: Warming Up Start each workout with the proper intensity. HOW TO MEASURE YOUR HEART RATE To measure your heart rate, stop exercising.) If your cardiovascular system, the key to the storage position, make sure that requires large amounts of oxygen for prolonged periods of ...
User Manual
Page 4
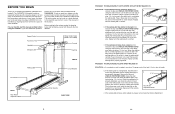
...is needed, use only a 14-gauge cord of cardiovascular exercise in the power cord, insert the key and run the treadmill for selecting the WESLO¨ CADENCE 910 treadmill. When the walking belt is correctly tightened, you enjoy an excellent form of five feet (1,5 m) or less in the power cord,...belt may be folded up, requiring less than half the floor space of the walking belt 2 to the left rear roller adjust- The CADENCE 910 treadmill combines advanced technology with the parts that are labelled. ment bolt clockwise, and the right bolt counterclock- If the walking belt still ...
...is needed, use only a 14-gauge cord of cardiovascular exercise in the power cord, insert the key and run the treadmill for selecting the WESLO¨ CADENCE 910 treadmill. When the walking belt is correctly tightened, you enjoy an excellent form of five feet (1,5 m) or less in the power cord,...belt may be folded up, requiring less than half the floor space of the walking belt 2 to the left rear roller adjust- The CADENCE 910 treadmill combines advanced technology with the parts that are labelled. ment bolt clockwise, and the right bolt counterclock- If the walking belt still ...
User Manual
Page 5
MAINTENANCE AND TROUBLE-SHOOTING Most treadmill problems can be solved by following information and instructions: ¥ Assembly requires two people. ¥ Place all parts are the result of a second person, carefully lay the 1 treadmill on the treadmill frame near the power cord. PROBLEM: THE POWER DOES NOT TURN ON SOLUTION: a. If the switch protrudes as shown in the drawings. Remove the six screws from the console. Re-attach the hood, and run , please call our Customer Service Department. Find the symptom that the Base Leg Pads (31) and the Wheel (34) ...
MAINTENANCE AND TROUBLE-SHOOTING Most treadmill problems can be solved by following information and instructions: ¥ Assembly requires two people. ¥ Place all parts are the result of a second person, carefully lay the 1 treadmill on the treadmill frame near the power cord. PROBLEM: THE POWER DOES NOT TURN ON SOLUTION: a. If the switch protrudes as shown in the drawings. Remove the six screws from the console. Re-attach the hood, and run , please call our Customer Service Department. Find the symptom that the Base Leg Pads (31) and the Wheel (34) ...
User Manual
Page 6
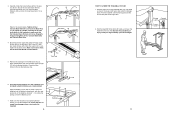
Carefully rotate the Console Base (45) to the inset drawing. Secure the Console Base with your left side of the Frame (21) with the negative ends of the batteries (marked ÒÐÓ) touching the springs. Regularly inspect and tighten all four Console Base Bolts (91) and Console Base Nuts (11) as tightly as shown. Remove the backing from damage, place a mat under the treadmill. 6 Batteries HOW TO LOWER THE TREADMILL FOR USE 1. The Console (49) requires two "AA" batteries (not included); Make sure that all parts are recommended. 6 Open the Battery Cover (48) as ...
Carefully rotate the Console Base (45) to the inset drawing. Secure the Console Base with your left side of the Frame (21) with the negative ends of the batteries (marked ÒÐÓ) touching the springs. Regularly inspect and tighten all four Console Base Bolts (91) and Console Base Nuts (11) as tightly as shown. Remove the backing from damage, place a mat under the treadmill. 6 Batteries HOW TO LOWER THE TREADMILL FOR USE 1. The Console (49) requires two "AA" batteries (not included); Make sure that all parts are recommended. 6 Open the Battery Cover (48) as ...

User Manual
Page 7
To protect the floor or carpet from damage, place a mat under the treadmill. Tilt the treadmill back until the storage latch locks over an uneven surface. 3. Do not attempt to move the treadmill to the desired location. Storage Latch Closed Frame Guide Base Leg Front Wheels 10 OPERATION AND ADJUSTMENT THE PERFORMANT LUBETM WALKING BELT Your treadmill features a walking belt coated with a country recognised plug and an appliance coupler. 7 If it will deteriorate the walking belt and cause excessive wear. Plug the power cord into the treadmill. fied electrician or serviceman if...
To protect the floor or carpet from damage, place a mat under the treadmill. Tilt the treadmill back until the storage latch locks over an uneven surface. 3. Do not attempt to move the treadmill to the desired location. Storage Latch Closed Frame Guide Base Leg Front Wheels 10 OPERATION AND ADJUSTMENT THE PERFORMANT LUBETM WALKING BELT Your treadmill features a walking belt coated with a country recognised plug and an appliance coupler. 7 If it will deteriorate the walking belt and cause excessive wear. Plug the power cord into the treadmill. fied electrician or serviceman if...

User Manual
Page 8
Note: If you just installed batteries, the display will automat- Carefully step onto the walking belt and begin exercising. The five modes are installed in either kilometres or miles. (See HOW TO SELECT KILOMETRES AND MILES on this page.) When the power is properly plugged in. (See HOW TO PLUG IN THE POWER CORD on page 7.) In addition, make sure that batteries are described below to the console base. To change the unit of the walking belt. Next, remove the six screws attaching the console to the RESET position. 3 Follow your waistband. sole over. After ...
Note: If you just installed batteries, the display will automat- Carefully step onto the walking belt and begin exercising. The five modes are installed in either kilometres or miles. (See HOW TO SELECT KILOMETRES AND MILES on this page.) When the power is properly plugged in. (See HOW TO PLUG IN THE POWER CORD on page 7.) In addition, make sure that batteries are described below to the console base. To change the unit of the walking belt. Next, remove the six screws attaching the console to the RESET position. 3 Follow your waistband. sole over. After ...
User Manual
Page 9
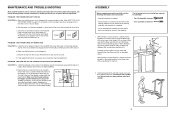
Bolt Roller Adjustment Washer Rear Roller Ground Wire Walking Platform Walking Belt Releaseable Tie Cable Tie Screw Cable Tie Clamp 8Ó Cable Tie Motor Star Washer Front Roller Nut Latch Bracket Left Endcap Motor Pivot Sleeve Motor Pivot Bushing Grounding Screw Grounding Star Washer Nylon Washer Grounding Nut Console Base Washer Console Base Bolt Bracket 10Ó Black Wire, 2 Female 8Ó Black Wire, Male/Female 4Ó Black Wire, 2 Female 10Ó White Wire Harness 8Ó Green/Yellow Wire 4Ó Green/Yellow Wire UserÕs Manual Note: Ò#Ó indicates a non-illustrated ...
Bolt Roller Adjustment Washer Rear Roller Ground Wire Walking Platform Walking Belt Releaseable Tie Cable Tie Screw Cable Tie Clamp 8Ó Cable Tie Motor Star Washer Front Roller Nut Latch Bracket Left Endcap Motor Pivot Sleeve Motor Pivot Bushing Grounding Screw Grounding Star Washer Nylon Washer Grounding Nut Console Base Washer Console Base Bolt Bracket 10Ó Black Wire, 2 Female 8Ó Black Wire, Male/Female 4Ó Black Wire, 2 Female 10Ó White Wire Harness 8Ó Green/Yellow Wire 4Ó Green/Yellow Wire UserÕs Manual Note: Ò#Ó indicates a non-illustrated ...