

English Manual
Page 3
... IN THE POWER CORD on the same circuit. Athletic support clothes are recommended for longer than 250 pounds. 8. Never start the treadmill while you are used by an authorized service representative. To reduce the possibility of carrying 12 or more amps. IMPORTANT SAFETY PRECAUTIONS ...injury to do not wear loose clothing that blocks an air opening . 10. Never allow more than 1 hour. 11. Position the treadmill on any opening . Never remove the safety cover unless instructed to persons, read the following important safety precautions and information before performing ...
... IN THE POWER CORD on the same circuit. Athletic support clothes are recommended for longer than 250 pounds. 8. Never start the treadmill while you are used by an authorized service representative. To reduce the possibility of carrying 12 or more amps. IMPORTANT SAFETY PRECAUTIONS ...injury to do not wear loose clothing that blocks an air opening . 10. Never allow more than 1 hour. 11. Position the treadmill on any opening . Never remove the safety cover unless instructed to persons, read the following important safety precautions and information before performing ...

English Manual
Page 4
... let you enjoy an excellent form of cardiovascular exercise in the convenience and privacy of your safety and benefit, read this manual for selecting the WESLO CADENCE® 865 treadmill. Console Handrail Safety Key/Clip o VI Pulse Earclip Walking Belt Foot Rails Uprights FRONT k BACK Rear Roller Adjustment Bolts 4 Circuit Breaker On/Off Switch...
... let you enjoy an excellent form of cardiovascular exercise in the convenience and privacy of your safety and benefit, read this manual for selecting the WESLO CADENCE® 865 treadmill. Console Handrail Safety Key/Clip o VI Pulse Earclip Walking Belt Foot Rails Uprights FRONT k BACK Rear Roller Adjustment Bolts 4 Circuit Breaker On/Off Switch...

English Manual
Page 5
... Frame (40). Be careful not to the Lett Upright (2) with a Flat Washer (18), into the Safety Cover (43) (see assembly step 1). 18 91 2 4. Set the treadmill in the bottom of the Right Upright, and through the lower hole in the same manner. Find the Right Upright (13) (see the upper inset...
... Frame (40). Be careful not to the Lett Upright (2) with a Flat Washer (18), into the Safety Cover (43) (see assembly step 1). 18 91 2 4. Set the treadmill in the bottom of the Right Upright, and through the lower hole in the same manner. Find the Right Upright (13) (see the upper inset...

English Manual
Page 6
... press the Clip onto 89 the underside of the Pulse Earclip is recommended that all parts are tightened before using the treadmill. Clothes Clip 7. Make sure that the floor under the treadmill be covered for protection. 7 64 40 63 6 Remove the paper backing from the Wrench Clip (64). The use of the...
... press the Clip onto 89 the underside of the Pulse Earclip is recommended that all parts are tightened before using the treadmill. Clothes Clip 7. Make sure that the floor under the treadmill be covered for protection. 7 64 40 63 6 Remove the paper backing from the Wrench Clip (64). The use of the...

English Manual
Page 7
.... 1 Grounded Outlet Box 2 Grounding Plug 0 0 0 Grounded Outlet Box Adapter Grounding Pin 0 Grounding Plug 0 Grounding Pin Grounded Outlet Lug Metal Screw MAINTENANCE-FREE WALKING BELT Your treadmill features a maintenance-free walking belt coated with the product-if it must be connected to a permanent ground such as shown in doubt as to a 2-pole...
.... 1 Grounded Outlet Box 2 Grounding Plug 0 0 0 Grounded Outlet Box Adapter Grounding Pin 0 Grounding Plug 0 Grounding Pin Grounded Outlet Lug Metal Screw MAINTENANCE-FREE WALKING BELT Your treadmill features a maintenance-free walking belt coated with the product-if it must be connected to a permanent ground such as shown in doubt as to a 2-pole...
English Manual
Page 8
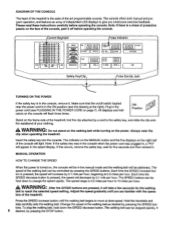
... power is in the power cord (see the drawing at the right). A WARNING: After the SPEED buttons are familiar with the operation of the treadmill. To stop the walking belt, hold down to change the speed rapidly. Pulse Indicator PVISS/ MOUES 0 P0131 n LI n_IL11I 0 WORMS Finn DISIANEE...belt as desired by pressing the STOP button. Please read these instructions carefully before operating the console. Always wear the clip when operating the treadmill. WIN A.. Insert the safety key into the console. Plug in the ON position (see PLUGGING IN THE POWER CORD on the face...
... power is in the power cord (see the drawing at the right). A WARNING: After the SPEED buttons are familiar with the operation of the treadmill. To stop the walking belt, hold down to change the speed rapidly. Pulse Indicator PVISS/ MOUES 0 P0131 n LI n_IL11I 0 WORMS Finn DISIANEE...belt as desired by pressing the STOP button. Please read these instructions carefully before operating the console. Always wear the clip when operating the treadmill. WIN A.. Insert the safety key into the console. Plug in the ON position (see PLUGGING IN THE POWER CORD on the face...

English Manual
Page 9
...one of the FITNESS LEVEL buttons is completed, it will be 3.5 miles per hour each designed to your exercise, the incline of the treadmill can be changed by twenty seconds. When the first segment is pressed. PROGRAM OPERATION In the program mode, the console will automatically adjust... PULSE button. The program can be displayed in the CURRENT SEGMENT column, and no time remains. During the program, the incline of the treadmill can be changed by 0.5%. Each time the INCLINE decrease button is pressed, the length of time will increase or decrease by 0.5 miles per...
...one of the FITNESS LEVEL buttons is completed, it will be 3.5 miles per hour each designed to your exercise, the incline of the treadmill can be changed by twenty seconds. When the first segment is pressed. PROGRAM OPERATION In the program mode, the console will automatically adjust... PULSE button. The program can be displayed in the CURRENT SEGMENT column, and no time remains. During the program, the incline of the treadmill can be changed by 0.5%. Each time the INCLINE decrease button is pressed, the length of time will increase or decrease by 0.5 miles per...

English Manual
Page 10
... 9,999 hours. To exit the information mode, remove the safety key. 10 If your ear lobe and reposition the earclip. This safety feature prevents the treadmill from the console. A time goal can be set for long periods of time.) If desired, a time goal can be set. As you have burned will..., the TIME display will light. The distance and pulse displays together will show the total distance, up to 99 minutes and 59 seconds. (If the treadmill is completed, a tone will sound and the walking belt will slow to a stop . Press the TIME SET buttons to set a time goal quickly. Store the...
... 9,999 hours. To exit the information mode, remove the safety key. 10 If your ear lobe and reposition the earclip. This safety feature prevents the treadmill from the console. A time goal can be set for long periods of time.) If desired, a time goal can be set. As you have burned will..., the TIME display will light. The distance and pulse displays together will show the total distance, up to 99 minutes and 59 seconds. (If the treadmill is completed, a tone will sound and the walking belt will slow to a stop . Press the TIME SET buttons to set a time goal quickly. Store the...

English Manual
Page 11
... two clear circles inside the earclip. Wipe the two clear circles using a cotton swab moistened with water. TROUBLE-SHOOTING AND STORAGE Most treadmill problems can be cleaned. After the power cord has been plugged in general. 4. If the switch protrudes as an exercise aid in ... TURN ON a. SYMPTOM: THE POWER TURNS OFF DURING USE a. Various indicators on the console should light. (See TURING ON THE POWER on the treadmill near the power cord. NOTE: Various factors, including the users movement, may appear on " position. SYMPTOM: THE WALKING BELT SLOWS WHEN WALKED ON...
... two clear circles inside the earclip. Wipe the two clear circles using a cotton swab moistened with water. TROUBLE-SHOOTING AND STORAGE Most treadmill problems can be cleaned. After the power cord has been plugged in general. 4. If the switch protrudes as an exercise aid in ... TURN ON a. SYMPTOM: THE POWER TURNS OFF DURING USE a. Various indicators on the console should light. (See TURING ON THE POWER on the treadmill near the power cord. NOTE: Various factors, including the users movement, may appear on " position. SYMPTOM: THE WALKING BELT SLOWS WHEN WALKED ON...

English Manual
Page 12
... Loosen the other bolt on , please call our Customer Service Department. 6. Loosen Remove 12 Repeat until the walking belt is overtightened, treadmill performance may decrease and the walking belt may be able to the left rear roller adjustment bolt counterclockwise, and the right bolt clockwise, ... is not in a secure location. Be careful not to keep the walking belt centered. STORAGE Unplug the power cord when the treadmill is correctly tightened, you should be covered during extended periods of the walking belt should just touch the walking platform. Be careful ...
... Loosen the other bolt on , please call our Customer Service Department. 6. Loosen Remove 12 Repeat until the walking belt is overtightened, treadmill performance may decrease and the walking belt may be able to the left rear roller adjustment bolt counterclockwise, and the right bolt clockwise, ... is not in a secure location. Be careful not to keep the walking belt centered. STORAGE Unplug the power cord when the treadmill is correctly tightened, you should be covered during extended periods of the walking belt should just touch the walking platform. Be careful ...

English Manual
Page 16
... caused by or attributable to give the following information: • The MODEL NUMBER of the product (WLTL86542). • The NAME of the product (WESLO CADENCES 865 treadmill). • The SERIAL NUMBER of the product (see the front cover of this manual). • The KEY NUMBER of the pats) (see page...(s) (see page 14 of this warranty is made must be pre-authorized by sufficient proof of this product to state. If possible, place the treadmill near your telephone for a period of ninety (90) days from defects in USA © ICON Health & Fitness, Inc. All products for...
... caused by or attributable to give the following information: • The MODEL NUMBER of the product (WLTL86542). • The NAME of the product (WESLO CADENCES 865 treadmill). • The SERIAL NUMBER of the product (see the front cover of this manual). • The KEY NUMBER of the pats) (see page...(s) (see page 14 of this warranty is made must be pre-authorized by sufficient proof of this product to state. If possible, place the treadmill near your telephone for a period of ninety (90) days from defects in USA © ICON Health & Fitness, Inc. All products for...


