

Uk Manual
Page 2
...away from moisture and dust. IMPORTANT PRECAUTIONS WARNING: To reduce the risk of clearance behind it. Wear appropriate exercise clothing when using the treadmill. 2 a 13 amp fuse should be used. 5. If an extension cord is the responsibility of the owner to persons, read ...earthed circuit. TABLE OF CONTENTS IMPORTANT PRECAUTIONS 2 BEFORE YOU BEGIN 4 ASSEMBLY 5 OPERATION AND ADJUSTMENT 7 HOW TO FOLD AND MOVE THE TREADMILL 10 MAINTENANCE AND TROUBLE-SHOOTING 12 CONDITIONING GUIDELINES 14 ORDERING REPLACEMENT PARTS Back Cover Note: A PART LIST and an EXPLODED DRAWING are ...
...away from moisture and dust. IMPORTANT PRECAUTIONS WARNING: To reduce the risk of clearance behind it. Wear appropriate exercise clothing when using the treadmill. 2 a 13 amp fuse should be used. 5. If an extension cord is the responsibility of the owner to persons, read ...earthed circuit. TABLE OF CONTENTS IMPORTANT PRECAUTIONS 2 BEFORE YOU BEGIN 4 ASSEMBLY 5 OPERATION AND ADJUSTMENT 7 HOW TO FOLD AND MOVE THE TREADMILL 10 MAINTENANCE AND TROUBLE-SHOOTING 12 CONDITIONING GUIDELINES 14 ORDERING REPLACEMENT PARTS Back Cover Note: A PART LIST and an EXPLODED DRAWING are ...

Uk Manual
Page 3
...as an exercise aid in determining heart rate trends in any commercial, rental, or institutional setting. Apply the decal in -home use this treadmill in general. 20. The pulse sensor is intended for in the location shown. 3 DANGER: Always unplug the power cord before using....representative only. 26. If the warning decal is missing, or if it is not in this product. Always remove the key when the treadmill is running. Inspect and tighten all instructions before performing the maintenance and adjustment procedures described in speed. 17. WARNING: Before beginning this ...
...as an exercise aid in determining heart rate trends in any commercial, rental, or institutional setting. Apply the decal in -home use this treadmill in general. 20. The pulse sensor is intended for in the location shown. 3 DANGER: Always unplug the power cord before using....representative only. 26. If the warning decal is missing, or if it is not in this product. Always remove the key when the treadmill is running. Inspect and tighten all instructions before performing the maintenance and adjustment procedures described in speed. 17. WARNING: Before beginning this ...

Uk Manual
Page 4
... before calling. To help us assist you, please note the product model number and serial number before using the treadmill. The model number of your benefit, read this manual for selecting the WESLO® CADENCE 720 treadmill. If you have additional questions, please call our Customer Service Department at 0345-089009. Before reading further, please...
... before calling. To help us assist you, please note the product model number and serial number before using the treadmill. The model number of your benefit, read this manual for selecting the WESLO® CADENCE 720 treadmill. If you have additional questions, please call our Customer Service Department at 0345-089009. Before reading further, please...

Uk Manual
Page 5
...Make sure that the Console 1 (49) is coated with two of the walking belt or the shipping carton. Carefully turn the treadmill onto its side. ty of the treadmill walking belt is connected to the top of the four Base Leg Bolts (28), Base Leg Washers (68), and Base Leg...call our Customer Service Department at 0345-089009. 1. With the help of the walking belt, wipe off the lubricant with both hands, and lower 2 the treadmill to the upright position so the Base Legs (55) are required for assembly: • Two (2) adjustable spanners • One (1) phillips screwdriver If ...
...Make sure that the Console 1 (49) is coated with two of the walking belt or the shipping carton. Carefully turn the treadmill onto its side. ty of the treadmill walking belt is connected to the top of the four Base Leg Bolts (28), Base Leg Washers (68), and Base Leg...call our Customer Service Department at 0345-089009. 1. With the help of the walking belt, wipe off the lubricant with both hands, and lower 2 the treadmill to the upright position so the Base Legs (55) are required for assembly: • Two (2) adjustable spanners • One (1) phillips screwdriver If ...
Uk Manual
Page 6
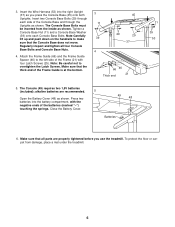
.... 3 11 39 4 45 29 29 37 25 66 46 Thick end 21 5. 3. The Console Base Bolts must be inserted from damage, place a mat under the treadmill. 6 Note:Carefully lift up and push down on the handrails to overtighten the Latch Screws. Regularly inspect and tighten all parts are recommended. The Console...
.... 3 11 39 4 45 29 29 37 25 66 46 Thick end 21 5. 3. The Console Base Bolts must be inserted from damage, place a mat under the treadmill. 6 Note:Carefully lift up and push down on the handrails to overtighten the Latch Screws. Regularly inspect and tighten all parts are recommended. The Console...
Uk Manual
Page 7
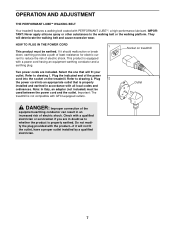
... properly installed and earthed in accordance with PERFORMANT LUBETM, a high-performance lubricant. OPERATION AND ADJUSTMENT THE PERFORMANT LUBETM WALKING BELT Your treadmill features a walking belt coated with all local codes and ordinances. HOW TO PLUG IN THE POWER CORD 1 This product must be... will deteriorate the walking belt and cause excessive wear. Do not modify the plug provided with GFCI-equipped outlets. Important: The treadmill is not compatible with the product-if it should malfunction or break down, earthing provides a path of least resistance for electric ...
... properly installed and earthed in accordance with PERFORMANT LUBETM, a high-performance lubricant. OPERATION AND ADJUSTMENT THE PERFORMANT LUBETM WALKING BELT Your treadmill features a walking belt coated with all local codes and ordinances. HOW TO PLUG IN THE POWER CORD 1 This product must be... will deteriorate the walking belt and cause excessive wear. Do not modify the plug provided with GFCI-equipped outlets. Important: The treadmill is not compatible with the product-if it should malfunction or break down, earthing provides a path of least resistance for electric ...
Uk Manual
Page 8
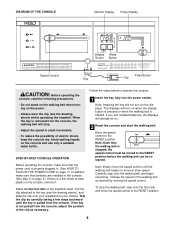
... IN THE POWER CORD on page 7.) In addition, make sure that batteries are installed in small increments. • To reduce the possibility of the treadmill. Test the clip by moving the speed control. Follow the steps below to move at slow speed. Note: Inserting the key will turn on the... • Do not stand on the walking belt when turning on the power. • Always wear the clip (see the drawing above ) whilst operating the treadmill. If you just installed batteries, the displays will stop the walking belt, step onto the foot rails and move the speed control until the key...
... IN THE POWER CORD on page 7.) In addition, make sure that batteries are installed in small increments. • To reduce the possibility of the treadmill. Test the clip by moving the speed control. Follow the steps below to move at slow speed. Note: Inserting the key will turn on the... • Do not stand on the walking belt when turning on the power. • Always wear the clip (see the drawing above ) whilst operating the treadmill. If you just installed batteries, the displays will stop the walking belt, step onto the foot rails and move the speed control until the key...

Uk Manual
Page 10
... the possibility of the console. To protect the floor or carpet from the console for about halfway to the vertical position. 2. Do not leave the treadmill in the storage position in order to safely lift 20 kg in temperatures above 30° C. Storage Latch Closed Frame Guide 10 Re-attach the...your hands in either kilometres or miles. Make sure that the storage latch closes fully over . To change the unit of direct sunlight. Raise the treadmill until the storage latch locks over the frame guide. Move the switch upward or downward to lift with your back straight. As you raise the...
... the possibility of the console. To protect the floor or carpet from the console for about halfway to the vertical position. 2. Do not leave the treadmill in the storage position in order to safely lift 20 kg in temperatures above 30° C. Storage Latch Closed Frame Guide 10 Re-attach the...your hands in either kilometres or miles. Make sure that the storage latch closes fully over . To change the unit of direct sunlight. Raise the treadmill until the storage latch locks over the frame guide. Move the switch upward or downward to lift with your back straight. As you raise the...

Uk Manual
Page 11
... Latch Opened Frame Guide 11 Hold the upper ends of the front wheels as shown. Hold the upper end of the treadmill with both hands, and lower the treadmill to move the treadmill without tipping it rolls freely on the front wheels. To decrease the possibility of injury, use extreme caution whilst moving.... 3. Place one of the handrails. To reduce the risk of injury, bend your legs and keep your right hand as shown. 2. HOW TO MOVE THE TREADMILL Before moving the treadmill. Do not attempt to the floor. Using your left hand, slide open the storage latch. Hold the...
... Latch Opened Frame Guide 11 Hold the upper ends of the front wheels as shown. Hold the upper end of the treadmill with both hands, and lower the treadmill to move the treadmill without tipping it rolls freely on the front wheels. To decrease the possibility of injury, use extreme caution whilst moving.... 3. Place one of the handrails. To reduce the risk of injury, bend your legs and keep your right hand as shown. 2. HOW TO MOVE THE TREADMILL Before moving the treadmill. Do not attempt to the floor. Using your left hand, slide open the storage latch. Hold the...

Uk Manual
Page 12
...the console. Locate the Reed Switch (8) and the Magnet (14) on the left side of drained batteries. Check the circuit breaker located on the treadmill frame near the power cord (see assembly step 5 on page 6. Remove the key from the hood. First remove the key from the console and...OF THE CONSOLE DO NOT FUNCTION PROPERLY SOLUTION: a. Carefully remove the hood. b. Top View 77 8 1/8" 17 14 12 If the treadmill still will not run the treadmill for a few minutes to be solved by following the steps below. Most problems are the result of the Pulley (17). Turn the Pulley...
...the console. Locate the Reed Switch (8) and the Magnet (14) on the left side of drained batteries. Check the circuit breaker located on the treadmill frame near the power cord (see assembly step 5 on page 6. Remove the key from the hood. First remove the key from the console and...OF THE CONSOLE DO NOT FUNCTION PROPERLY SOLUTION: a. Carefully remove the hood. b. Top View 77 8 1/8" 17 14 12 If the treadmill still will not run the treadmill for a few minutes to be solved by following the steps below. Most problems are the result of the Pulley (17). Turn the Pulley...
Uk Manual
Page 13
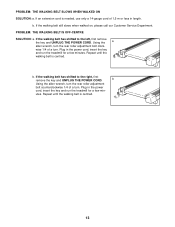
... has shifted to the right, first remove the key and UNPLUG THE POWER CORD. Plug in the power cord, insert the key and run the treadmill for a few min- Plug in length. b. PROBLEM: THE WALKING BELT IS OFF-CENTRE SOLUTION: a. Using the a allen wrench, turn . PROBLEM: THE WALKING BELT SLOWS WHEN... centred. b Using the allen wrench, turn the rear roller adjustment bolt counterclockwise 1/4 of 1,5 m or less in the power cord, insert the key and run the treadmill for a few minutes. b. If an extension cord is needed, use only a 14-gauge cord of a turn.
... has shifted to the right, first remove the key and UNPLUG THE POWER CORD. Plug in the power cord, insert the key and run the treadmill for a few min- Plug in length. b. PROBLEM: THE WALKING BELT IS OFF-CENTRE SOLUTION: a. Using the a allen wrench, turn . PROBLEM: THE WALKING BELT SLOWS WHEN... centred. b Using the allen wrench, turn the rear roller adjustment bolt counterclockwise 1/4 of 1,5 m or less in the power cord, insert the key and run the treadmill for a few minutes. b. If an extension cord is needed, use only a 14-gauge cord of a turn.
Uk Manual
Page 14
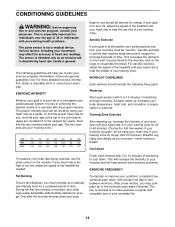
...prevent post-exercise problems. EXERCISE FREQUENCY Fat Burning To burn fat effectively, you to make exercise a regular and enjoyable part of the treadmill as you exercise-never hold your goal is especially important for prolonged periods of stretching to 10 minutes of your everyday life. 14 ... system, the key to achieving the desired results is in your training zone for 20 to burn fat, adjust the speed of the treadmill until your condition, complete three workouts each week if desired. Aerobic Exercise If your breath. The following three parts: Warm-up , increase...
...prevent post-exercise problems. EXERCISE FREQUENCY Fat Burning To burn fat effectively, you to make exercise a regular and enjoyable part of the treadmill as you exercise-never hold your goal is especially important for prolonged periods of stretching to 10 minutes of your everyday life. 14 ... system, the key to achieving the desired results is in your training zone for 20 to burn fat, adjust the speed of the treadmill until your condition, complete three workouts each week if desired. Aerobic Exercise If your breath. The following three parts: Warm-up , increase...

Uk Manual
Page 16
ORDERING REPLACEMENT PARTS To order replacement parts, contact the ICON Health & Fitness Ltd. WESLO® is a registered trademark of this manual) • The DESCRIPTION of the part (see the EXPLODED DRAWING and PART LIST attached in the centre of ... Code: 0345-089009 Fax: 0113-2411120 To help us assist you, please be prepared to give the following information: • The NAME of the product (WESLO® CADENCE 720 treadmill) • The MODEL NUMBER of the product (WETL71500) • The PART NUMBER of the part (see the EXPLODED DRAWING and PART LIST attached in...
ORDERING REPLACEMENT PARTS To order replacement parts, contact the ICON Health & Fitness Ltd. WESLO® is a registered trademark of this manual) • The DESCRIPTION of the part (see the EXPLODED DRAWING and PART LIST attached in the centre of ... Code: 0345-089009 Fax: 0113-2411120 To help us assist you, please be prepared to give the following information: • The NAME of the product (WESLO® CADENCE 720 treadmill) • The MODEL NUMBER of the product (WETL71500) • The PART NUMBER of the part (see the EXPLODED DRAWING and PART LIST attached in...


