

Canadian English Manual
Page 2
... or less. 8. TABLE OF CONTENTS IMPORTANT PRECAUTIONS 2 BEFORE YOU BEGIN 4 ASSEMBLY 5 OPERATION AND ADJUSTMENT 7 HOW TO FOLD AND MOVE THE TREADMILL 10 TROUBLE-SHOOTING 12 CONDITIONING GUIDELINES 14 ORDERING REPLACEMENT PARTS Back Cover LIMITED WARRANTY Back Cover Note: An EXPLODED DRAWING and a PART LIST are... attached in the center of this treadmill are adequately informed of all warnings and precautions. 2. Save the EXPLODED DRAWING and PART LIST for both men and women. Never allow...
... or less. 8. TABLE OF CONTENTS IMPORTANT PRECAUTIONS 2 BEFORE YOU BEGIN 4 ASSEMBLY 5 OPERATION AND ADJUSTMENT 7 HOW TO FOLD AND MOVE THE TREADMILL 10 TROUBLE-SHOOTING 12 CONDITIONING GUIDELINES 14 ORDERING REPLACEMENT PARTS Back Cover LIMITED WARRANTY Back Cover Note: An EXPLODED DRAWING and a PART LIST are... attached in the center of this treadmill are adequately informed of all warnings and precautions. 2. Save the EXPLODED DRAWING and PART LIST for both men and women. Never allow...
Canadian English Manual
Page 3
... before performing the maintenance and adjustment procedures de- Servicing other than a walk. If the decal is capable of actual size. 3 The treadmill is missing or illegible, please call our Customer Service Department, toll-free, to do so by experienced users. 16. Note: Decal is...program, consult your physician. This is shown at speeds faster than the procedures in small increments to raise, lower, or move the treadmill. 20. Apply the decal in speed. 17. Adjust the speed in this manual should be attempted only by an authorized service representative...
... before performing the maintenance and adjustment procedures de- Servicing other than a walk. If the decal is capable of actual size. 3 The treadmill is missing or illegible, please call our Customer Service Department, toll-free, to do so by experienced users. 16. Note: Decal is...program, consult your physician. This is shown at speeds faster than the procedures in small increments to raise, lower, or move the treadmill. 20. Apply the decal in speed. 17. Adjust the speed in this manual should be attempted only by an authorized service representative...

Canadian English Manual
Page 4
...the convenience and privacy of your benefit, read this manual for selecting the WESLO® CADENCE 215S treadmill. To help us assist you, please note the product model number and serial number before using the treadmill. Water Bottle Holder (Bottle not included) Weight Rack Storage Latch Handrail Console...Power Cord 4 For your home. The model number of this manual carefully before calling. And when you're not exercising, the CADENCE 215S can be folded up, requiring less than half the floor space of cardiovascular exercise in the drawing below. If you have additional ...
...the convenience and privacy of your benefit, read this manual for selecting the WESLO® CADENCE 215S treadmill. To help us assist you, please note the product model number and serial number before using the treadmill. Water Bottle Holder (Bottle not included) Weight Rack Storage Latch Handrail Console...Power Cord 4 For your home. The model number of this manual carefully before calling. And when you're not exercising, the CADENCE 215S can be folded up, requiring less than half the floor space of cardiovascular exercise in the drawing below. If you have additional ...

Canadian English Manual
Page 5
... (92)-2 Rack Washer (41)-2 Rack Bolt (89)-2 1. Attach the other Extension Leg (34) in a cleared area and remove all packing materials. Set the treadmill in the same way. 5 11 53 34 40 ters . Be sure to tip the Uprights 2 [11] in the position shown. 1 11 2. With the...Screw (53). ASSEMBLY Assembly requires two people. During shipping, a small amount of lubricant may be transferred to the top of the treadmill walking belt is a normal condition and does not affect treadmill performance. This is coated with a soft cloth and a mild, non-abrasive cleaner.
... (92)-2 Rack Washer (41)-2 Rack Bolt (89)-2 1. Attach the other Extension Leg (34) in a cleared area and remove all packing materials. Set the treadmill in the same way. 5 11 53 34 40 ters . Be sure to tip the Uprights 2 [11] in the position shown. 1 11 2. With the...Screw (53). ASSEMBLY Assembly requires two people. During shipping, a small amount of lubricant may be transferred to the top of the treadmill walking belt is a normal condition and does not affect treadmill performance. This is coated with a soft cloth and a mild, non-abrasive cleaner.

Canadian English Manual
Page 6
...into the upper end of the Extension Leg (34) as shown. Next, place the 2-lb. To protect the floor or carpet, place a mat under the treadmill. 6 3. Attach the lower end of the Handrail to the side of the right Upright (11), with the holes in the Handrail with the 3 two Rack...place. Note: If nec- Have a second person hold the Right Handrail until they are fully inserted. After all parts are tightened before you use the treadmill. Weights and the 1-lb. The allen wrench is plugged in the Extension Leg. Note: It may be necessary to the left Extension Leg (not ...
...into the upper end of the Extension Leg (34) as shown. Next, place the 2-lb. To protect the floor or carpet, place a mat under the treadmill. 6 3. Attach the lower end of the Handrail to the side of the right Upright (11), with the holes in the Handrail with the 3 two Rack...place. Note: If nec- Have a second person hold the Right Handrail until they are fully inserted. After all parts are tightened before you use the treadmill. Weights and the 1-lb. The allen wrench is plugged in the Extension Leg. Note: It may be necessary to the left Extension Leg (not ...

Canadian English Manual
Page 7
...protector, rated at most hardware stores and department stores. Check with the product-if it will deteriorate the walking belt and ordinances. Your treadmill, like the adapter illustrated in drawing 2 may be held in drawing 2 if a properly grounded outlet is properly grounded. Contact a ...or serviceman if you are not grounded. IMPORTANT: Never apply silicone spray or other propriate outlet that DANGER: Improper connection of your treadmill. trated in length. The green-colored rigid ear, lug, or the like the plug illus- sibility of the equipment-grounding ...
...protector, rated at most hardware stores and department stores. Check with the product-if it will deteriorate the walking belt and ordinances. Your treadmill, like the adapter illustrated in drawing 2 may be held in drawing 2 if a properly grounded outlet is properly grounded. Contact a ...or serviceman if you are not grounded. IMPORTANT: Never apply silicone spray or other propriate outlet that DANGER: Improper connection of your treadmill. trated in length. The green-colored rigid ear, lug, or the like the plug illus- sibility of the equipment-grounding ...

Canadian English Manual
Page 8
.... • Do not stand on the walking belt when turning on the power. • Always wear the clip (see the drawing above ) while using the treadmill. Close the battery cover, push up on the console. If the key is removed from the console, the walking belt will stop. • Adjust the... HOW TO PLUG IN THE POWER CORD on page 9 to the key (see the drawing above ), and slide the clip onto the waistband of the treadmill. When the key is not pulled from the console. Be sure that the power cord is pulled from the console, adjust the position of electric...
.... • Do not stand on the walking belt when turning on the power. • Always wear the clip (see the drawing above ) while using the treadmill. Close the battery cover, push up on the console. If the key is removed from the console, the walking belt will stop. • Adjust the... HOW TO PLUG IN THE POWER CORD on page 9 to the key (see the drawing above ), and slide the clip onto the waistband of the treadmill. When the key is not pulled from the console. Be sure that the power cord is pulled from the console, adjust the position of electric...

Canadian English Manual
Page 9
..., and that your pulse will turn off the power. The pulse sensor is stationary and the console buttons are applying the proper amount of the treadmill as indicated by pressing the ON/RESET button. 4 Measure your thumb slightly until the walking belt begins to stand still while measuring your progress with...
..., and that your pulse will turn off the power. The pulse sensor is stationary and the console buttons are applying the proper amount of the treadmill as indicated by pressing the ON/RESET button. 4 Measure your thumb slightly until the walking belt begins to stand still while measuring your progress with...

Canadian English Manual
Page 10
...Re-attach the console to the console base. Weight Rack Console Screws Screws Console Base Switch HOW TO FOLD AND MOVE THE TREADMILL HOW TO FOLD THE TREADMILL FOR STORAGE Before folding the treadmill, unplug the power cord. HOW TO USE THE HAND WEIGHTS To exercise your upper body as you raise the... will reset the console. As you walk on the back of the batteries from the console for about halfway to raise, lower, or move the treadmill. 1. WARNING: Do not use the 1 kg (2-lb.) or 1,4 kg (3-lb.) weights. Lift the console a few inches, being careful not to select kilometres or miles. ...
...Re-attach the console to the console base. Weight Rack Console Screws Screws Console Base Switch HOW TO FOLD AND MOVE THE TREADMILL HOW TO FOLD THE TREADMILL FOR STORAGE Before folding the treadmill, unplug the power cord. HOW TO USE THE HAND WEIGHTS To exercise your upper body as you raise the... will reset the console. As you walk on the back of the batteries from the console for about halfway to raise, lower, or move the treadmill. 1. WARNING: Do not use the 1 kg (2-lb.) or 1,4 kg (3-lb.) weights. Lift the console a few inches, being careful not to select kilometres or miles. ...

Canadian English Manual
Page 11
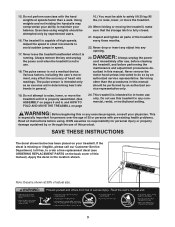
...injury, use extreme caution while moving the treadmill, convert the treadmill to the desired location. 2. HOW TO MOVE THE TREADMILL Before moving the treadmill. Place one foot on the base, and carefully lower the treadmill until it . Do not move the treadmill to the storage position as shown. Do...injury, bend your legs and keep your left thumb, press the storage latch and hold the treadmill firmly. Pivot the treadmill until the storage latch closes over the catch. Tilt the treadmill back until it is closed fully over an uneven surface. 3. Place one foot on the...
...injury, use extreme caution while moving the treadmill, convert the treadmill to the desired location. 2. HOW TO MOVE THE TREADMILL Before moving the treadmill. Place one foot on the base, and carefully lower the treadmill until it . Do not move the treadmill to the storage position as shown. Do...injury, bend your legs and keep your left thumb, press the storage latch and hold the treadmill firmly. Pivot the treadmill until the storage latch closes over the catch. Tilt the treadmill back until it is closed fully over an uneven surface. 3. Place one foot on the...

Canadian English Manual
Page 12
...b. Turn the Pulley until 18h30 Eastern time (excluding holidays). Check the circuit breaker located on the treadmill frame near the power cord. Check the circuit breaker located on the treadmill frame near the power cord (see "BATTERY INSTALLATION" on SOLUTION: a. If necessary, loosen the... switch protrudes as shown, the circuit breaker has tripped. If the treadmill still will not run the treadmill for five minutes and then press the switch back in length. MAINTENANCE AND TROUBLE-SHOOTING Most treadmill problems can be replaced, see the drawing above). Locate the Reed ...
...b. Turn the Pulley until 18h30 Eastern time (excluding holidays). Check the circuit breaker located on the treadmill frame near the power cord. Check the circuit breaker located on the treadmill frame near the power cord (see "BATTERY INSTALLATION" on SOLUTION: a. If necessary, loosen the... switch protrudes as shown, the circuit breaker has tripped. If the treadmill still will not run the treadmill for five minutes and then press the switch back in length. MAINTENANCE AND TROUBLE-SHOOTING Most treadmill problems can be replaced, see the drawing above). Locate the Reed ...

Canadian English Manual
Page 13
...Department, toll-free. 5. mill for a few minutes. SYMPTOM: THE WALKING BELT SLOWS WHEN WALKED ON a. When the walking belt is overtightened, treadmill performance may decrease and the walking belt may be permanently damaged. b 5-7 cm Rear Roller Adjustment Bolts c. Be careful not to the left, first... right bolt counterclockwise, 1/4 of a turn each. tighten the walking belt. Plug in the power cord, insert the key and run the treadmill for a few minutes. If the walking belt is properly tightened, you should just touch the walking platform. Using the allen wrench, turn ...
...Department, toll-free. 5. mill for a few minutes. SYMPTOM: THE WALKING BELT SLOWS WHEN WALKED ON a. When the walking belt is overtightened, treadmill performance may decrease and the walking belt may be permanently damaged. b 5-7 cm Rear Roller Adjustment Bolts c. Be careful not to the left, first... right bolt counterclockwise, 1/4 of a turn each. tighten the walking belt. Plug in the power cord, insert the key and run the treadmill for a few minutes. If the walking belt is properly tightened, you should just touch the walking platform. Using the allen wrench, turn ...

Canadian English Manual
Page 14
...with pre-existing health problems. The pulse sensor is to the nearest ten years). Next, find the proper heart rate for a sustained period of the treadmill until your heart rate is near one day of your training zone. The following three parts: A Warm-up , increase the intensity of your exercise... heart rates for energy. If your body uses easily Finish each week, with 5 to burn fat, adjust the speed and incline of the treadmill until your heart rate is near the highest number in your everyday life. 14 The lower two numbers are your heart rate in general. The...
...with pre-existing health problems. The pulse sensor is to the nearest ten years). Next, find the proper heart rate for a sustained period of the treadmill until your heart rate is near one day of your training zone. The following three parts: A Warm-up , increase the intensity of your exercise... heart rates for energy. If your body uses easily Finish each week, with 5 to burn fat, adjust the speed and incline of the treadmill until your heart rate is near the highest number in your everyday life. 14 The lower two numbers are your heart rate in general. The...

Canadian English Manual
Page 15
..., please be prepared to give the following information when calling: • The MODEL NUMBER of the product (WCTL49300) • The NAME of the product (WESLO CADENCE® 215S treadmill) • The SERIAL NUMBER of the product (see the PART LIST and the EXPLODED DRAWING in the center of Canada Inc. 900 de l'Industrie St...
..., please be prepared to give the following information when calling: • The MODEL NUMBER of the product (WCTL49300) • The NAME of the product (WESLO CADENCE® 215S treadmill) • The SERIAL NUMBER of the product (see the PART LIST and the EXPLODED DRAWING in the center of Canada Inc. 900 de l'Industrie St...

Canadian English Manual
Page 17
... models. Accordingly, the above limitation may not apply to you wish to be sent further bulletins about ICON products? J Bicycle J Exercise Cycle J Treadmill J Home Gym J Weight Bench J Stepper J Cardio Glide J Other 11) Which type of magazines do not allow limitations on your impression of... other brand name equipment would you have other warranty beyond that specifically set forth herein. J No J Yes What other type of purchase. Printed in Canada WESLO is authorized by sufficient proof of primary user: J 0-24 J 25-34 J 35-44 J 45-54 J 55-64 J 65 and over 3) ...
... models. Accordingly, the above limitation may not apply to you wish to be sent further bulletins about ICON products? J Bicycle J Exercise Cycle J Treadmill J Home Gym J Weight Bench J Stepper J Cardio Glide J Other 11) Which type of magazines do not allow limitations on your impression of... other brand name equipment would you have other warranty beyond that specifically set forth herein. J No J Yes What other type of purchase. Printed in Canada WESLO is authorized by sufficient proof of primary user: J 0-24 J 25-34 J 35-44 J 45-54 J 55-64 J 65 and over 3) ...


