
English Manual
Page 2
... stockings, or in sandals. 2. Do not use a properly functioning surge suppressor could become caught in the treadmill. Never move the walking belt while the power is being administered. 6. IMPORTANT PRECAUTIONS WARNING: To reduce the risk of the specifications described on each side. Never ... circuit capable of carrying 15 or more than 250 pounds. 8. Always wear athletic shoes. When connecting the power cord (see your local WESLO dealer or call 1-800-8063651 and order part number 146148. 5. TABLE OF CONTENTS IMPORTANT PRECAUTIONS 2 BEFORE YOU BEGIN 4 ASSEMBLY 5 OPERATION...
... stockings, or in sandals. 2. Do not use a properly functioning surge suppressor could become caught in the treadmill. Never move the walking belt while the power is being administered. 6. IMPORTANT PRECAUTIONS WARNING: To reduce the risk of the specifications described on each side. Never ... circuit capable of carrying 15 or more than 250 pounds. 8. Always wear athletic shoes. When connecting the power cord (see your local WESLO dealer or call 1-800-8063651 and order part number 146148. 5. TABLE OF CONTENTS IMPORTANT PRECAUTIONS 2 BEFORE YOU BEGIN 4 ASSEMBLY 5 OPERATION...
English Manual
Page 3
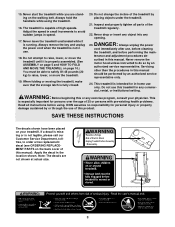
.... Apply the decal in speed. 17. ing or is properly assembled. (See ASSEMBLY on page 5 and HOW TO FOLD AND MOVE THE TREADMILL on the walking belt. This is fully closed. 20. Always hold the handrails while using .
.... Apply the decal in speed. 17. ing or is properly assembled. (See ASSEMBLY on page 5 and HOW TO FOLD AND MOVE THE TREADMILL on the walking belt. This is fully closed. 20. Always hold the handrails while using .
English Manual
Page 4
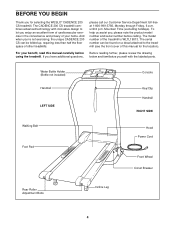
...convenience and privacy of the treadmill is WLTL19013. Water Bottle Holder (Bottle not included) Handrail LEFT SIDE Console Key/Clip Handrail RIGHT SIDE Walking Belt Foot Pad Hood Power Cord Front Wheel Circuit Breaker Rear Roller Adjustment Bolts Incline Leg 4 until 6 p.m. If you have additional questions, ... the labeled parts. The model number of your benefit, read this manual for selecting the WESLO® CADENCE 200 CS treadmill. And when you're not exercising, the unique CADENCE 200 CS can be folded up, requiring less than half the floor space of this manual...
...convenience and privacy of the treadmill is WLTL19013. Water Bottle Holder (Bottle not included) Handrail LEFT SIDE Console Key/Clip Handrail RIGHT SIDE Walking Belt Foot Pad Hood Power Cord Front Wheel Circuit Breaker Rear Roller Adjustment Bolts Incline Leg 4 until 6 p.m. If you have additional questions, ... the labeled parts. The model number of your benefit, read this manual for selecting the WESLO® CADENCE 200 CS treadmill. And when you're not exercising, the unique CADENCE 200 CS can be folded up, requiring less than half the floor space of this manual...

English Manual
Page 5
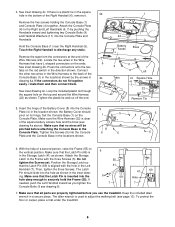
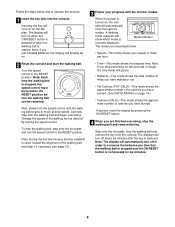
... end. (Note: There may be identification decals on the Handrails.) Hold the Right Handrail in the positions shown. With the help of the walking belt or the shipping carton. Do not tighten the Nuts yet. This does not affect treadmill performance. Using a 9/16" socket wrench and the allen... of the Base (71) with a Frame Bolt (10), a Handrail Washer (11), and a Star Washer (33). do not dispose of the treadmill walking belt is completed. Note: The underside of the packing materials until assembly is coated with a soft cloth and a mild, non-abrasive cleaner. If there is ...
... end. (Note: There may be identification decals on the Handrails.) Hold the Right Handrail in the positions shown. With the help of the walking belt or the shipping carton. Do not tighten the Nuts yet. This does not affect treadmill performance. Using a 9/16" socket wrench and the allen... of the Base (71) with a Frame Bolt (10), a Handrail Washer (11), and a Star Washer (33). do not dispose of the treadmill walking belt is completed. Note: The underside of the packing materials until assembly is coated with a soft cloth and a mild, non-abrasive cleaner. If there is ...
English Manual
Page 6
... before attaching the Console Base to the Right and Left Handrails (6, 7) by the arrows in the location shown; Attach the Storage Latch to adjust the walking belt (see drawing 4a above). Then, tighten the three Screws. ing. Touch the Right Handrail to the back of the square battery access hole and the...
... before attaching the Console Base to the Right and Left Handrails (6, 7) by the arrows in the location shown; Attach the Storage Latch to adjust the walking belt (see drawing 4a above). Then, tighten the three Screws. ing. Touch the Right Handrail to the back of the square battery access hole and the...
English Manual
Page 7
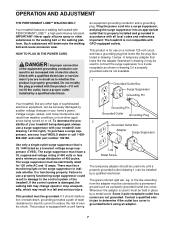
...If it must be grounded. OPERATION AND ADJUSTMENT THE PERFORMANT LUBETM WALKING BELT Your treadmill features a walking belt coated with a cord having Lug Metal Screw The temporary adapter should be connected to the walking belt or the walking platform. ances being damaged, always use a surge suppressor with ... There must be electrically rated for use a properly functioning surge suppressor could result in an increased risk of your local WESLO dealer or call 1-800- 806-3651 and order part number 146148. Whenever the adapter is functioning properly. This product is...
...If it must be grounded. OPERATION AND ADJUSTMENT THE PERFORMANT LUBETM WALKING BELT Your treadmill features a walking belt coated with a cord having Lug Metal Screw The temporary adapter should be connected to the walking belt or the walking platform. ances being damaged, always use a surge suppressor with ... There must be electrically rated for use a properly functioning surge suppressor could result in an increased risk of your local WESLO dealer or call 1-800- 806-3651 and order part number 146148. Whenever the adapter is functioning properly. This product is...
English Manual
Page 8
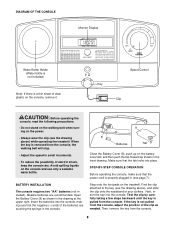
... two "AA" batteries (not included). Find the clip attached to the key (see page 7). If the key is not pulled from the console, the walking belt will stop. • Adjust the speed in (see the drawing above ) while operating the treadmill. Make sure that the tab locks into the console. ..., insert the key into place. Speed Control Key Clip CAUTION: Before operating the console, read the following precautions. • Do not stand on the walking belt when turning on the power. • Always wear the clip (see the drawing above ), and slide the clip onto the waistband of your clothes.
... two "AA" batteries (not included). Find the clip attached to the key (see page 7). If the key is not pulled from the console, the walking belt will stop. • Adjust the speed in (see the drawing above ) while operating the treadmill. Make sure that the tab locks into the console. ..., insert the key into place. Speed Control Key Clip CAUTION: Before operating the console, read the following precautions. • Do not stand on the walking belt when turning on the power. • Always wear the clip (see the drawing above ), and slide the clip onto the waistband of your clothes.
English Manual
Page 9
... ON/RESET button is stopped, the speed control must be turned to the RESET position before the walking belt can be on the display. sole will turn the speed control until the walking belt begins to the RESET position. Note: The display will not turn the speed control to move at...speed. Inserting the key will automatically turn off in miles per hour. • Time-This mode shows the elapsed time. Note: Each time the walking belt is not pressed for ten seconds or longer, the time mode will show which mode is removed. A flashing mode indicator will pause. • ...
... ON/RESET button is stopped, the speed control must be turned to the RESET position before the walking belt can be on the display. sole will turn the speed control until the walking belt begins to the RESET position. Note: The display will not turn the speed control to move at...speed. Inserting the key will automatically turn off in miles per hour. • Time-This mode shows the elapsed time. Note: Each time the walking belt is not pressed for ten seconds or longer, the time mode will show which mode is removed. A flashing mode indicator will pause. • ...
English Manual
Page 13
... Department. ing belt 3 to overtighten the walking belt. Be careful to 3 inches off -center or slips when walked on page 7. b. Repeat until the walking belt is properly tightened, you should be able to lift each side of the walking belt 2 to keep the walking belt centered. ened, you should be able to keep the walking belt centered. Repeat until the walking belt is off...
... Department. ing belt 3 to overtighten the walking belt. Be careful to 3 inches off -center or slips when walked on page 7. b. Repeat until the walking belt is properly tightened, you should be able to lift each side of the walking belt 2 to keep the walking belt centered. ened, you should be able to keep the walking belt centered. Repeat until the walking belt is off...
English Manual
Page 16
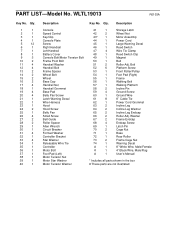
...the box # These parts are not illustrated Qty. Bolt Platform Screw Front Roller/Pulley Foot Pad (Right) Frame Walking Belt Walking Platform Incline Pin Ground Screw Ground Wire 8" Cable Tie Power Cord Grommet Incline Leg Incline Leg Washer Incline Leg ... 1 70 2 71 1 72 1 73 2 74 1 # 1 # 1 # 1 Storage Latch Wheel Nut Motor Assembly Power Cord Large Warning Decal Reed Switch Wire Tie Clamp Reed Switch Clip Magnet Belt Roller Adj. Qty. 1 1 2 1 3 1 4 1 5 12 6 1 7 1 8 1 9 3 10 2 11 4 12 4 13 2 14 2 15 2 16 2 17 4 18 1 19 4 20 4 21 1 22...
...the box # These parts are not illustrated Qty. Bolt Platform Screw Front Roller/Pulley Foot Pad (Right) Frame Walking Belt Walking Platform Incline Pin Ground Screw Ground Wire 8" Cable Tie Power Cord Grommet Incline Leg Incline Leg Washer Incline Leg ... 1 70 2 71 1 72 1 73 2 74 1 # 1 # 1 # 1 Storage Latch Wheel Nut Motor Assembly Power Cord Large Warning Decal Reed Switch Wire Tie Clamp Reed Switch Clip Magnet Belt Roller Adj. Qty. 1 1 2 1 3 1 4 1 5 12 6 1 7 1 8 1 9 3 10 2 11 4 12 4 13 2 14 2 15 2 16 2 17 4 18 1 19 4 20 4 21 1 22...


