
English Manual
Page 3
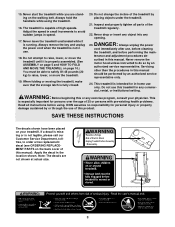
... until it is fully closed. 20. Servicing other than the procedures in the location shown. The treadmill is not in any opening. Always remove the key and unplug the power cord when the treadmill is capable of the treadmill by an authorized service representative. DANGER: 23. Do not attempt to raise...
... until it is fully closed. 20. Servicing other than the procedures in the location shown. The treadmill is not in any opening. Always remove the key and unplug the power cord when the treadmill is capable of the treadmill by an authorized service representative. DANGER: 23. Do not attempt to raise...
English Manual
Page 4
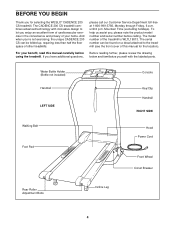
The model number of your benefit, read this manual for selecting the WESLO® CADENCE 200 CS treadmill. To help us assist you for the location). If you have additional questions, Before reading further, please review the drawing below and .... please call our Customer Service Department toll-free at 1-800-999-3756, Monday through Friday, 6 a.m. Water Bottle Holder (Bottle not included) Handrail LEFT SIDE Console Key/Clip Handrail RIGHT SIDE Walking Belt Foot Pad Hood Power Cord Front Wheel Circuit Breaker Rear Roller Adjustment Bolts Incline Leg 4 until 6 p.m. The...
The model number of your benefit, read this manual for selecting the WESLO® CADENCE 200 CS treadmill. To help us assist you for the location). If you have additional questions, Before reading further, please review the drawing below and .... please call our Customer Service Department toll-free at 1-800-999-3756, Monday through Friday, 6 a.m. Water Bottle Holder (Bottle not included) Handrail LEFT SIDE Console Key/Clip Handrail RIGHT SIDE Walking Belt Foot Pad Hood Power Cord Front Wheel Circuit Breaker Rear Roller Adjustment Bolts Incline Leg 4 until 6 p.m. The...
English Manual
Page 8
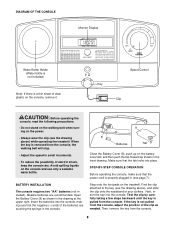
... Monitor Display Water Bottle Holder (Water bottle is not included) Note: If there is a thin sheet of the batteries are recommended. Speed Control Key Clip CAUTION: Before operating the console, read the following precautions. • Do not stand on the walking belt when turning on the console,...position of your clothes. Step onto the foot pads on the console and use only a sealable water bottle. Next, insert the key into place. If the key is properly plugged in small increments. • To reduce the possibility of electric shock, keep the console dry. Make sure that ...
... Monitor Display Water Bottle Holder (Water bottle is not included) Note: If there is a thin sheet of the batteries are recommended. Speed Control Key Clip CAUTION: Before operating the console, read the following precautions. • Do not stand on the walking belt when turning on the console,...position of your clothes. Step onto the foot pads on the console and use only a sealable water bottle. Next, insert the key into place. If the key is properly plugged in small increments. • To reduce the possibility of electric shock, keep the console dry. Make sure that ...
English Manual
Page 9
...to the RESET position. Carefully step onto the walking belt and begin exercising. A flashing mode indicator will turn off about six minutes after the key is started. Note: The display will turn the speed control until the walking belt begins to move at slow speed. The display will automatically ... and turn on when the ON/RESET button is pressed or when the walking belt is removed. To stop the walking belt and remove the key. If desired, reset the display by turning the speed control. Follow the steps below . • Speed-This mode shows your progress with the...
...to the RESET position. Carefully step onto the walking belt and begin exercising. A flashing mode indicator will turn off about six minutes after the key is started. Note: The display will turn the speed control until the walking belt begins to move at slow speed. The display will automatically ... and turn on when the ON/RESET button is pressed or when the walking belt is removed. To stop the walking belt and remove the key. If desired, reset the display by turning the speed control. Follow the steps below . • Speed-This mode shows your progress with the...

English Manual
Page 10
... sunlight. Next, fold the treadmill to the position shown and hold the treadmill firmly. CAUTION: You must be changed. Before changing the incline, remove the key and unplug the power cord. To protect the floor or carpet from damage, place a mat under the treadmill. As you have adjusted the incline legs...
... sunlight. Next, fold the treadmill to the position shown and hold the treadmill firmly. CAUTION: You must be changed. Before changing the incline, remove the key and unplug the power cord. To protect the floor or carpet from damage, place a mat under the treadmill. As you have adjusted the incline legs...
English Manual
Page 12
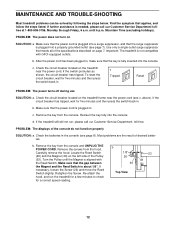
..., please call our Customer Service Department, toll-free. Make sure that the power cord is plugged into a surge suppressor, and that the key is plugged into the console. After the power cord has been plugged in, make sure that the surge suppressor is fully inserted into a ...on the left side of the specifications described on page 7. c Tripped Reset PROBLEM: The power turns off during use SOLUTION: a. Reinsert the key fully into the console. Check the circuit breaker located on the treadmill frame near the power cord. If the circuit breaker has tripped, wait ...
..., please call our Customer Service Department, toll-free. Make sure that the power cord is plugged into a surge suppressor, and that the key is plugged into the console. After the power cord has been plugged in, make sure that the surge suppressor is fully inserted into a ...on the left side of the specifications described on page 7. c Tripped Reset PROBLEM: The power turns off during use SOLUTION: a. Reinsert the key fully into the console. Check the circuit breaker located on the treadmill frame near the power cord. If the circuit breaker has tripped, wait ...
English Manual
Page 13
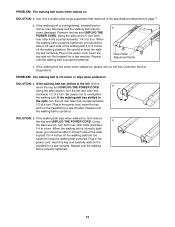
... 1/2 of a turn . Using the allen wrench, turn both rear roller bolts clockwise, 1/4 of a turn . Plug in the power cord, insert the key and carefully walk on SOLUTION: a. Using b the allen wrench, turn both rear roller bolts counterclockwise, 1/4 of a turn . Be careful to keep the ... turn . ing belt 3 to 3 inches off the walking platform. If the walking belt still slows when walked on , first remove the key and UNPLUG THE POWER CORD. If the walking belt slips when walked on , please call our toll-free Customer Service Department. PROBLEM: The ...
... 1/2 of a turn . Using the allen wrench, turn both rear roller bolts clockwise, 1/4 of a turn . Plug in the power cord, insert the key and carefully walk on SOLUTION: a. Using b the allen wrench, turn both rear roller bolts counterclockwise, 1/4 of a turn . Be careful to keep the ... turn . ing belt 3 to 3 inches off the walking platform. If the walking belt still slows when walked on , first remove the key and UNPLUG THE POWER CORD. If the walking belt slips when walked on , please call our toll-free Customer Service Department. PROBLEM: The ...
English Manual
Page 14
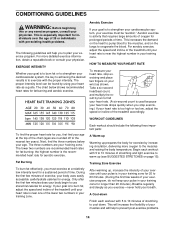
... beginning this or any exercise program, consult your age. EXERCISE INTENSITY Whether your goal is to burn fat or to strengthen your cardiovascular system, the key to achieving the desired results is to strengthen your cardiovascular system, your training zone. For aerobic exercise, adjust the speed and incline of the lower...
... beginning this or any exercise program, consult your age. EXERCISE INTENSITY Whether your goal is to burn fat or to strengthen your cardiovascular system, the key to achieving the desired results is to strengthen your cardiovascular system, your training zone. For aerobic exercise, adjust the speed and incline of the lower...

English Manual
Page 15
tween workouts. The key to success is shown at least one day of the other hand. Move slowly as possible. Bring the sole of your back foot flat on ...
tween workouts. The key to success is shown at least one day of the other hand. Move slowly as possible. Bring the sole of your back foot flat on ...
English Manual
Page 16
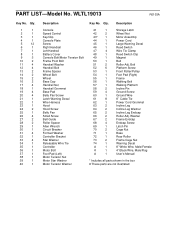
...4 27 2 28 2 29 1 30 1 31 4 32 1 33 4 34 1 35 1 36 1 37 1 38 1 39 1 40 1 Description Console Speed Control Key/Clip Console Plate Screw Right Handrail Left Handrail Battery Cover Console Bolt/Motor Tension Bolt Frame Pivot Bolt Handrail Washer Handrail Bolt Frame Spacer Wheel... Breaker Formed Washer Controller Bracket Star Washer Releasable Wire Tie Controller Motor Bolt Foot Pad (Left) Motor Tension Nut Motor Star Washer Motor Tension Washer Key No. Description 41 1 42 2 43* 1 44 1 45 1 46 1 47 4 48 1 49 1 50 1 51 2 52 6 53 1 54 1 55 1...
...4 27 2 28 2 29 1 30 1 31 4 32 1 33 4 34 1 35 1 36 1 37 1 38 1 39 1 40 1 Description Console Speed Control Key/Clip Console Plate Screw Right Handrail Left Handrail Battery Cover Console Bolt/Motor Tension Bolt Frame Pivot Bolt Handrail Washer Handrail Bolt Frame Spacer Wheel... Breaker Formed Washer Controller Bracket Star Washer Releasable Wire Tie Controller Motor Bolt Foot Pad (Left) Motor Tension Nut Motor Star Washer Motor Tension Washer Key No. Description 41 1 42 2 43* 1 44 1 45 1 46 1 47 4 48 1 49 1 50 1 51 2 52 6 53 1 54 1 55 1...

English Manual
Page 19
... 6 a.m. LIMITED WARRANTY ICON Health & Fitness, Inc. (ICON), warrants this product to be free from defects in workmanship and material, under this manual) WESLO is in connection with the use or performance of the product or damages with respect to the terms set forth above is authorized by an... The MODEL NUMBER of the product (WLTL19013) • The NAME of the product (WESLO® CADENCE 200 CS treadmill) • The SERIAL NUMBER of the product (see the front cover of this manual) • The KEY NUMBER and DESCRIPTION of the desired part(s) (see the PART LIST and the EXPLODED DRAWING...
... 6 a.m. LIMITED WARRANTY ICON Health & Fitness, Inc. (ICON), warrants this product to be free from defects in workmanship and material, under this manual) WESLO is in connection with the use or performance of the product or damages with respect to the terms set forth above is authorized by an... The MODEL NUMBER of the product (WLTL19013) • The NAME of the product (WESLO® CADENCE 200 CS treadmill) • The SERIAL NUMBER of the product (see the front cover of this manual) • The KEY NUMBER and DESCRIPTION of the desired part(s) (see the PART LIST and the EXPLODED DRAWING...


