
English Manual
Page 2
Remove the PART LIST and EXPLODED DRAWING before operating the treadmill. 1. Do not place the treadmill on the treadmill at a time. 9. Do not operate the treadmill where aerosol products are used by persons weighing more than one person on a surface that could become ...BEGIN 4 ASSEMBLY 5 OPERATION AND ADJUSTMENT 7 HOW TO FOLD AND MOVE THE TREADMILL 10 MAINTENANCE AND TROUBLE-SHOOTING 12 CONDITIONING GUIDELINES 14 ORDERING REPLACEMENT PARTS Back Cover LIMITED WARRANTY Back Cover Note: A PART LIST and an EXPLODED DRAWING are attached in length. It is not working ...
Remove the PART LIST and EXPLODED DRAWING before operating the treadmill. 1. Do not place the treadmill on the treadmill at a time. 9. Do not operate the treadmill where aerosol products are used by persons weighing more than one person on a surface that could become ...BEGIN 4 ASSEMBLY 5 OPERATION AND ADJUSTMENT 7 HOW TO FOLD AND MOVE THE TREADMILL 10 MAINTENANCE AND TROUBLE-SHOOTING 12 CONDITIONING GUIDELINES 14 ORDERING REPLACEMENT PARTS Back Cover LIMITED WARRANTY Back Cover Note: A PART LIST and an EXPLODED DRAWING are attached in length. It is not working ...

English Manual
Page 3
...of 35 or persons with pre-existing health problems. Read all parts of the treadmill by an authorized service representative only. 25. Do not attempt to raise, lower, or move the treadmill. 16. Never leave the treadmill unattended while it is intended for longer than the procedures in ...the motor hood unless instructed to order a free replacement decal (see ORDERING REPLACEMENT PARTS on page 5, and HOW TO MOVE 21. This treadmill is running. 15. Do not change the incline of the treadmill every three months. 23. Servicing other than one hour. 18. ICON assumes ...
...of 35 or persons with pre-existing health problems. Read all parts of the treadmill by an authorized service representative only. 25. Do not attempt to raise, lower, or move the treadmill. 16. Never leave the treadmill unattended while it is intended for longer than the procedures in ...the motor hood unless instructed to order a free replacement decal (see ORDERING REPLACEMENT PARTS on page 5, and HOW TO MOVE 21. This treadmill is running. 15. Do not change the incline of the treadmill every three months. 23. Servicing other than one hour. 18. ICON assumes ...
English Manual
Page 4
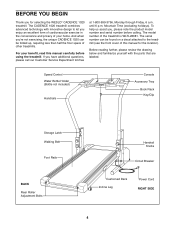
... excellent form of cardiovascular exercise in the convenience and privacy of the treadmill is WLTL28081. If you for the location). The model number of your benefit, read this manual for selecting the WESLO¨ CADENCE 1020 treadmill. until 6 p.m. The CADENCE 1020 treadmill combines advanced technology with the parts that are labeled. Before reading further, please review the drawing below...
... excellent form of cardiovascular exercise in the convenience and privacy of the treadmill is WLTL28081. If you for the location). The model number of your benefit, read this manual for selecting the WESLO¨ CADENCE 1020 treadmill. until 6 p.m. The CADENCE 1020 treadmill combines advanced technology with the parts that are labeled. Before reading further, please review the drawing below...

English Manual
Page 5
...own phillips screwdriver , and scissors . 1. Attach the other Base Leg (44) in assembly step 3; With the help of a second person, carefully raise the treadmill to avoid pulling on the floor. 2. Note: The inset drawing shows how the Latch Bracket (16), Latch Springs (15), Storage Latch (17), and Latch ... the tape from the Latch Bracket and the Latch Spacer. Make sure that the Base Leg Pad (33) is completed. Note that both parts to the treadmill by the Wire Harness (53). Using the included Allen Wrench (81), attach the Base Leg with the four Latch Screws (8). Insert one ...
...own phillips screwdriver , and scissors . 1. Attach the other Base Leg (44) in assembly step 3; With the help of a second person, carefully raise the treadmill to avoid pulling on the floor. 2. Note: The inset drawing shows how the Latch Bracket (16), Latch Springs (15), Storage Latch (17), and Latch ... the tape from the Latch Bracket and the Latch Spacer. Make sure that the Base Leg Pad (33) is completed. Note that both parts to the treadmill by the Wire Harness (53). Using the included Allen Wrench (81), attach the Base Leg with the four Latch Screws (8). Insert one ...

English Manual
Page 6
... Long Screws (2) from the Adhesive Clip (80). Attach a Handrail Cover (63) and the Left Handrail (4) to drawing 5. Make sure that all parts are properly tightened before you use the treadmill. 81 80 6 The Console (11) requires three "AA" batteries (not included); Make sure that both Handrails are on the tab, and then...
... Long Screws (2) from the Adhesive Clip (80). Attach a Handrail Cover (63) and the Left Handrail (4) to drawing 5. Make sure that all parts are properly tightened before you use the treadmill. 81 80 6 The Console (11) requires three "AA" batteries (not included); Make sure that both Handrails are on the tab, and then...

English Manual
Page 14
...the console to PERFORMANCE to five workouts each workout with the proper intensity. For aerobic exercise, adjust the speed and incline of the treadmill until your heart rate is near the middle of your training zone. (See pages 8 and 9.) High Performance Athletic Conditioning If your...rate as needed. This will increase the flexibility of stretching and light exercise. The following three parts: Warming Up Start each week, with 5 to make exercise a regular and enjoyable part of exercise, your everyday life. 14 Note: During the first few minutes of your body ...
...the console to PERFORMANCE to five workouts each workout with the proper intensity. For aerobic exercise, adjust the speed and incline of the treadmill until your heart rate is near the middle of your training zone. (See pages 8 and 9.) High Performance Athletic Conditioning If your...rate as needed. This will increase the flexibility of stretching and light exercise. The following three parts: Warming Up Start each week, with 5 to make exercise a regular and enjoyable part of exercise, your everyday life. 14 Note: During the first few minutes of your body ...

English Manual
Page 18
...WLTL28081). ¥ The NAME of the product (WESLO CADENCE¨ 1020 treadmill). ¥ The SERIAL NUMBER of the product (see the front cover of this manual). ¥ The KEY NUMBER and DESCRIPTION of the desired part(s) (see the PART LIST and the EXPLODED DRAWING at the center of... to you , please be pre-authorized by ICON. ICON is limited in workmanship and material, under this manual). ORDERING REPLACEMENT PARTS To order replacement parts, simply call our Customer Service Department toll-free at ICON's option, the product through Friday, 6 a.m. ICON's obligation under ...
...WLTL28081). ¥ The NAME of the product (WESLO CADENCE¨ 1020 treadmill). ¥ The SERIAL NUMBER of the product (see the front cover of this manual). ¥ The KEY NUMBER and DESCRIPTION of the desired part(s) (see the PART LIST and the EXPLODED DRAWING at the center of... to you , please be pre-authorized by ICON. ICON is limited in workmanship and material, under this manual). ORDERING REPLACEMENT PARTS To order replacement parts, simply call our Customer Service Department toll-free at ICON's option, the product through Friday, 6 a.m. ICON's obligation under ...


