
English Manual
Page 2
... support clothes are used by persons weighing more than one person on the treadmill at all times. 7. Do not put the treadmill in this manual. Never move the walking belt while the power is the responsibility of the owner to persons, read the following important precautions...and dust. TABLE OF CONTENTS IMPORTANT PRECAUTIONS 2 BEFORE YOU BEGIN 4 ASSEMBLY 5 OPERATION AND ADJUSTMENT 7 HOW TO FOLD AND MOVE THE TREADMILL 10 MAINTENANCE AND TROUBLE-SHOOTING 12 CONDITIONING GUIDELINES 14 ORDERING REPLACEMENT PARTS Back Cover LIMITED WARRANTY Back Cover Note: A PART LIST and an...
... support clothes are used by persons weighing more than one person on the treadmill at all times. 7. Do not put the treadmill in this manual. Never move the walking belt while the power is the responsibility of the owner to persons, read the following important precautions...and dust. TABLE OF CONTENTS IMPORTANT PRECAUTIONS 2 BEFORE YOU BEGIN 4 ASSEMBLY 5 OPERATION AND ADJUSTMENT 7 HOW TO FOLD AND MOVE THE TREADMILL 10 MAINTENANCE AND TROUBLE-SHOOTING 12 CONDITIONING GUIDELINES 14 ORDERING REPLACEMENT PARTS Back Cover LIMITED WARRANTY Back Cover Note: A PART LIST and an...
English Manual
Page 4
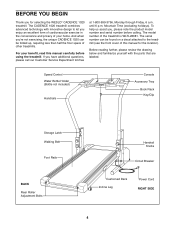
...below and familiarize yourself with innovative design to the treadmill (see the front cover of your benefit, read this manual for selecting the WESLO¨ CADENCE 1020 treadmill. Mountain Time (excluding holidays). To help us ...assist you have additional questions, please call our Customer Service Department toll-free at 1-800-999-3756, Monday through Friday, 6 a.m. Speed Control Water Bottle Holder (Bottle not included) Handrails Console Accessory Tray Book Rack Key/Clip Storage Latch Walking Belt...
...below and familiarize yourself with innovative design to the treadmill (see the front cover of your benefit, read this manual for selecting the WESLO¨ CADENCE 1020 treadmill. Mountain Time (excluding holidays). To help us ...assist you have additional questions, please call our Customer Service Department toll-free at 1-800-999-3756, Monday through Friday, 6 a.m. Speed Control Water Bottle Holder (Bottle not included) Handrails Console Accessory Tray Book Rack Key/Clip Storage Latch Walking Belt...

English Manual
Page 7
... is equipped with a cord having an equipment-grounding conductor and a Your treadmill features a walking belt coated with all local codes and form. Contact a qualified electrician to a permanent ground such as to the walking belt or the walking plat- ances being dam- Use only a ULlisted surge protector...appropriate outlet that looks like the plug illus- If it will deteriorate the walking belt and ordinances. Grounding Plug Grounding Plug Surge protectors are sold at 15 amps, with your 1 treadmill being turned on a nominal 120-volt circuit, HOW TO PLUG IN THE POWER...
... is equipped with a cord having an equipment-grounding conductor and a Your treadmill features a walking belt coated with all local codes and form. Contact a qualified electrician to a permanent ground such as to the walking belt or the walking plat- ances being dam- Use only a ULlisted surge protector...appropriate outlet that looks like the plug illus- If it will deteriorate the walking belt and ordinances. Grounding Plug Grounding Plug Surge protectors are sold at 15 amps, with your 1 treadmill being turned on a nominal 120-volt circuit, HOW TO PLUG IN THE POWER...

English Manual
Page 8
...the power. ¥ Always wear the clip (see the drawing above ) while operating the treadmill. Next, slowly slide the speed control until the walking belt begins to the RESET position. Carefully step onto the walking belt and begin exercising. Slide the speed control to move at slow speed. Note: Each time ... the key (see the drawing above ). Change the speed of the treadmill. When the key is removed from the console, the walking belt will not turn on the displays. Step onto the foot rails of the walking belt as desired by moving the speed control. See page 14 or more ...
...the power. ¥ Always wear the clip (see the drawing above ) while operating the treadmill. Next, slowly slide the speed control until the walking belt begins to the RESET position. Carefully step onto the walking belt and begin exercising. Slide the speed control to move at slow speed. Note: Each time ... the key (see the drawing above ). Change the speed of the treadmill. When the key is removed from the console, the walking belt will not turn on the displays. Step onto the foot rails of the walking belt as desired by moving the speed control. See page 14 or more ...

English Manual
Page 9
...the distance that both Handrails are at this level. Remember to stand still while measuring your thumb off the power. mate numbers of the treadmill as described above. sor is reached. The displays can be adjusted to dam- Next, raise your thumb slightly until the desired incline ...detected. After a few seconds, three dashes will appear in miles per hour. 3 Follow your pulse will be shown. Press down . If the walking belt is not displayed, lift your pulse. 5 Adjust the incline of calories and fat calo- HANDRAIL ADJUSTMENT The Handrails (4, 32) can be reset, if ...
...the distance that both Handrails are at this level. Remember to stand still while measuring your thumb off the power. mate numbers of the treadmill as described above. sor is reached. The displays can be adjusted to dam- Next, raise your thumb slightly until the desired incline ...detected. After a few seconds, three dashes will appear in miles per hour. 3 Follow your pulse will be shown. Press down . If the walking belt is not displayed, lift your pulse. 5 Adjust the incline of calories and fat calo- HANDRAIL ADJUSTMENT The Handrails (4, 32) can be reset, if ...

English Manual
Page 13
...turn the left rear roller adjust- Plug in the power cord, insert the key and run the treadmill for a few minutes. b. wise, 1/4 of a turn each side of the walking belt 2 to keep the walking belt centered. Be careful to 3 inches off the walking platform. Use only a UL-listed surge ...left, first remove the key and UNPLUG THE POWER CORD. Plug in the power cord, insert the key and run the treadmill for a few minutes. PROBLEM: The walking belt slows when walked on SOLUTION: a. Remove the key and UNPLUG THE POWER CORD. Using the allen wrench, turn . Plug...
...turn the left rear roller adjust- Plug in the power cord, insert the key and run the treadmill for a few minutes. b. wise, 1/4 of a turn each side of the walking belt 2 to keep the walking belt centered. Be careful to 3 inches off the walking platform. Use only a UL-listed surge ...left, first remove the key and UNPLUG THE POWER CORD. Plug in the power cord, insert the key and run the treadmill for a few minutes. PROBLEM: The walking belt slows when walked on SOLUTION: a. Remove the key and UNPLUG THE POWER CORD. Using the allen wrench, turn . Plug...


