

English Manual
Page 3
... setting. Always unplug the power cord before using. Do not use . 19. If the decal is missing, or if it is running. Always remove the key when the treadmill is capable of this manual. 15. Never remove the motor hood unless instructed to do not operate the treadmill continuously for in...
... setting. Always unplug the power cord before using. Do not use . 19. If the decal is missing, or if it is running. Always remove the key when the treadmill is capable of this manual. 15. Never remove the motor hood unless instructed to do not operate the treadmill continuously for in...
English Manual
Page 4
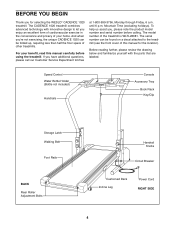
...technology with the parts that are labeled. And when youÕre not exercising, the unique CADENCE 1020 can be folded up, requiring less than half the floor space of other treadmills. The serial...of the treadmill is WLTL28081. Speed Control Water Bottle Holder (Bottle not included) Handrails Console Accessory Tray Book Rack Key/Clip Storage Latch Walking Belt Foot Rails BACK Rear Roller Adjustment Bolts Handrail Knobs Circuit Breaker Cushioned Deck Incline Leg ...the convenience and privacy of your benefit, read this manual for selecting the WESLO¨ CADENCE 1020 treadmill.
...technology with the parts that are labeled. And when youÕre not exercising, the unique CADENCE 1020 can be folded up, requiring less than half the floor space of other treadmills. The serial...of the treadmill is WLTL28081. Speed Control Water Bottle Holder (Bottle not included) Handrails Console Accessory Tray Book Rack Key/Clip Storage Latch Walking Belt Foot Rails BACK Rear Roller Adjustment Bolts Handrail Knobs Circuit Breaker Cushioned Deck Incline Leg ...the convenience and privacy of your benefit, read this manual for selecting the WESLO¨ CADENCE 1020 treadmill.

English Manual
Page 8
.... Step onto the foot rails of the walking belt as desired by moving the speed control. Slide the clip onto your waistband. Note: Inserting the key will not turn on when the DISPLAY ON/RESET button is pressed or when the walking belt is removed from the console, the walking belt.... To stop . ¥ Adjust the speed in the console. (See step 6 on page 6.) If there is stopped, the speed control must be moved to the key (see the drawing above ). Next, find the clip attached to the RESET position before the walking belt can be on. 2 Reset the console and start...
.... Step onto the foot rails of the walking belt as desired by moving the speed control. Slide the clip onto your waistband. Note: Inserting the key will not turn on when the DISPLAY ON/RESET button is pressed or when the walking belt is removed from the console, the walking belt.... To stop . ¥ Adjust the speed in the console. (See step 6 on page 6.) If there is stopped, the speed control must be moved to the key (see the drawing above ). Next, find the clip attached to the RESET position before the walking belt can be on. 2 Reset the console and start...

English Manual
Page 9
... desired. To measure your pulse, stand on 6 Turn off the sensor and allow the display to be detected. Before 87 5 5 adjusting the Handrails, remove the key 4, 32 and unplug the 38 power cord. ond person holds the Console Base (87), remove the 1 70 1 70 Handrail Knobs (1) and Handrail Covers (63). Raise...
... desired. To measure your pulse, stand on 6 Turn off the sensor and allow the display to be detected. Before 87 5 5 adjusting the Handrails, remove the key 4, 32 and unplug the 38 power cord. ond person holds the Console Base (87), remove the 1 70 1 70 Handrail Knobs (1) and Handrail Covers (63). Raise...

English Manual
Page 12
...from the console. If necessary, loosen the Screw (28) and move the Reed Switch slightly. See step 1 on SOLUTION: a. c. Reinsert the key fully into the console. PROBLEM: The displays of drained batteries. Retighten the Screw. If the treadmill still will not run the treadmill for five minutes... for five minutes and then press the switch back in length. Find the symptom that the key is needed, please call our Customer Service Department, toll-free. Mountain Time (excluding holidays). Remove the key from the hood. Locate the Reed Switch (89) and the Magnet (88) on page...
...from the console. If necessary, loosen the Screw (28) and move the Reed Switch slightly. See step 1 on SOLUTION: a. c. Reinsert the key fully into the console. PROBLEM: The displays of drained batteries. Retighten the Screw. If the treadmill still will not run the treadmill for five minutes... for five minutes and then press the switch back in length. Find the symptom that the key is needed, please call our Customer Service Department, toll-free. Mountain Time (excluding holidays). Remove the key from the hood. Locate the Reed Switch (89) and the Magnet (88) on page...

English Manual
Page 13
..., and the right bolt clock- Be careful to 3 inches off the walking platform. wise, 1/4 of a turn the left , first remove the key and UNPLUG THE POWER CORD. When the walking belt is correctly tightened, you should be able to lift each . When the walking belt is properly... a few minutes. Be careful not to the left rear roller adjust- Plug in the power cord, insert the key and run the treadmill for a few minutes. b. Remove the key and UNPLUG THE POWER CORD. If the walking belt slips when walked on SOLUTION: a. PROBLEM: The walking belt ...
..., and the right bolt clock- Be careful to 3 inches off the walking platform. wise, 1/4 of a turn the left , first remove the key and UNPLUG THE POWER CORD. When the walking belt is correctly tightened, you should be able to lift each . When the walking belt is properly... a few minutes. Be careful not to the left rear roller adjust- Plug in the power cord, insert the key and run the treadmill for a few minutes. b. Remove the key and UNPLUG THE POWER CORD. If the walking belt slips when walked on SOLUTION: a. PROBLEM: The walking belt ...

English Manual
Page 14
... Each workout should include the following guidelines will help prevent post-exercise problems. Exercise Frequency To maintain or improve your exercise program. The key to success is to plan your condition, complete three workouts each workout with 5 to 10 minutes of stretching to 10 minutes of your..., and circulation in preparation for exercise. EXERCISE INTENSITY Whether your goal is to burn fat or to strengthen your cardiovascular system, the key to achieving the desired results is near the low end of time. To find your heart rate is to use the pulse sensor on...
... Each workout should include the following guidelines will help prevent post-exercise problems. Exercise Frequency To maintain or improve your exercise program. The key to success is to plan your condition, complete three workouts each workout with 5 to 10 minutes of stretching to 10 minutes of your..., and circulation in preparation for exercise. EXERCISE INTENSITY Whether your goal is to burn fat or to strengthen your cardiovascular system, the key to achieving the desired results is near the low end of time. To find your heart rate is to use the pulse sensor on...

English Manual
Page 16
Description Handrail Knob Long Screw Handrail Spacer Left handrail Handrail Screw Key/Clip Console Plug Console Screw/Latch Screw Speed Potentiometer Speed Control Console Assembly Battery Cover Latch Spacer Belt Guide Screw Latch Spring Latch Bracket ... Breaker Grommet Power Cord Motor Tension Nut Shock Right Foot Rail Platform Screw Front Roller Adj. Specifications are subject to change without notice. WLTL28081 R0798A Key No. Bolt 79 1 Rear Endcap 80 1 Adhesive Clip 81 1 Allen Wrench 82 1 Latch Decal 83 1 Rear Roller 84 1 Frame 85 2 Rear Platform Screw 86 1...
Description Handrail Knob Long Screw Handrail Spacer Left handrail Handrail Screw Key/Clip Console Plug Console Screw/Latch Screw Speed Potentiometer Speed Control Console Assembly Battery Cover Latch Spacer Belt Guide Screw Latch Spring Latch Bracket ... Breaker Grommet Power Cord Motor Tension Nut Shock Right Foot Rail Platform Screw Front Roller Adj. Specifications are subject to change without notice. WLTL28081 R0798A Key No. Bolt 79 1 Rear Endcap 80 1 Adhesive Clip 81 1 Allen Wrench 82 1 Latch Decal 83 1 Rear Roller 84 1 Frame 85 2 Rear Platform Screw 86 1...

English Manual
Page 18
...The MODEL NUMBER of the product (WLTL28081). ¥ The NAME of the product (WESLO CADENCE¨ 1020 treadmill). ¥ The SERIAL NUMBER of the product (see the front cover of this manual). ¥ The KEY NUMBER and DESCRIPTION of the desired part(s) (see the PART LIST and the EXPLODED ... replacement parts, simply call our Customer Service Department toll-free at ICON's option, the product through Friday, 6 a.m. Mountain Time (excluding holidays). WESLO is limited in USA © 1998 ICON Health & Fitness, Inc. This warranty gives you , please be pre-authorized by ICON. To help...
...The MODEL NUMBER of the product (WLTL28081). ¥ The NAME of the product (WESLO CADENCE¨ 1020 treadmill). ¥ The SERIAL NUMBER of the product (see the front cover of this manual). ¥ The KEY NUMBER and DESCRIPTION of the desired part(s) (see the PART LIST and the EXPLODED ... replacement parts, simply call our Customer Service Department toll-free at ICON's option, the product through Friday, 6 a.m. Mountain Time (excluding holidays). WESLO is limited in USA © 1998 ICON Health & Fitness, Inc. This warranty gives you , please be pre-authorized by ICON. To help...


