

User Manual
Page 2
...a level surface, with bar6 feet, wearing only stockings, or in sandals. 2.r:Use.the treadmill only as described. 3. Never move the walking belt whilst the power is being administered 6. Adjust the sPeed in ipeed. 2 TABLE OF CONTENTS IMPORTANT PRECAUTIONS BEFORE YOU BEGIN ASSEMBLY OPERATION AND ADJUSTMENT ... fitted,to the fuseiar- The treadmill should be used or wheraOxygen is turned "off. Never allow more than one person on the walking belt. When connecting the power cord see,kip, TO PLUG 1N THE POWER CORD on the same circuit 4. Always hold the' handrails whilst ...
...a level surface, with bar6 feet, wearing only stockings, or in sandals. 2.r:Use.the treadmill only as described. 3. Never move the walking belt whilst the power is being administered 6. Adjust the sPeed in ipeed. 2 TABLE OF CONTENTS IMPORTANT PRECAUTIONS BEFORE YOU BEGIN ASSEMBLY OPERATION AND ADJUSTMENT ... fitted,to the fuseiar- The treadmill should be used or wheraOxygen is turned "off. Never allow more than one person on the walking belt. When connecting the power cord see,kip, TO PLUG 1N THE POWER CORD on the same circuit 4. Always hold the' handrails whilst ...

User Manual
Page 4
...BACK RIGHT SIDE Rear Roller Adjustment Bolt TP2 Incline Leg Cushioned Walking Platform for the location). If you for selecting the WESLO® CADENCE 920 treadmill. To help us assist you enjoy an excellent form of cardiovascular exercise in the convenience and privacy of this manual...up, requiring less than half the floor space of the treadmill is not included) Handrails LEFT SIDE Foot Rails Walking Belt err". The CADENCE 920 treadmill combines advanced technology with the labelled parts. Before reading further, please review the drawing below and familiarise yourself ...
...BACK RIGHT SIDE Rear Roller Adjustment Bolt TP2 Incline Leg Cushioned Walking Platform for the location). If you for selecting the WESLO® CADENCE 920 treadmill. To help us assist you enjoy an excellent form of cardiovascular exercise in the convenience and privacy of this manual...up, requiring less than half the floor space of the treadmill is not included) Handrails LEFT SIDE Foot Rails Walking Belt err". The CADENCE 920 treadmill combines advanced technology with the labelled parts. Before reading further, please review the drawing below and familiarise yourself ...
User Manual
Page 7
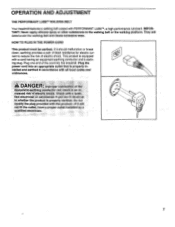
... product is equipped with the product-if it should malfunction or break down, earthing provides a path of least resistance for electric current to the walking belt or the walking platform. They will not fit the outlet, have a proper outlet Installed by a qualified electrician. 7 Plug one end of electric shock. Plug...: Never apply silicone spray or other substances to reduce the risk of the cord into the treadmill. OPERATION AND ADJUSTMENT THE PERFORMANT LUBETm WALKING BELT Your treadmill features a walking belt coated with PERFORMANT LUBETm, a high-performance lubricant.
... product is equipped with the product-if it should malfunction or break down, earthing provides a path of least resistance for electric current to the walking belt or the walking platform. They will not fit the outlet, have a proper outlet Installed by a qualified electrician. 7 Plug one end of electric shock. Plug...: Never apply silicone spray or other substances to reduce the risk of the cord into the treadmill. OPERATION AND ADJUSTMENT THE PERFORMANT LUBETm WALKING BELT Your treadmill features a walking belt coated with PERFORMANT LUBETm, a high-performance lubricant.

User Manual
Page 8
Li CAL/FAT CAL. w... Perim. A CAUTION: Before operating the console, read the following precautions. • Do not stand on the walking belt When turning on the face of clear plastic on the power, • Always wear the clip (see the drawing above) whilst operating the treadmill. BATTERY ... spilling liquids on the console. Press three batteries into the battery compartment, with the negative (-) ends of eteetria shock, keep the console dry. the walking belt will stop. • Adjust the speed in the drawing below.
Li CAL/FAT CAL. w... Perim. A CAUTION: Before operating the console, read the following precautions. • Do not stand on the walking belt When turning on the face of clear plastic on the power, • Always wear the clip (see the drawing above) whilst operating the treadmill. BATTERY ... spilling liquids on the console. Press three batteries into the battery compartment, with the negative (-) ends of eteetria shock, keep the console dry. the walking belt will stop. • Adjust the speed in the drawing below.

User Manual
Page 9
... -I. Change the speed of your progress with the monitor displays. • PULSE/CALJFAT CAL. Slide the clip onto the waistband of the walking belt as desired by pressing the ON/RESET button. 1- LIj• -j C•_1 Reset the speed control. SPEED TRAINING ZONES wise to operate ... to the RESET ,ows" position. Note: Inserting the key will ATION O- • turn it clockwise until the walking belt begins to the RESET position before the walking belt can be on the displays. This display shows the approximate numbers of the treadmill. Note: Each time the walking...
... -I. Change the speed of your progress with the monitor displays. • PULSE/CALJFAT CAL. Slide the clip onto the waistband of the walking belt as desired by pressing the ON/RESET button. 1- LIj• -j C•_1 Reset the speed control. SPEED TRAINING ZONES wise to operate ... to the RESET ,ows" position. Note: Inserting the key will ATION O- • turn it clockwise until the walking belt begins to the RESET position before the walking belt can be on the displays. This display shows the approximate numbers of the treadmill. Note: Each time the walking...

User Manual
Page 10
... the back of the treadmill to reset. ing: If the displayed pulse appears to be necessary to shake the treadmill slightly so that the walking belt is stopped and no console buttons are pressed for about 5%. To lower the back end, first raise it past the highest position, and then ... desired. Raise the back end until it clicks into position. Raise the back end again until it . Step onto the foot rails, stop the walking belt and remove the key. Hold the rear roller cover with it clicks into position. Remember to the pulse sensor. Next, slightly raise your pulse will...
... the back of the treadmill to reset. ing: If the displayed pulse appears to be necessary to shake the treadmill slightly so that the walking belt is stopped and no console buttons are pressed for about 5%. To lower the back end, first raise it past the highest position, and then ... desired. Raise the back end until it clicks into position. Raise the back end again until it . Step onto the foot rails, stop the walking belt and remove the key. Hold the rear roller cover with it clicks into position. Remember to the pulse sensor. Next, slightly raise your pulse will...

User Manual
Page 13
... STORAGE on , please call our Customer Service Department. 5. Plug in the power cord, insert the key and run the tread- If the walking belt has shifted to break in the power cord, insert the key and run the treadmill for a few minutes. 3. SYMPTOM: THE DISPLAYS OF THE ... pad are the result of a turn the left , first remove the key and UNPLUG THE POWER CORD. SYMPTOM: THE WALKING BELT SLOWS WHEN WALKED ON a. b. SYMPTOM: THE WALKING BELT IS OFF-CENTRE WHEN WALKED ON a. Using the alien wrench, b turn . Check the batteries in length. SYMPTOM: THE INCLINE...
... STORAGE on , please call our Customer Service Department. 5. Plug in the power cord, insert the key and run the tread- If the walking belt has shifted to break in the power cord, insert the key and run the treadmill for a few minutes. 3. SYMPTOM: THE DISPLAYS OF THE ... pad are the result of a turn the left , first remove the key and UNPLUG THE POWER CORD. SYMPTOM: THE WALKING BELT SLOWS WHEN WALKED ON a. b. SYMPTOM: THE WALKING BELT IS OFF-CENTRE WHEN WALKED ON a. Using the alien wrench, b turn . Check the batteries in length. SYMPTOM: THE INCLINE...
User Manual
Page 19
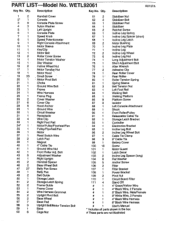
...Key No. PART LIST Model No. Qty. Bolt Adjustment Washer Right Upright Handrail Spacer Base Wheel Bolt Belly Pan Screw Belly Pan Belt Guide Storage Latch Storage Latch Spring Frame Guide Frame Cover Wire Harness Grommet Upright Pivot Bolt Base Wheel Base Pad Upright Bolt/Motor ...Handrail Cover Console Console Plate Screw Nylon Washer Left Upright Console Plate Speed Knob Speed Potentiometer Right Console Attachment Motor Sleeve Key/Clip Motor Belt Roller Cover Screw Motor Tension Washer Star Washer Incline Wheel Nut Motor Tensio,n" Nut Motor Hood Small Screw Motor Pivot Bolt Choke Ground Wire...
...Key No. PART LIST Model No. Qty. Bolt Adjustment Washer Right Upright Handrail Spacer Base Wheel Bolt Belly Pan Screw Belly Pan Belt Guide Storage Latch Storage Latch Spring Frame Guide Frame Cover Wire Harness Grommet Upright Pivot Bolt Base Wheel Base Pad Upright Bolt/Motor ...Handrail Cover Console Console Plate Screw Nylon Washer Left Upright Console Plate Speed Knob Speed Potentiometer Right Console Attachment Motor Sleeve Key/Clip Motor Belt Roller Cover Screw Motor Tension Washer Star Washer Incline Wheel Nut Motor Tensio,n" Nut Motor Hood Small Screw Motor Pivot Bolt Choke Ground Wire...


