

English Manual
Page 3
...Always unplug the power cord before the walking belt begins to the power requirements, no responsibility for both men and women. 5. Weslo assumes no other appliances should be a pause before removing the treadmill motor hood. ,'7. Keep small children away from the treadmill ...a minimum of 8 feet of the treadmill directly into a grounded circuit carrying 12 amps or more. This is moving. 4. mid0011.0 AUTO INCLINE TABLE OF CONTENTS Warranty 2 Safety Precautions 3 Before You Begin 4 Assembly 5 Operation and Adjustment 5 Maintenance and Storage 7 Conditioning Guidelines Exploded Drawing...
...Always unplug the power cord before the walking belt begins to the power requirements, no responsibility for both men and women. 5. Weslo assumes no other appliances should be a pause before removing the treadmill motor hood. ,'7. Keep small children away from the treadmill ...a minimum of 8 feet of the treadmill directly into a grounded circuit carrying 12 amps or more. This is moving. 4. mid0011.0 AUTO INCLINE TABLE OF CONTENTS Warranty 2 Safety Precautions 3 Before You Begin 4 Assembly 5 Operation and Adjustment 5 Maintenance and Storage 7 Conditioning Guidelines Exploded Drawing...

English Manual
Page 4
...your convenience, in Canada 1-800-824-8949) during our regular business hours: Monday - Incline Indicator Console Incline Control Lever Speed Control Knob On/Off Switch Handrail Front Motor Hood Frame Incline Leg Power Cord Left Side 4 Right Side • Back Grip Tape Walking Belt ...program. Basic fitness guidelines are included to the model number (TL8.0), and the serial number (located on /off switch, consolemounted incline control, electronic speed control and microprocessor-based electronic exercise monitor. If you get started with the parts identified. The WEIDER 8.0...
...your convenience, in Canada 1-800-824-8949) during our regular business hours: Monday - Incline Indicator Console Incline Control Lever Speed Control Knob On/Off Switch Handrail Front Motor Hood Frame Incline Leg Power Cord Left Side 4 Right Side • Back Grip Tape Walking Belt ...program. Basic fitness guidelines are included to the model number (TL8.0), and the serial number (located on /off switch, consolemounted incline control, electronic speed control and microprocessor-based electronic exercise monitor. If you get started with the parts identified. The WEIDER 8.0...

English Manual
Page 6
.... When the bubble is at medium speed. Stand beside the treadmill and turn at a time until the bubble in the indicator is at the highest incline. IF THE BELT HAS SHIFTED TO THE RIGHT SIDE: turn the adjustment bolt on the left side clockwise and the adjustment bolt on the right... BELT ADJUSTMENT To prevent damage to the center. Check the spaces between the walking belt and the sides of the treadmill, and pull back the Incline Control Lever. Turn both rear adjustment bolts clockwise an equal amount until the belt moves to the walking belt, always keep your feet on the...
.... When the bubble is at medium speed. Stand beside the treadmill and turn at a time until the bubble in the indicator is at the highest incline. IF THE BELT HAS SHIFTED TO THE RIGHT SIDE: turn the adjustment bolt on the left side clockwise and the adjustment bolt on the right... BELT ADJUSTMENT To prevent damage to the center. Check the spaces between the walking belt and the sides of the treadmill, and pull back the Incline Control Lever. Turn both rear adjustment bolts clockwise an equal amount until the belt moves to the walking belt, always keep your feet on the...
English Manual
Page 11
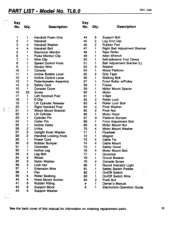
... Washer 4 4 Handrail Bolt 5 1 Electronic Monitor 6 1 Pulse Monitor Clip 7 1 Wire Clip 8 1 Speed Control Knob 9 1 Sensor Wire 10 1 Console 11 1 Incline Bubble Level 12 1 Incline Control Lever 13 1 Potentiometer Assembly 14 2 Safety Card 15 1 Console Cover 16 23 Screw 17 1 Left Handrail Post 18 1 E-Clip 19 1 Lift Cylinder Release...1 Right Handrail Post 21 1 Shock Mount Bracket 22 1 Lift Cylinder 23 1 Cylinder Pin 24 1 Cotter Pin 25 1 Incline Cable 26 2 U-Nut 27 2 Upright Knob Washer 28 2 Handrail Locking Knob 29 1 Power Cord 30 2 Rubber Bumper 31 1 Controller 32...
... Washer 4 4 Handrail Bolt 5 1 Electronic Monitor 6 1 Pulse Monitor Clip 7 1 Wire Clip 8 1 Speed Control Knob 9 1 Sensor Wire 10 1 Console 11 1 Incline Bubble Level 12 1 Incline Control Lever 13 1 Potentiometer Assembly 14 2 Safety Card 15 1 Console Cover 16 23 Screw 17 1 Left Handrail Post 18 1 E-Clip 19 1 Lift Cylinder Release...1 Right Handrail Post 21 1 Shock Mount Bracket 22 1 Lift Cylinder 23 1 Cylinder Pin 24 1 Cotter Pin 25 1 Incline Cable 26 2 U-Nut 27 2 Upright Knob Washer 28 2 Handrail Locking Knob 29 1 Power Cord 30 2 Rubber Bumper 31 1 Controller 32...


