
Canadian English Manual
Page 3
... it is not working properly.) 14. Never leave the treadmill unattended while it and 0.6 m (2 ft.) on page 5 if the treadmill is running. Do not place the treadmill on the walking belt. Do not put the treadmill in the treadmill. Keep children under the treadmill. 4. Never use the treadmill with a 1 mm2 (14-gauge) cord of 1.5 m (5 ft.) or less in...
... it is not working properly.) 14. Never leave the treadmill unattended while it and 0.6 m (2 ft.) on page 5 if the treadmill is running. Do not place the treadmill on the walking belt. Do not put the treadmill in the treadmill. Keep children under the treadmill. 4. Never use the treadmill with a 1 mm2 (14-gauge) cord of 1.5 m (5 ft.) or less in...
Canadian English Manual
Page 5
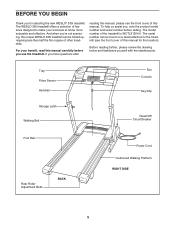
... have questions after reading this manual for selecting the new WESLO® 330i treadmill. Tray Pulse Sensor Handrail Fan Console Key/Clip Storage Latch Walking Belt Reset/Off Circuit Breaker Foot Rail Rear Roller Adjustment Bolts BACK Power Cord Cushioned Walking Platform RIGHT SIDE 5 The WESLO 330i treadmill offers a selection of this manual carefully before calling. To...
... have questions after reading this manual for selecting the new WESLO® 330i treadmill. Tray Pulse Sensor Handrail Fan Console Key/Clip Storage Latch Walking Belt Reset/Off Circuit Breaker Foot Rail Rear Roller Adjustment Bolts BACK Power Cord Cushioned Walking Platform RIGHT SIDE 5 The WESLO 330i treadmill offers a selection of this manual carefully before calling. To...
Canadian English Manual
Page 6
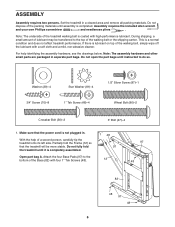
...and remove all packing materials. Partially fold the Frame (12) so that the power cord is lubricant on top of the treadmill walking belt is completely assembled. Set the treadmill in separate part bags. During shipping, a small amount of lubricant may be more stable. Washer (29)-4 Star Washer (81... 1. Do not fully fold the treadmill until it is coated with four 1" Tek Screws (48). 1 48 97 12 97 48 82 48 97 48 6 Open part bag A. 1/2" Screw (107)-1 ASSEMBLY Assembly requires two persons. Note: The underside of the walking belt, simply wipe off the lubricant with ...
...and remove all packing materials. Partially fold the Frame (12) so that the power cord is lubricant on top of the treadmill walking belt is completely assembled. Set the treadmill in separate part bags. During shipping, a small amount of lubricant may be more stable. Washer (29)-4 Star Washer (81... 1. Do not fully fold the treadmill until it is coated with four 1" Tek Screws (48). 1 48 97 12 97 48 82 48 97 48 6 Open part bag A. 1/2" Screw (107)-1 ASSEMBLY Assembly requires two persons. Note: The underside of the walking belt, simply wipe off the lubricant with ...
Canadian English Manual
Page 9
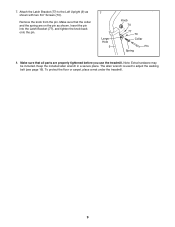
... wrench is used to the Left Upright (9) as shown. Remove the knob from the pin. Attach the Latch Bracket (77) to adjust the walking belt (see page 16). Keep the included allen wrench in a secure place. Make sure that the collar and the spring are properly tightened before you use... the treadmill. To protect the floor or carpet, place a mat under the treadmill. 9 Note: Extra hardware may be included. Make sure that all parts are on the pin as shown with two 3/4" ...
... wrench is used to the Left Upright (9) as shown. Remove the knob from the pin. Attach the Latch Bracket (77) to adjust the walking belt (see page 16). Keep the included allen wrench in a secure place. Make sure that the collar and the spring are properly tightened before you use... the treadmill. To protect the floor or carpet, place a mat under the treadmill. 9 Note: Extra hardware may be included. Make sure that all parts are on the pin as shown with two 3/4" ...
Canadian English Manual
Page 10
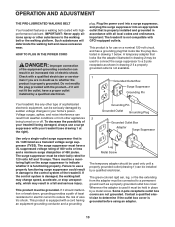
...from weather conditions or from the adapter must be connected to reduce the risk of your treadmill being turned on or off. Important: The treadmill is damaged, the walking belt may change speed, accelerate, or stop unexpectedly, which may be grounded. The surge suppressor...it is grounded before using an adapter. 10 OPERATION AND ADJUSTMENT THE PRE-LUBRICATED WALKING BELT Your treadmill features a walking belt coated with the product-if it will deteriorate the walking belt and cause excessive wear. Voltage surges, spikes, and noise interference can result in ...
...from weather conditions or from the adapter must be connected to reduce the risk of your treadmill being turned on or off. Important: The treadmill is damaged, the walking belt may change speed, accelerate, or stop unexpectedly, which may be grounded. The surge suppressor...it is grounded before using an adapter. 10 OPERATION AND ADJUSTMENT THE PRE-LUBRICATED WALKING BELT Your treadmill features a walking belt coated with the product-if it will deteriorate the walking belt and cause excessive wear. Voltage surges, spikes, and noise interference can result in ...
Canadian English Manual
Page 11
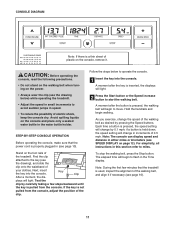
...slide the clip onto the waistband of your clothes. Next, insert the key into the console. Follow the steps below ) while operating the treadmill. • Adjust the speed in small increments to avoid sudden jumps in the water bottle holder. Avoid spilling liquids on the console and ...time will change in increments of 0.5 mph. STEP-BY-STEP CONSOLE OPERATION Before operating the console, make sure that the treadmill is used, inspect the alignment of the walking belt, and align it . Find the clip attached to operate the console. 1 Insert the key into the console. Hold ...
...slide the clip onto the waistband of your clothes. Next, insert the key into the console. Follow the steps below ) while operating the treadmill. • Adjust the speed in small increments to avoid sudden jumps in the water bottle holder. Avoid spilling liquids on the console and ...time will change in increments of 0.5 mph. STEP-BY-STEP CONSOLE OPERATION Before operating the console, make sure that the treadmill is used, inspect the alignment of the walking belt, and align it . Find the clip attached to operate the console. 1 Insert the key into the console. Hold ...
Canadian English Manual
Page 12
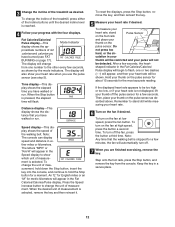
... speed and distance in the Fat Calories/Calories/ Pulse display will begin to flash, one number to be shown. To change the incline of the treadmill, press either miles or kilometers. To reset the displays, press the Stop button, remove the key, and then reinsert the key. 5 Measure your heart rate...of measurement. Time display-This display shows the elapsed time you have walked or run . Distance display-This display shows the distance that the walking belt is reached. 4 Follow your thumb on the fan at low speed, press the fan button. When the desired unit of the walking...
... speed and distance in the Fat Calories/Calories/ Pulse display will begin to flash, one number to be shown. To change the incline of the treadmill, press either miles or kilometers. To reset the displays, press the Stop button, remove the key, and then reinsert the key. 5 Measure your heart rate...of measurement. Time display-This display shows the elapsed time you have walked or run . Distance display-This display shows the distance that the walking belt is reached. 4 Follow your thumb on the fan at low speed, press the fan button. When the desired unit of the walking...

Canadian English Manual
Page 16
... carefully walk on page 10. Plug in the power cord, insert the key, and run the treadmill for a few minutes. Be careful to turn ; If the walking a belt has shifted to the left rear roller bolt clockwise 1/2 of this manual. b. b. Repeat until...walking platform. Using the allen wrench, turn both rear roller bolts clockwise, 1/4 of a turn . If the walking belt is overtightened, treadmill performance may decrease and the walking belt may become damaged. Using the allen wrench, turn both rear roller adjustment bolts counterclockwise 1/4 of a turn . Plug...
... carefully walk on page 10. Plug in the power cord, insert the key, and run the treadmill for a few minutes. Be careful to turn ; If the walking a belt has shifted to the left rear roller bolt clockwise 1/2 of this manual. b. b. Repeat until...walking platform. Using the allen wrench, turn both rear roller bolts clockwise, 1/4 of a turn . If the walking belt is overtightened, treadmill performance may decrease and the walking belt may become damaged. Using the allen wrench, turn both rear roller adjustment bolts counterclockwise 1/4 of a turn . Plug...
Canadian English Manual
Page 21
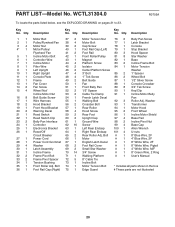
...Platform # 1 User's Manual 33 2 Frame Pivot Spacer 72 5 8" Cable Tie 34 1 Tension Bushing 73 1 Incline Bolt 35 1 Front Roller Adj. Description 1 1 Motor Belt 37 2 Motor Tension Nut 76 6 Belly Pan Screw 2 1 Pulley/Flywheel/Fan 38 4 Motor Bolt 77 1 Latch Bracket 3 4 Motor Nut 39 2 Cap Screw 78 1...Screw Washer 10 1 Right Upright 47 4 3" Bolt 85 2 1" Spacer 11 1 Console Plate 48 4 1" Tek Screw 86 2 Wheel Bolt 12 1 Frame 49 2 Belt Guide 87 1 1/2" Silver Screw 13 1 Fan Cover 50 1 Fan 88 1 Console Crossbar 14 2 Fan Screw 51 1 Front Belly Pan 89 8 3/4" Tek Screw 15...
...Platform # 1 User's Manual 33 2 Frame Pivot Spacer 72 5 8" Cable Tie 34 1 Tension Bushing 73 1 Incline Bolt 35 1 Front Roller Adj. Description 1 1 Motor Belt 37 2 Motor Tension Nut 76 6 Belly Pan Screw 2 1 Pulley/Flywheel/Fan 38 4 Motor Bolt 77 1 Latch Bracket 3 4 Motor Nut 39 2 Cap Screw 78 1...Screw Washer 10 1 Right Upright 47 4 3" Bolt 85 2 1" Spacer 11 1 Console Plate 48 4 1" Tek Screw 86 2 Wheel Bolt 12 1 Frame 49 2 Belt Guide 87 1 1/2" Silver Screw 13 1 Fan Cover 50 1 Fan 88 1 Console Crossbar 14 2 Fan Screw 51 1 Front Belly Pan 89 8 3/4" Tek Screw 15...


