
Owner Manual
Page 2
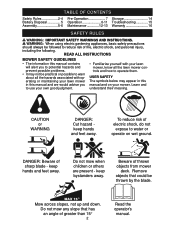
.... WARNING: When using electric gardening appliances, basic safety precautions should always be thrown by the blade. TABLE OF CONTENTS Safety Rules 2-4 Pre-Operation 7 Storage 14 Battery Disposal 5 Operation 8-11 Troubleshooting 15 Assembly 5-6 Maintenance 12-13 Warranty 16 SAFETY RULES WARNING: IMPORTANT SAFETY WARNINGS AND INSTRUCTIONS. DANGER: Beware of fire, electric...
.... WARNING: When using electric gardening appliances, basic safety precautions should always be thrown by the blade. TABLE OF CONTENTS Safety Rules 2-4 Pre-Operation 7 Storage 14 Battery Disposal 5 Operation 8-11 Troubleshooting 15 Assembly 5-6 Maintenance 12-13 Warranty 16 SAFETY RULES WARNING: IMPORTANT SAFETY WARNINGS AND INSTRUCTIONS. DANGER: Beware of fire, electric...
Owner Manual
Page 4
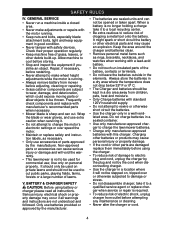
...closed area. • Never make wheel height adjustments while the motor is required. • To reduce risk of dropping a metal tool onto the battery. Frequently check components and replace with manufacturer's recommended parts when necessary. • Mower blade is sharp and can cause serious injury or damage and ...will not be used for commercial use batteries provided or approved by the manufacturer. It should only be used on private lawns and should be used to rewire or otherwise short ...
...closed area. • Never make wheel height adjustments while the motor is required. • To reduce risk of dropping a metal tool onto the battery. Frequently check components and replace with manufacturer's recommended parts when necessary. • Mower blade is sharp and can cause serious injury or damage and ...will not be used for commercial use batteries provided or approved by the manufacturer. It should only be used on private lawns and should be used to rewire or otherwise short ...

Owner Manual
Page 5
... and do not swallow it and replace with heavy-duty adhesive tape. • DO NOT attempt to remove or destroy any of the battery pack components. • DO NOT attempt to raise the handle into the handle mounting bracket. • Align the holes between the upper...certain the lower handle is seated securely into the operating position. Always wear gloves or other protection when working under housing. Dispose of batteries according to local by the American National Standards Institute and Consumer Products Safety Commission. WARNING: All toxic materials must be between the upper...
... and do not swallow it and replace with heavy-duty adhesive tape. • DO NOT attempt to remove or destroy any of the battery pack components. • DO NOT attempt to raise the handle into the handle mounting bracket. • Align the holes between the upper...certain the lower handle is seated securely into the operating position. Always wear gloves or other protection when working under housing. Dispose of batteries according to local by the American National Standards Institute and Consumer Products Safety Commission. WARNING: All toxic materials must be between the upper...
Owner Manual
Page 6
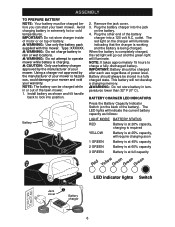
...the lawn mower. 1. Battery 2. The red light on the battery. 4. Battery should be charged after each use battery charger approved by the manufacturer of the battery). WARNING: Do not store battery in extremely hot or cold temperatures. Type: XXXXXX. Install battery as follows: LIGHT MODE BATTERY STATUS RED Battery is at 20% capacity,...charged, the red light will go out and the green light will illuminate indicating that the charger is working and the battery is hazardous, could damage your mower and void your warranty. IMPORTANT: Do not store charger inside of motor or on...
...the lawn mower. 1. Battery 2. The red light on the battery. 4. Battery should be charged after each use battery charger approved by the manufacturer of the battery). WARNING: Do not store battery in extremely hot or cold temperatures. Type: XXXXXX. Install battery as follows: LIGHT MODE BATTERY STATUS RED Battery is at 20% capacity,...charged, the red light will go out and the green light will illuminate indicating that the charger is working and the battery is hazardous, could damage your mower and void your warranty. IMPORTANT: Do not store charger inside of motor or on...
Owner Manual
Page 7
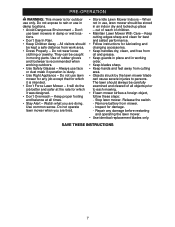
.... Keep cutting edges sharp and clean for best and safest performance. • Follow instructions for which it is intended. • Don't Force Lawn Mower - Remove battery from oil and grease. • Keep guards in place and in moving parts. Repair any job except that for lubricating and changing accessories. • Keep...
.... Keep cutting edges sharp and clean for best and safest performance. • Follow instructions for which it is intended. • Don't Force Lawn Mower - Remove battery from oil and grease. • Keep guards in place and in moving parts. Repair any job except that for lubricating and changing accessories. • Keep...
Owner Manual
Page 8
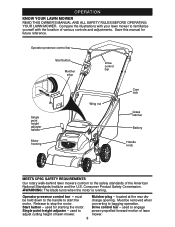
... MOWER. Operator presence control bar Start button Mulcher plug Drive control bar Single point height adjuster handle Motor housing Wing nut Cam lock Grass catcher Battery Handle knob MEETS CPSC SAFETY REQUIREMENTS Our rotary walk-behind lawn mowers conform to the safety standards of lawn mower. 8 Mulcher plug - Release to familiarize...
... MOWER. Operator presence control bar Start button Mulcher plug Drive control bar Single point height adjuster handle Motor housing Wing nut Cam lock Grass catcher Battery Handle knob MEETS CPSC SAFETY REQUIREMENTS Our rotary walk-behind lawn mowers conform to the safety standards of lawn mower. 8 Mulcher plug - Release to familiarize...
Owner Manual
Page 12
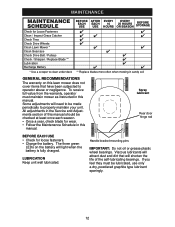
...Grass Catcher Check Tires Check Drive Wheels Clean Lawn Mower * Clean Gearcase Check Drive Belt / Pulleys Check / Sharpen / Replace Blade ** Lubrication Recharge Battery * Use a scraper to clean under deck BEFORE EACH USE AFTER EACH USE EVERY 10 HOURS EVERY 25 HOURS OR SEASON BEFORE STORAGE ** Replace ... manual should be checked at least once each season. • Once a year, check blade for loose fasteners. • Charge the battery. Handle bracket mounting pins IMPORTANT: Do not oil or grease plastic wheel bearings. Viscous lubricants will attract dust and dirt that have been ...
...Grass Catcher Check Tires Check Drive Wheels Clean Lawn Mower * Clean Gearcase Check Drive Belt / Pulleys Check / Sharpen / Replace Blade ** Lubrication Recharge Battery * Use a scraper to clean under deck BEFORE EACH USE AFTER EACH USE EVERY 10 HOURS EVERY 25 HOURS OR SEASON BEFORE STORAGE ** Replace ... manual should be checked at least once each season. • Once a year, check blade for loose fasteners. • Charge the battery. Handle bracket mounting pins IMPORTANT: Do not oil or grease plastic wheel bearings. Viscous lubricants will attract dust and dirt that have been ...
Owner Manual
Page 13
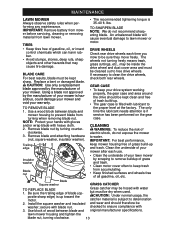
IMPORTANT: Remove battery from mower before servicing, cleaning or removing material from turning when removing blade nut. Replace a bent or damaged blade. TO REMOVE BLADE 1. IMPORTANT: For best ...
IMPORTANT: Remove battery from mower before servicing, cleaning or removing material from turning when removing blade nut. Replace a bent or damaged blade. TO REMOVE BLADE 1. IMPORTANT: For best ...
Owner Manual
Page 14
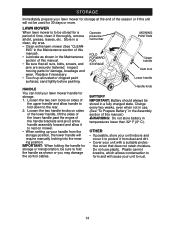
... unit indoors and cover it to fold the handle as shown in the Maintenance section of this manual.) WARNING: Do not store battery in a fully charged state. Handle knob BATTERY IMPORTANT: Battery should always be stored for 30 days or more. Plastic cannot breathe, which allows condensation to form and will cause your...; When setting up all rusted or chipped paint surfaces; Charge every two weeks, even when not in use plastic. Do not use . (See "To Prepare Battery" in a clean, dry area. • Clean entire lawn mower (See "CLEAN-
... unit indoors and cover it to fold the handle as shown in the Maintenance section of this manual.) WARNING: Do not store battery in a fully charged state. Handle knob BATTERY IMPORTANT: Battery should always be stored for 30 days or more. Plastic cannot breathe, which allows condensation to form and will cause your...; When setting up all rusted or chipped paint surfaces; Charge every two weeks, even when not in use plastic. Do not use . (See "To Prepare Battery" in a clean, dry area. • Clean entire lawn mower (See "CLEAN-

Owner Manual
Page 15
...wheel height is too low. 2. Grass catcher too full. 4. Start button not depressed. 2. Loose blade or broken blade adapter. 5. Remove battery and charge. 4. Replace operator presence control bar. 1. Buildup of mower housing. 3. Replace blade. Lift on blade worn off of power Poor... mower. 3. Cut at slower walking speed. 1. Clean underside of grass, leaves and trash under mower. 4. Tighten blade bolt. 1. Remove battery and charge. 1. Handle height position not right for you. 1. Check/replace drive belt. 2. TROUBLESHOOTING PROBLEM Does not start Loss of pulley....
...wheel height is too low. 2. Grass catcher too full. 4. Start button not depressed. 2. Loose blade or broken blade adapter. 5. Remove battery and charge. 4. Replace operator presence control bar. 1. Buildup of mower housing. 3. Replace blade. Lift on blade worn off of power Poor... mower. 3. Cut at slower walking speed. 1. Clean underside of grass, leaves and trash under mower. 4. Tighten blade bolt. 1. Remove battery and charge. 1. Handle height position not right for you. 1. Check/replace drive belt. 2. TROUBLESHOOTING PROBLEM Does not start Loss of pulley....
Owner Manual
Page 16
... Excluded from this Warranty are the responsibility of ownership. Transportation charges for the movement of any battery which we will exchange the Battery, charging you . Battery must return the product to an authorized service dealer. This Warranty is requested by the original ...64257;ned in replacing parts, any unanswered questions concerning this Warranty, contact: Weed Eater Customer Service Department 9335 Harris Corners Parkway Charlotte, NC 28269 USA In Canada contact: Weed Eater Customer Service Department 5855 Terry Fox Way Mississauga, Ontario L5V 3E4 giving the ...
... Excluded from this Warranty are the responsibility of ownership. Transportation charges for the movement of any battery which we will exchange the Battery, charging you . Battery must return the product to an authorized service dealer. This Warranty is requested by the original ...64257;ned in replacing parts, any unanswered questions concerning this Warranty, contact: Weed Eater Customer Service Department 9335 Harris Corners Parkway Charlotte, NC 28269 USA In Canada contact: Weed Eater Customer Service Department 5855 Terry Fox Way Mississauga, Ontario L5V 3E4 giving the ...


