User Manual
Page 1
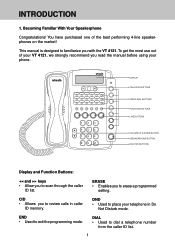
...; Used to erase a programmed setting. END • Used to dial a telephone number from the caller ID list. 1 This manual is designed to familiarize you to place your phone. To get the most use out of the best performing 4-line speakerphones on the market! You have purchased one of your VT... 4121, we strongly recommend you read the manual before using your telephone in caller ID memory. ERASE •...
...; Used to erase a programmed setting. END • Used to dial a telephone number from the caller ID list. 1 This manual is designed to familiarize you to place your phone. To get the most use out of the best performing 4-line speakerphones on the market! You have purchased one of your VT... 4121, we strongly recommend you read the manual before using your telephone in caller ID memory. ERASE •...
User Manual
Page 5
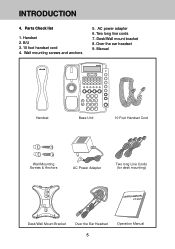
Parts Check list 1. Wall mounting screws and anchors 5. Desk/Wall mount bracket 8. Over the ear headset 9. Two long line cords 7. B/U 3. 10 foot handset cord 4. Manual Handset Base Unit 10 Foot Handset Cord Wall Mounting Screws & Anchors AC Power Adapter Two long Line Cords (for desk mounting) USER'S MANUAL VT 4121 Desk/Wall Mount Bracket Over the Ear Headset 5 Operation Manual Handset 2. AC power adapter 6. INTRODUCTION 4.
Parts Check list 1. Wall mounting screws and anchors 5. Desk/Wall mount bracket 8. Over the ear headset 9. Two long line cords 7. B/U 3. 10 foot handset cord 4. Manual Handset Base Unit 10 Foot Handset Cord Wall Mounting Screws & Anchors AC Power Adapter Two long Line Cords (for desk mounting) USER'S MANUAL VT 4121 Desk/Wall Mount Bracket Over the Ear Headset 5 Operation Manual Handset 2. AC power adapter 6. INTRODUCTION 4.
User Manual
Page 11
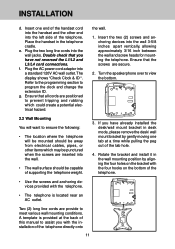
...telephone. • Use the screws and anchoring devices provided with the installation of this manual to prevent tripping and rubbing which could create a potential electrical hazard. Ensure that all cords are inserted into the wall. • The wall surface should be away from electrical...various wall mounting conditions. If you have already installed the desk/wall mount bracket in the telephone cradle. f. Plug the AC power cord adaptor into the wall jacks. INSTALLATION d. e. g. the wall. 1. Double check that the screws are provide to program the clock ...
...telephone. • Use the screws and anchoring devices provided with the installation of this manual to prevent tripping and rubbing which could create a potential electrical hazard. Ensure that all cords are inserted into the wall. • The wall surface should be away from electrical...various wall mounting conditions. If you have already installed the desk/wall mount bracket in the telephone cradle. f. Plug the AC power cord adaptor into the wall jacks. INSTALLATION d. e. g. the wall. 1. Double check that the screws are provide to program the clock ...

User Manual
Page 27
...You may use the Pause feature to access certain banking and long distance services. Dial the new telephone number or service code. 22. During manual dialing, you have Au- Dial the numbers prior to answer the page. Press SPEAKER (If you can use Flash instead of pressing the... a delay in the system, the extension telephone will automatically select a line-proceed to create a longer delay. While the telephone is 3 seconds. BASIC OPERATION 19.5 Receiving a Voice Page to the idle mode. 21. The display will dial the number. Dial the remaining number after about 15 seconds, it ...
...You may use the Pause feature to access certain banking and long distance services. Dial the new telephone number or service code. 22. During manual dialing, you have Au- Dial the numbers prior to answer the page. Press SPEAKER (If you can use Flash instead of pressing the... a delay in the system, the extension telephone will automatically select a line-proceed to create a longer delay. While the telephone is 3 seconds. BASIC OPERATION 19.5 Receiving a Voice Page to the idle mode. 21. The display will dial the number. Dial the remaining number after about 15 seconds, it ...

User Manual
Page 29
Follow your service, provider to see if FSK signaling is available. BASIC OPERATION 3. The display will return to activate the Message Waiting Light. This feature is a message waiting on L1 and L4. The display will flash when someone ... remaining numbers to the right of the Caller ID keys will show: Note: Your telephone company may press ERASE twice to remove the indicator light manually. *Not all local telephone service providers send the FSK signal required to the pulse dialing mode. 28. Message Waiting Light If you have voice messaging...
Follow your service, provider to see if FSK signaling is available. BASIC OPERATION 3. The display will return to activate the Message Waiting Light. This feature is a message waiting on L1 and L4. The display will flash when someone ... remaining numbers to the right of the Caller ID keys will show: Note: Your telephone company may press ERASE twice to remove the indicator light manually. *Not all local telephone service providers send the FSK signal required to the pulse dialing mode. 28. Message Waiting Light If you have voice messaging...

