Quick Start Guide
Page 10
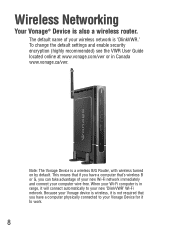
... settings and enable security encryption (highly recommended) see the VWR User Guide located online at www.vonage.com/vwr or in range, it is in Canada www.vonage.ca/vwr. Note: The Vonage Device is also a wireless router. When your new 'DlinkVWR' Wi-Fi network. Because your Vonage device is wireless, it will connect automatically to your Wi-Fi computer...
... settings and enable security encryption (highly recommended) see the VWR User Guide located online at www.vonage.com/vwr or in range, it is in Canada www.vonage.ca/vwr. Note: The Vonage Device is also a wireless router. When your new 'DlinkVWR' Wi-Fi network. Because your Vonage device is wireless, it will connect automatically to your Wi-Fi computer...
Quick Start Guide
Page 11
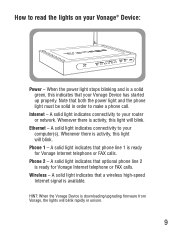
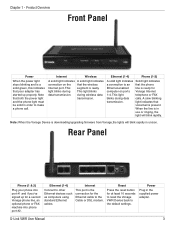
A solid light indicates connectivity to your router or network. Wireless - A solid light indicates that a wireless high-speed Internet signal is ready for Vonage Internet telephone or FAX calls. A solid light indicates connectivity to your computer(s). Phone 2 - Note that your Vonage® Device: Power - Phone 1 ...When the power light stops blinking and is activity, this light will blink rapidly in order to read the lights on your Vonage Device has started up properly. Ethernet - Whenever there is a solid green, this light will blink. A solid light indicates...
A solid light indicates connectivity to your router or network. Wireless - A solid light indicates that a wireless high-speed Internet signal is ready for Vonage Internet telephone or FAX calls. A solid light indicates connectivity to your computer(s). Phone 2 - Note that your Vonage® Device: Power - Phone 1 ...When the power light stops blinking and is activity, this light will blink rapidly in order to read the lights on your Vonage Device has started up properly. Ethernet - Whenever there is a solid green, this light will blink. A solid light indicates...
User Manual
Page 3
Installation 4 Network Overview 5 Chapter 3 - Configuration 6 Login...7 WAN ...8 Dynamic IP Address 8 Static IP Address 9 PPPoE ...10 LAN...11 DHCP ...12 Wireless...14 Wireless Security 15 WEP ...15 802.1x...16 WPA/WPA2 17 Password ...18 System...19 Virtual Server...20 Filters...22 Custom IP Filters 23 Performance ...24 Routing ...25 Dynamic Routing 26 D-Link VWR User Manual II Table of Contents Table of Contents Welcome to Vonage! ...I Chapter 1 - Product Overview 1 Package Contents 2 System Requirements 2 Front Panel ...3 Rear Panel...3 Chapter 2 -
Installation 4 Network Overview 5 Chapter 3 - Configuration 6 Login...7 WAN ...8 Dynamic IP Address 8 Static IP Address 9 PPPoE ...10 LAN...11 DHCP ...12 Wireless...14 Wireless Security 15 WEP ...15 802.1x...16 WPA/WPA2 17 Password ...18 System...19 Virtual Server...20 Filters...22 Custom IP Filters 23 Performance ...24 Routing ...25 Dynamic Routing 26 D-Link VWR User Manual II Table of Contents Table of Contents Welcome to Vonage! ...I Chapter 1 - Product Overview 1 Package Contents 2 System Requirements 2 Front Panel ...3 Rear Panel...3 Chapter 2 -
User Manual
Page 6
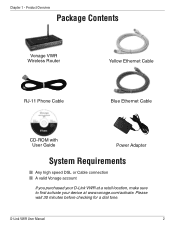
Please wait 30 minutes before checking for a dial tone. D-Link VWR User Manual 2 Chapter 1 - Product Overview Package Contents Vonage VWR Wireless Router Yellow Ethernet Cable RJ-11 Phone Cable Blue Ethernet Cable CD-ROM with User Guide Power Adapter System Requirements Any high speed DSL or Cable connection A valid Vonage account If you purchased your D-Link VWR at a retail location, make sure to first activate your device at www.vonage.com/activate.
Please wait 30 minutes before checking for a dial tone. D-Link VWR User Manual 2 Chapter 1 - Product Overview Package Contents Vonage VWR Wireless Router Yellow Ethernet Cable RJ-11 Phone Cable Blue Ethernet Cable CD-ROM with User Guide Power Adapter System Requirements Any high speed DSL or Cable connection A valid Vonage account If you purchased your D-Link VWR at a retail location, make sure to first activate your device at www.vonage.com/activate.
User Manual
Page 7
...wireless data transmission. When the line is the connection for a second Vonage phone line, an optional phone or FAX machine into port #1 and if you've signed up properly. Internet This port is in use or ringing, the light will blink rapidly in the supplied power adapter. D-Link VWR... User Manual 3 Product Overview Front Panel Power When the power light stops blinking and is downloading/upgrading firmware from Vonage,the lights will blink rapidly. Chapter 1 - A slow blinking transmission...
...wireless data transmission. When the line is the connection for a second Vonage phone line, an optional phone or FAX machine into port #1 and if you've signed up properly. Internet This port is in use or ringing, the light will blink rapidly in the supplied power adapter. D-Link VWR... User Manual 3 Product Overview Front Panel Power When the power light stops blinking and is downloading/upgrading firmware from Vonage,the lights will blink rapidly. Chapter 1 - A slow blinking transmission...
User Manual
Page 18
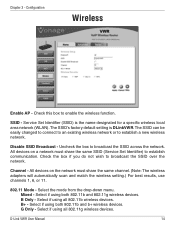
... SSID can be easily changed to connect to an existing wireless network or to enable the wireless function. Uncheck the box to broadcast the SSID over the network. Select if using all 802.11g wireless devices. Service Set Identifier (SSID) is DLinkVWR. D-Link VWR User Manual 14 B Only - B+ - Chapter 3 - SSID - Disable SSID Broadcast...
... SSID can be easily changed to connect to an existing wireless network or to enable the wireless function. Uncheck the box to broadcast the SSID over the network. Select if using all 802.11g wireless devices. Service Set Identifier (SSID) is DLinkVWR. D-Link VWR User Manual 14 B Only - B+ - Chapter 3 - SSID - Disable SSID Broadcast...
User Manual
Page 19
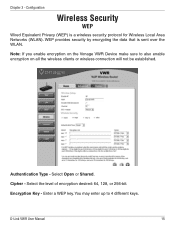
... Key - Enter a WEP key. You may enter up to also enable encryption on the Vonage VWR Device make sure to 4 different keys. Note: If you enable encryption on all the wireless clients or wireless connection will not be established. D-Link VWR User Manual 15 Authentication Type - Cipher - Select the level of encryption desired: 64, 128, or...
... Key - Enter a WEP key. You may enter up to also enable encryption on the Vonage VWR Device make sure to 4 different keys. Note: If you enable encryption on all the wireless clients or wireless connection will not be established. D-Link VWR User Manual 15 Authentication Type - Cipher - Select the level of encryption desired: 64, 128, or...
User Manual
Page 20
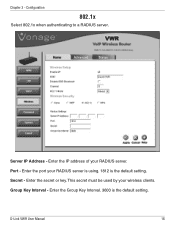
Enter the IP address of your wireless clients. Enter the port your RADIUS server is using. 1812 is the default setting. Enter the secret or key. Group Key Interval - This secret must be used by your RADIUS server. D-Link VWR User Manual 16 Configuration 802.1x Select 802.1x when authenticating to a RADIUS server. Port - Server IP Address - Enter the Group Key Interval. 3600 is the default setting. Chapter 3 - Secret -
Enter the IP address of your wireless clients. Enter the port your RADIUS server is using. 1812 is the default setting. Enter the secret or key. Group Key Interval - This secret must be used by your RADIUS server. D-Link VWR User Manual 16 Configuration 802.1x Select 802.1x when authenticating to a RADIUS server. Port - Server IP Address - Enter the Group Key Interval. 3600 is the default setting. Chapter 3 - Secret -
User Manual
Page 21
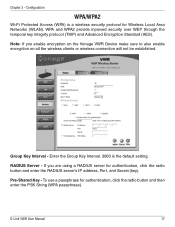
Enter the Group Key Interval. 3600 is a wireless security protocol for Wireless Local Area Networks (WLAN). If you enable encryption on the Vonage VWR Device make sure to also enable encryption on all the wireless clients or wireless connection will not be established. Pre-Shared Key - D-Link VWR User Manual 17 WPA and WPA2 provide inproved security over WEP...
Enter the Group Key Interval. 3600 is a wireless security protocol for Wireless Local Area Networks (WLAN). If you enable encryption on the Vonage VWR Device make sure to also enable encryption on all the wireless clients or wireless connection will not be established. Pre-Shared Key - D-Link VWR User Manual 17 WPA and WPA2 provide inproved security over WEP...
User Manual
Page 23
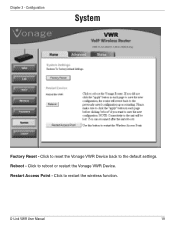
Click to reset the Vonage VWR Device back to reboot or restart the Vonage VWR Device. Restart Access Point - Reboot - Configuration System Factory Reset - Click to the default settings. Click to restart the wireless function. D-Link VWR User Manual 19 Chapter 3 -
Click to reset the Vonage VWR Device back to reboot or restart the Vonage VWR Device. Restart Access Point - Reboot - Configuration System Factory Reset - Click to the default settings. Click to restart the wireless function. D-Link VWR User Manual 19 Chapter 3 -
User Manual
Page 28
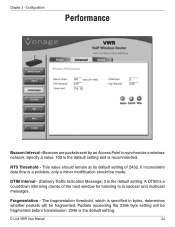
... its default setting of the next window for listening to synchronize a wireless network. RTS Threshold - If inconsistent data flow is the default setting. The fragmentation threshold, which is specified in bytes, determines whether packets will be fragmented. Fragmentation - D-Link VWR User Manual 24 A DTIM is recommended. Specify a value. 100 is...
... its default setting of the next window for listening to synchronize a wireless network. RTS Threshold - If inconsistent data flow is the default setting. The fragmentation threshold, which is specified in bytes, determines whether packets will be fragmented. Fragmentation - D-Link VWR User Manual 24 A DTIM is recommended. Specify a value. 100 is...

