
User Manual
Page 2
... DATA ...22 SETTINGS ...25 Camera Technical Specifications 27 Troubleshooting...28 Technical Support...30 Sakar Warranty Card...30 1 ANDROID AND IOS SYSTEM REQUIREMENTS...7 VIVITAR CAPTURECAM2 APP INSTALL...7 Connecting Your IP Camera with the Vivitar CaptureCam2 Mobile Application 8 INTRODUCTION ...8 INITIAL SETUP: CONNECTING YOUR CAMERA TO THE APP ...9 Using CaptureCam2 ...13 HOME SCREEN ...13 LIVE CAMERA VIEW -
... DATA ...22 SETTINGS ...25 Camera Technical Specifications 27 Troubleshooting...28 Technical Support...30 Sakar Warranty Card...30 1 ANDROID AND IOS SYSTEM REQUIREMENTS...7 VIVITAR CAPTURECAM2 APP INSTALL...7 Connecting Your IP Camera with the Vivitar CaptureCam2 Mobile Application 8 INTRODUCTION ...8 INITIAL SETUP: CONNECTING YOUR CAMERA TO THE APP ...9 Using CaptureCam2 ...13 HOME SCREEN ...13 LIVE CAMERA VIEW -

User Manual
Page 3
...Built-in Wi-Fi Connectivity Built-in Speaker/Microphone Built-in Light Sensor IR Night Vision Vivitar Capture Cam2 : Free Mobile App for purchasing your Vivitar IPC 112 Capture Cam. Note: Your Capture Cam requires a Class 4 or higher Micro SDHC memory card up to be purchased separately. Memory ... online application. Please read this manual carefully first in HD and capture still images and videos remotely is included with your Vivitar Capture Cam. Everything you for iOS and Android smartphone or tablets 2 Introduction Thank you need to 32 GB.
...Built-in Wi-Fi Connectivity Built-in Speaker/Microphone Built-in Light Sensor IR Night Vision Vivitar Capture Cam2 : Free Mobile App for purchasing your Vivitar IPC 112 Capture Cam. Note: Your Capture Cam requires a Class 4 or higher Micro SDHC memory card up to be purchased separately. Memory ... online application. Please read this manual carefully first in HD and capture still images and videos remotely is included with your Vivitar Capture Cam. Everything you for iOS and Android smartphone or tablets 2 Introduction Thank you need to 32 GB.

User Manual
Page 7
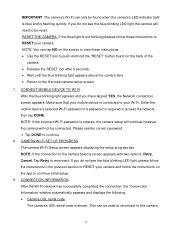
... blue indicator light is flashing, this indicates that the camera connection to clear the setup data and reset the camera settings via the Capture Cam2 app. 6
... blue indicator light is flashing, this indicates that the camera connection to clear the setup data and reset the camera settings via the Capture Cam2 app. 6

User Manual
Page 8
Android OS iOS 2. Install the application according to find the application. ANDROID AND IOS SYSTEM REQUIREMENTS Android 4.3 or higher iOS 7 or higher VIVITAR CAPTURECAM2 APP INSTALL 1. Alternatively, scan the QR codes below to the instructions. 7 Use your mobile phone or tablet to search for Vivitar CaptureCam2 in Google Play (for Android OS) or the Apple App Store (for iOS). Initial Mobile Device Setup MOBILE DEVICE -
Android OS iOS 2. Install the application according to find the application. ANDROID AND IOS SYSTEM REQUIREMENTS Android 4.3 or higher iOS 7 or higher VIVITAR CAPTURECAM2 APP INSTALL 1. Alternatively, scan the QR codes below to the instructions. 7 Use your mobile phone or tablet to search for Vivitar CaptureCam2 in Google Play (for Android OS) or the Apple App Store (for iOS). Initial Mobile Device Setup MOBILE DEVICE -

User Manual
Page 9
Connecting Your IP Camera with the Vivitar CaptureCam2 Mobile Application INTRODUCTION The Vivitar CaptureCam2 application allows you to: Register and connect a new camera in minutes. Remotely monitor up to four cameras using the application from anywhere. &#... card to your computer. View your captured photos that are saved directly to your iOS and Android devices. Adjust camera settings from your app. Allow other people to access your camera. Use the audio microphone and speaker. 8
Connecting Your IP Camera with the Vivitar CaptureCam2 Mobile Application INTRODUCTION The Vivitar CaptureCam2 application allows you to: Register and connect a new camera in minutes. Remotely monitor up to four cameras using the application from anywhere. &#... card to your computer. View your captured photos that are saved directly to your iOS and Android devices. Adjust camera settings from your app. Allow other people to access your camera. Use the audio microphone and speaker. 8

User Manual
Page 10
WELCOME: SETUP WIZARD The Welcome screen appears with the 'Setup Wizard'. ENABLE MOBILE DEVICE WI-FI Make sure to enable Wi-Fi on your smartphone or tablet to launch the installed app. 4. NOTE: The 'Setup Wizard' screen appears only upon first time, initial setup. 9 INITIAL SETUP: CONNECTING YOUR CAMERA TO THE APP 1. INSTALL MICRO SD CARD Insert a Micro SD Memory card into your mobile device. 3. LAUNCH MOBILE APP Tap the Vivitar CaptureCam2 application icon on your smartphone or tablet via the settings of your camera. 2.
WELCOME: SETUP WIZARD The Welcome screen appears with the 'Setup Wizard'. ENABLE MOBILE DEVICE WI-FI Make sure to enable Wi-Fi on your smartphone or tablet to launch the installed app. 4. NOTE: The 'Setup Wizard' screen appears only upon first time, initial setup. 9 INITIAL SETUP: CONNECTING YOUR CAMERA TO THE APP 1. INSTALL MICRO SD CARD Insert a Micro SD Memory card into your mobile device. 3. LAUNCH MOBILE APP Tap the Vivitar CaptureCam2 application icon on your smartphone or tablet via the settings of your camera. 2.

User Manual
Page 11
... turns quickly light blue and then turns red for the blue light to appear above the camera lens begins blinking tap YES on the CaptureCam2 app screen to continue the initial setup. Tap Yes to continue. 10 NOTE: You can connect to the camera's Wi-Fi. NEW CAMERA SETUP The... 'New Camera Setup/Connect to a new camera. The following options appear: No, Yes Please plug in setup mode so that the app can only turn on and connect one camera at a time during setup. Connect to camera: Tap to open the 'Add new camera' screen and...
... turns quickly light blue and then turns red for the blue light to appear above the camera lens begins blinking tap YES on the CaptureCam2 app screen to continue the initial setup. Tap Yes to continue. 10 NOTE: You can connect to the camera's Wi-Fi. NEW CAMERA SETUP The... 'New Camera Setup/Connect to a new camera. The following options appear: No, Yes Please plug in setup mode so that the app can only turn on and connect one camera at a time during setup. Connect to camera: Tap to open the 'Add new camera' screen and...
User Manual
Page 12
... the camera lens. Return to RESET your Wi-Fi. Make sure that your mobile device is not blinking pleases follow the instructions on the app to be found on the screen to view these instructions to the first new camera setup screen. 7. CAMERA WI-FI SET UP PROGRESS The camera...
... the camera lens. Return to RESET your Wi-Fi. Make sure that your mobile device is not blinking pleases follow the instructions on the app to be found on the screen to view these instructions to the first new camera setup screen. 7. CAMERA WI-FI SET UP PROGRESS The camera...

User Manual
Page 16
... exit without removing the camera. Cancel: Exits the Camera Functions menu. 15 The options include the following: Reconnect: Reconnects the camera to the app. Share Camera: Sends an email message with the QR code and camera UID that allows quick and easy remote connectivity from other handsets. ... data: Opens the Captured Data screen. Settings: Opens the Camera Settings screen. Remove camera: Removes camera from the Cameras list and from the app. NOTE: A confirmation window appears.
... exit without removing the camera. Cancel: Exits the Camera Functions menu. 15 The options include the following: Reconnect: Reconnects the camera to the app. Share Camera: Sends an email message with the QR code and camera UID that allows quick and easy remote connectivity from other handsets. ... data: Opens the Captured Data screen. Settings: Opens the Camera Settings screen. Remove camera: Removes camera from the Cameras list and from the app. NOTE: A confirmation window appears.

User Manual
Page 17
... your camera and wait for more details. 16 Tap Done to continue the setup. NOTE: Please refer to INITIAL SETUP: CONNECTING YOUR CAMERA TO THE APP for the blue light to the mobile device's Wi-Fi. After the connection has successfully completed, you see a red blinking light, use the Setup...
... your camera and wait for more details. 16 Tap Done to continue the setup. NOTE: Please refer to INITIAL SETUP: CONNECTING YOUR CAMERA TO THE APP for the blue light to the mobile device's Wi-Fi. After the connection has successfully completed, you see a red blinking light, use the Setup...
User Manual
Page 19
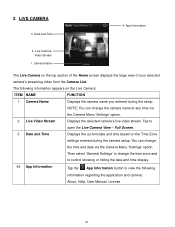
App Information 2. LIVE CAMERA 3. Live Camera Video Stream 1. Camera Name The Live Camera on the Live Camera: ITEM NAME FUNCTION 1 Camera Name Displays the camera name ...'s streaming video from the Camera List. NOTE: You can change the time zone and to control showing or hiding the date and time display. 45 App Information Tap the App Information button to open the Live Camera View -
App Information 2. LIVE CAMERA 3. Live Camera Video Stream 1. Camera Name The Live Camera on the Live Camera: ITEM NAME FUNCTION 1 Camera Name Displays the camera name ...'s streaming video from the Camera List. NOTE: You can change the time zone and to control showing or hiding the date and time display. 45 App Information Tap the App Information button to open the Live Camera View -
User Manual
Page 20
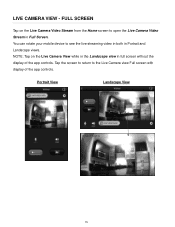
LIVE CAMERA VIEW - You can rotate your mobile device to open the Live Camera Video Stream in Full Screen. Tap the screen to return to the Live Camera view Full screen with display of the app controls. NOTE: Tap on the Live Camera Video Stream from the Home screen to see the live streaming video in both in full screen without the display of the app controls. Portrait View Landscape View 19 FULL SCREEN Tap on the Live Camera View while in the Landscape view in Portrait and Landscape views.
LIVE CAMERA VIEW - You can rotate your mobile device to open the Live Camera Video Stream in Full Screen. Tap the screen to return to the Live Camera view Full screen with display of the app controls. NOTE: Tap on the Live Camera Video Stream from the Home screen to see the live streaming video in both in full screen without the display of the app controls. Portrait View Landscape View 19 FULL SCREEN Tap on the Live Camera View while in the Landscape view in Portrait and Landscape views.

User Manual
Page 21
...you entered during the camera setup. Then select 'General Settings' to change the time and date via the Camera Menu 'Settings' option. App Information 9. Camera Settings 6. By default this feature in the full screen view. Tap the Microphone 20 2. Snapshot The following appears on ...3. Captured Data 4. Date and Time 5. Camera Name 8. Microphone (ON/OFF) 7. Record (Start/Stop) 10. Tap to speak via the mobile app, and those near the camera can view the snapshots you have recorded. 4 Date and Time 5 Live Camera Video Stream - The microphone allows you to...
...you entered during the camera setup. Then select 'General Settings' to change the time and date via the Camera Menu 'Settings' option. App Information 9. Camera Settings 6. By default this feature in the full screen view. Tap the Microphone 20 2. Snapshot The following appears on ...3. Captured Data 4. Date and Time 5. Camera Name 8. Microphone (ON/OFF) 7. Record (Start/Stop) 10. Tap to speak via the mobile app, and those near the camera can view the snapshots you have recorded. 4 Date and Time 5 Live Camera Video Stream - The microphone allows you to...

User Manual
Page 22
... ON and the audio of the live audio tap the Speaker Volume button. NOTE: Reconnect: When the camera and app are saved to your camera's memory card. 8 App Information 9 Camera Settings Tap the App Information button to view the following information regarding the application and camera: About, Help, User Manual, License Tap the...
... ON and the audio of the live audio tap the Speaker Volume button. NOTE: Reconnect: When the camera and app are saved to your camera's memory card. 8 App Information 9 Camera Settings Tap the App Information button to view the following information regarding the application and camera: About, Help, User Manual, License Tap the...

User Manual
Page 29
..., reset your phone and cannot connect to the camera. 1. If this solution does not work then please try the instructions below . 2. Then, in the app, tap on "Connect to Camera" and choose one of the options shown on your camera as the camera was unplugged from its power source. 4. Reconnect... Connecting another phone to your phone and switch to a different Wi-Fi network (make sure your camera: Click on your camera. Exit the CaptureCam2 app. If you are connecting with a different phone to the camera, you will not need to make sure it's not the same Wi-Fi network ...
..., reset your phone and cannot connect to the camera. 1. If this solution does not work then please try the instructions below . 2. Then, in the app, tap on "Connect to Camera" and choose one of the options shown on your camera as the camera was unplugged from its power source. 4. Reconnect... Connecting another phone to your phone and switch to a different Wi-Fi network (make sure your camera: Click on your camera. Exit the CaptureCam2 app. If you are connecting with a different phone to the camera, you will not need to make sure it's not the same Wi-Fi network ...

User Manual
Page 30
... snapshots will need to tap "re-connect" a couple of the camera for 10 seconds. 4. Connection Failed: You have manually removed the old camera from the app then you were previously connected to in the main screen and then tap on "re-connect" (you wish to connect to iPhone. Your camera should... enter the desired camera name and location and only then it will connect. Enter the correct Wi-Fi credentials and tap the "Done" button. Note: App can perform slower while the phone and the camera are connected to initially). 3. Note: If you saved the camera you will be prompted to that...
... snapshots will need to tap "re-connect" a couple of the camera for 10 seconds. 4. Connection Failed: You have manually removed the old camera from the app then you were previously connected to in the main screen and then tap on "re-connect" (you wish to connect to iPhone. Your camera should... enter the desired camera name and location and only then it will connect. Enter the correct Wi-Fi credentials and tap the "Done" button. Note: App can perform slower while the phone and the camera are connected to initially). 3. Note: If you saved the camera you will be prompted to that...


