Installation Instructions
Page 2
...-Tip Dimensions (36 17 Cabinet Information (Professional 18 Cabinet Information (Professional Integrated 20 Designer Side-by-Side Dimensions & Specifications (42" & 48 22 Cutout Dimensions (42 24 Anti-Tip Dimensions (42 25 Cutout Dimensions (48 26 Anti-Tip Dimensions (48 27 Designer Bottom-Mount Dimensions & Specifications (36 28 Cutout Dimensions (36 30...
...-Tip Dimensions (36 17 Cabinet Information (Professional 18 Cabinet Information (Professional Integrated 20 Designer Side-by-Side Dimensions & Specifications (42" & 48 22 Cutout Dimensions (42 24 Anti-Tip Dimensions (42 25 Cutout Dimensions (48 26 Anti-Tip Dimensions (48 27 Designer Bottom-Mount Dimensions & Specifications (36 28 Cutout Dimensions (36 30...
Installation Instructions
Page 4
...cord with grounded 3-prong plug attached to product 9.9 amps 1/4" copper tubing inlet waterline; 1/4" copper tubing inlet waterline; to 84-1/16" (213.5 cm) max. 24" (61.0 cm) min. 115 volt, 60 Hz, 15 amp dedicated circuit; 3-wire cord with grounded 3-prong plug attached to product 9.9 amps 1/4" copper ...tubing inlet waterline; 1/4" copper tubing inlet waterline; To front edge of side trim: 22-3/16" (56.4 cm) To front of top grille: 24-11/16" (62.7 cm) To front of handle endcap: 27-1/4" (69.2 cm) 47-1/2" (120.7 cm) min. to 41-3/4" (106 cm) max. 82...
...cord with grounded 3-prong plug attached to product 9.9 amps 1/4" copper tubing inlet waterline; 1/4" copper tubing inlet waterline; to 84-1/16" (213.5 cm) max. 24" (61.0 cm) min. 115 volt, 60 Hz, 15 amp dedicated circuit; 3-wire cord with grounded 3-prong plug attached to product 9.9 amps 1/4" copper ...tubing inlet waterline; 1/4" copper tubing inlet waterline; To front edge of side trim: 22-3/16" (56.4 cm) To front of top grille: 24-11/16" (62.7 cm) To front of handle endcap: 27-1/4" (69.2 cm) 47-1/2" (120.7 cm) min. to 41-3/4" (106 cm) max. 82...

Installation Instructions
Page 5
... (321.8 kg) 18.5 cu. ft. (767 liters) 735 lbs. (330.8 kg) 9 To front edge of side trim: 23-3/8" (59.4 cm) To front of top grille: 24" (61.0 cm) To front of handle endcap: 26-1/2" (67.3 cm) 48" (121.9 cm) 82-7/8" (210.5 cm) min. ft. (507 liters) 8.6 cu. maximum 120 ...capacity Approximate shipping weight VISB542 VISB542D 42" (106.7 cm) 82-3/4" (210.2 cm) min. maximum 120 psi 18.5 cu. to 84-1/16" (213.5 cm) max. 24" (61.0 cm) min. 115 volt, 60 Hz, 15 amp dedicated circuit; 3-wire cord with grounded 3-prong plug attached to product 9.9 amps 1/4" copper tubing inlet ...
... (321.8 kg) 18.5 cu. ft. (767 liters) 735 lbs. (330.8 kg) 9 To front edge of side trim: 23-3/8" (59.4 cm) To front of top grille: 24" (61.0 cm) To front of handle endcap: 26-1/2" (67.3 cm) 48" (121.9 cm) 82-7/8" (210.5 cm) min. ft. (507 liters) 8.6 cu. maximum 120 ...capacity Approximate shipping weight VISB542 VISB542D 42" (106.7 cm) 82-3/4" (210.2 cm) min. maximum 120 psi 18.5 cu. to 84-1/16" (213.5 cm) max. 24" (61.0 cm) min. 115 volt, 60 Hz, 15 amp dedicated circuit; 3-wire cord with grounded 3-prong plug attached to product 9.9 amps 1/4" copper tubing inlet ...
Installation Instructions
Page 6
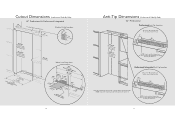
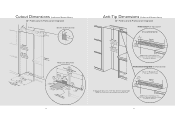
.../c2m") (883.95"cm) Bottom of unit must be placed firmly under anti-tip board. NOTE: Top of anti-tip board is installed deeper than 24" (61.0 cm), then shim behind the mounting board by the difference. 11 Cutout Dimensions (Professional Side-By-Side) (612.04"cm) 42" Professional & Professional Integrated...) 42" Professional Professional Anti-Tip Location (2at0no71tbi.9-6to-iptc3tmob/m8)oma"ordifn. (2at0no48t.bi06-to-icpt1tmob/m)2oma"oradfx. NOTE: If unit is installed deeper than 24" (61.0 cm),then shim behind the mounting board by the difference.
.../c2m") (883.95"cm) Bottom of unit must be placed firmly under anti-tip board. NOTE: Top of anti-tip board is installed deeper than 24" (61.0 cm), then shim behind the mounting board by the difference. 11 Cutout Dimensions (Professional Side-By-Side) (612.04"cm) 42" Professional & Professional Integrated...) 42" Professional Professional Anti-Tip Location (2at0no71tbi.9-6to-iptc3tmob/m8)oma"ordifn. (2at0no48t.bi06-to-icpt1tmob/m)2oma"oradfx. NOTE: If unit is installed deeper than 24" (61.0 cm),then shim behind the mounting board by the difference.

Installation Instructions
Page 7
... Boards 3" (7.6 cm) x 3-1/2" (8.9 cm) (7.63"cm) 3(8-.91/c2m") (1044.11"cm) NOTE: If unit is installed deeper than 24" (61.0 cm), then shim behind the mounting board by the difference. Promfeosdsieoln(s1ao2l1nIn.l9yt4e(c81gm2"r)1a.t2e4dc7m(1-)23m0/t4.ao7"4xc.7m-)1m/2in".... Professional Anti-Tip Location (2at0on71tbi.9-6ot-itpc3tmob/m8)oma"orfdin. (2at0on48tb.i06-ot-itcp1tmob/m)2oma"orafdx. NOTE: If unit is installed deeper than 24" (61.0 cm), then shim behind the mounting board by the difference. 13 Professional Integrated Anti-Tip Location One 2"x 4" Mounting Board 3"...
... Boards 3" (7.6 cm) x 3-1/2" (8.9 cm) (7.63"cm) 3(8-.91/c2m") (1044.11"cm) NOTE: If unit is installed deeper than 24" (61.0 cm), then shim behind the mounting board by the difference. Promfeosdsieoln(s1ao2l1nIn.l9yt4e(c81gm2"r)1a.t2e4dc7m(1-)23m0/t4.ao7"4xc.7m-)1m/2in".... Professional Anti-Tip Location (2at0on71tbi.9-6ot-itpc3tmob/m8)oma"orfdin. (2at0on48tb.i06-ot-itcp1tmob/m)2oma"orafdx. NOTE: If unit is installed deeper than 24" (61.0 cm), then shim behind the mounting board by the difference. 13 Professional Integrated Anti-Tip Location One 2"x 4" Mounting Board 3"...

Installation Instructions
Page 8
... VCBB536 36" (91.5 cm) 82-3/4" (210.2 cm) min. minimum 20 psi; ft. (145 Liters) 20.3 cu. to 84-1/16" (213.5 cm) max. 24" (61.0 cm) min. 115 volt, 60 Hz, 15 amp dedicated circuit; 3-wire cord with grounded 3-prong plug attached to product 9.9 amps 1/4" copper tubing inlet waterline...; ft. (145 Liters) 20.3 cu. to 84-1/16" (213.5 cm) max. 24" (61.0 cm) min. 115 volt, 60 Hz, 15 amp dedicated circuit; 3-wire cord with grounded 3-prong plug attached to 35-3/4" (90.8 cm) max. 82-7/8" ...
... VCBB536 36" (91.5 cm) 82-3/4" (210.2 cm) min. minimum 20 psi; ft. (145 Liters) 20.3 cu. to 84-1/16" (213.5 cm) max. 24" (61.0 cm) min. 115 volt, 60 Hz, 15 amp dedicated circuit; 3-wire cord with grounded 3-prong plug attached to product 9.9 amps 1/4" copper tubing inlet waterline...; ft. (145 Liters) 20.3 cu. to 84-1/16" (213.5 cm) max. 24" (61.0 cm) min. 115 volt, 60 Hz, 15 amp dedicated circuit; 3-wire cord with grounded 3-prong plug attached to 35-3/4" (90.8 cm) max. 82-7/8" ...
Installation Instructions
Page 9
NOTE: Top of anti-tip board is installed deeper than 24" (61.0 cm), then shim behind the mounting boards by the difference. 17 Professional Integrated Anti-Tip Location Bottom of unit must be placed firmly under ... unit is 3-7/8" (9.8 cm) below opening height. One 2"x 4" Mounting Board 3" (7.6 cm) x 3-1/2" (8.9 cm) (31.8.5c"m) 3(8-.91/c2m") 2(794-.91/c2m") NOTE: If unit is installed deeper than 24" (61.0 cm), then shim behind the mounting boards by the difference.
NOTE: Top of anti-tip board is installed deeper than 24" (61.0 cm), then shim behind the mounting boards by the difference. 17 Professional Integrated Anti-Tip Location Bottom of unit must be placed firmly under ... unit is 3-7/8" (9.8 cm) below opening height. One 2"x 4" Mounting Board 3" (7.6 cm) x 3-1/2" (8.9 cm) (31.8.5c"m) 3(8-.91/c2m") 2(794-.91/c2m") NOTE: If unit is installed deeper than 24" (61.0 cm), then shim behind the mounting boards by the difference.

Installation Instructions
Page 10
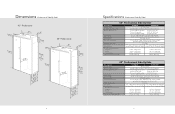
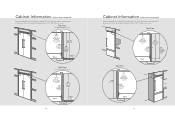
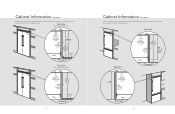
...1-13/16" (4.6 cm) Space if 24" standard cabinet depth is used 3/4" (1.9 cm) Full End Panel 24" (61.0 cm) Standard Cabinet Depth Partial Overlay Cabinet Door Top View Wall 24" (61.0 cm) Standard Cabinet Depth 1-13/16" (4.6 cm) Space if 24" standard cabinet depth is used 3/4" ... 18 Cabinet Information (Professional) Professional models fit "semi-flush" in standard 24" (61.0 cm) deep cabinet openings. Top View Wall 1-13/16" (4.6 cm) Space if 24" standard cabinet depth is used 3/4" (1.9 cm) Full End Panel 24" (61.0 cm) Standard Cabinet Depth Countertop Overhang Door 2-1/2" (6.4 cm)...
...1-13/16" (4.6 cm) Space if 24" standard cabinet depth is used 3/4" (1.9 cm) Full End Panel 24" (61.0 cm) Standard Cabinet Depth Partial Overlay Cabinet Door Top View Wall 24" (61.0 cm) Standard Cabinet Depth 1-13/16" (4.6 cm) Space if 24" standard cabinet depth is used 3/4" ... 18 Cabinet Information (Professional) Professional models fit "semi-flush" in standard 24" (61.0 cm) deep cabinet openings. Top View Wall 1-13/16" (4.6 cm) Space if 24" standard cabinet depth is used 3/4" (1.9 cm) Full End Panel 24" (61.0 cm) Standard Cabinet Depth Countertop Overhang Door 2-1/2" (6.4 cm)...
Installation Instructions
Page 11
...) Full End Panel 25" (63.5 cm) Cabinet Depth Door Cabinet Door Flush 20 Cabinet Information (Professional Integrated) Professional Integrated models fit flush in standard 24" (61.0 cm) deep cabinet openings with no protrusion into the room except the handle protrudes 2-1/2" (6.4 cm) into the room. Top View Wall 1"... (2.5 cm) space if 25" (63.5 cm) cabinet depth is used 3/4" (1.9 cm) Full End Panel 25" (63.5 cm) Countertop Depth 24" (61.0 cm) Standard Cabinet Depth Top View Wall 25" (63.5 cm) 1" (2.5 cm) space if 25" (63.5 cm) cabinet depth is used 3/4" (1.9 ...
...) Full End Panel 25" (63.5 cm) Cabinet Depth Door Cabinet Door Flush 20 Cabinet Information (Professional Integrated) Professional Integrated models fit flush in standard 24" (61.0 cm) deep cabinet openings with no protrusion into the room except the handle protrudes 2-1/2" (6.4 cm) into the room. Top View Wall 1"... (2.5 cm) space if 25" (63.5 cm) cabinet depth is used 3/4" (1.9 cm) Full End Panel 25" (63.5 cm) Countertop Depth 24" (61.0 cm) Standard Cabinet Depth Top View Wall 25" (63.5 cm) 1" (2.5 cm) space if 25" (63.5 cm) cabinet depth is used 3/4" (1.9 ...

Installation Instructions
Page 12
... 26-1/2" (67.3 cm) 42" (106.7 cm) 82-7/8" (210.5 cm) min. maximum 120 psi 18.5 cu. ft. (243 liters) 27.1 cu. ft. (255 liters) 24.0 cu. ft. (776 liters) 705 lbs. (317.3 kg) 18.5 cu. ft. (668 liters) 665 lbs. (299.3 kg) 48" Designer Side-By-Side Description Overall width... grounded 3-prong plug attached to 84-1/16" (213.5 cm) max. To front edge of side trim: 23-3/8" (59.4 cm) To front of top gr:ille: 24" (61.0 cm) To front of handle: 26-1/2" (67.3 cm) 48" (121.9 cm) 82-7/8" (210.5 cm) min. to product 9.9 amps 1/4" copper tubing inlet waterline; ...
... 26-1/2" (67.3 cm) 42" (106.7 cm) 82-7/8" (210.5 cm) min. maximum 120 psi 18.5 cu. ft. (243 liters) 27.1 cu. ft. (255 liters) 24.0 cu. ft. (776 liters) 705 lbs. (317.3 kg) 18.5 cu. ft. (668 liters) 665 lbs. (299.3 kg) 48" Designer Side-By-Side Description Overall width... grounded 3-prong plug attached to 84-1/16" (213.5 cm) max. To front edge of side trim: 23-3/8" (59.4 cm) To front of top gr:ille: 24" (61.0 cm) To front of handle: 26-1/2" (67.3 cm) 48" (121.9 cm) 82-7/8" (210.5 cm) min. to product 9.9 amps 1/4" copper tubing inlet waterline; ...
Installation Instructions
Page 13
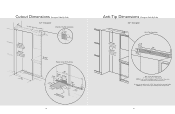
Bottom of unit must be placed firmly under anti-tip board. 25 NOTE: Top of anti-tip board is installed deeper than 24" (61.0 cm), then shim behind the mounting board by the difference. Cutout Dimensions (Designer Side-By-Side) (612.04"cm) 42" Designer See ... (7.63"cm) (1046.27"cm) (617-.31/c4m") (9.23-c5m/)8" (15.6/8c"m) (271.30-cm3/)4" (261.70-c1m/)2" waOteprtliionneael nfltoryor (1.65c/m8)" (2.15"cm) 24 Anti-Tip Dimensions (Designer Side-By-Side) 42" Designer Anti-Tip Location (2at0on71tbi.9-6ot-itpc3tmob/m8)oma"orfdin. (2at0on48tb.i06-ot-itcp1tmob/m)2oma"orafdx. 1(3-.81...
Bottom of unit must be placed firmly under anti-tip board. 25 NOTE: Top of anti-tip board is installed deeper than 24" (61.0 cm), then shim behind the mounting board by the difference. Cutout Dimensions (Designer Side-By-Side) (612.04"cm) 42" Designer See ... (7.63"cm) (1046.27"cm) (617-.31/c4m") (9.23-c5m/)8" (15.6/8c"m) (271.30-cm3/)4" (261.70-c1m/)2" waOteprtliionneael nfltoryor (1.65c/m8)" (2.15"cm) 24 Anti-Tip Dimensions (Designer Side-By-Side) 42" Designer Anti-Tip Location (2at0on71tbi.9-6ot-itpc3tmob/m8)oma"orfdin. (2at0on48tb.i06-ot-itcp1tmob/m)2oma"orafdx. 1(3-.81...
Installation Instructions
Page 14
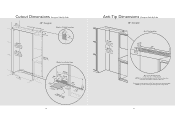
....11"cm) One 2"x 4" Mounting Board 1-1/2" (3.8 cm) x 3 1/2" (8.9 cm) NOTE: If unit is 3-7/8" (9.8 cm) below opening height. NOTE: Top of anti-tip board is installed deeper than 24" (61.0 cm), then shim behind the mounting board by the difference. Bottom of unit must be placed firmly under anti-tip board. 27
....11"cm) One 2"x 4" Mounting Board 1-1/2" (3.8 cm) x 3 1/2" (8.9 cm) NOTE: If unit is 3-7/8" (9.8 cm) below opening height. NOTE: Top of anti-tip board is installed deeper than 24" (61.0 cm), then shim behind the mounting board by the difference. Bottom of unit must be placed firmly under anti-tip board. 27

Installation Instructions
Page 15
minimum 20 psi; To front edge of side trim: 23-3/8" (59.4 cm) To front of top grille: 24" (61.0 cm) To front of handle: 26-1/2" (67.3 cm) 36" (91.5 cm) 82-7/8" (210.5 cm) min. ft. (576 Liters) 565 lbs. (254.3 kg) 29 to ...product 9.9 amps 1/4" copper tubing inlet waterline; to 84-1/16" (213.5 cm) max. 24" (61.0 cm) min. 115 volt, 60 Hz, 15 amp dedicated circuit; 3-wire cord with grounded 3-prong plug attached to 84-1/16" (213.5 cm) max. ft...
minimum 20 psi; To front edge of side trim: 23-3/8" (59.4 cm) To front of top grille: 24" (61.0 cm) To front of handle: 26-1/2" (67.3 cm) 36" (91.5 cm) 82-7/8" (210.5 cm) min. ft. (576 Liters) 565 lbs. (254.3 kg) 29 to ...product 9.9 amps 1/4" copper tubing inlet waterline; to 84-1/16" (213.5 cm) max. 24" (61.0 cm) min. 115 volt, 60 Hz, 15 amp dedicated circuit; 3-wire cord with grounded 3-prong plug attached to 84-1/16" (213.5 cm) max. ft...

Installation Instructions
Page 16
...) below opening height. Bottom of unit must be placed firmly under anti-tip board. 31 NOTE: Top of anti-tip board is installed deeper than 24" (61.0 cm), then shim behind the mounting board by the difference.
...) below opening height. Bottom of unit must be placed firmly under anti-tip board. 31 NOTE: Top of anti-tip board is installed deeper than 24" (61.0 cm), then shim behind the mounting board by the difference.
Installation Instructions
Page 17
...Panel Door Flush Door Flush 33 Top View Overlapping cabinet doors Wall 3/4" (1.9 cm) space if 24" (61.0 cm) standard cabinet depth is used 3/4" (1.9 cm) Full End Panel Door 24-3/4" (62.9 cm) 24" (61.0 cm) Standard Cabinet Depth Cabinet Door Flush Top View Flush mount cabinet doors Wall ... End Panel 25" (63.5 cm) Cabinet Depth Door Cabinet Door Flush 32 Cabinet Information (Designer) Designer models fit flush in standard 24" (61.0 cm) deep cabinet openings with no protrusion into the room except 2-1/2" (6.3 cm) handle depth. Cabinet Information (Designer) Designer models...
...Panel Door Flush Door Flush 33 Top View Overlapping cabinet doors Wall 3/4" (1.9 cm) space if 24" (61.0 cm) standard cabinet depth is used 3/4" (1.9 cm) Full End Panel Door 24-3/4" (62.9 cm) 24" (61.0 cm) Standard Cabinet Depth Cabinet Door Flush Top View Flush mount cabinet doors Wall ... End Panel 25" (63.5 cm) Cabinet Depth Door Cabinet Door Flush 32 Cabinet Information (Designer) Designer models fit flush in standard 24" (61.0 cm) deep cabinet openings with no protrusion into the room except 2-1/2" (6.3 cm) handle depth. Cabinet Information (Designer) Designer models...

Installation Instructions
Page 23
... MF/L 107 to run water until filter stops. Close water filter door. Installation instructions, parts and service availability, and standard warranty are included with Dispenser) 24 25 Locate water filter door. The door is located under standard laboratory conditions, actual performance may be installed and operated in accordance with manufacturer's recommended...
... MF/L 107 to run water until filter stops. Close water filter door. Installation instructions, parts and service availability, and standard warranty are included with Dispenser) 24 25 Locate water filter door. The door is located under standard laboratory conditions, actual performance may be installed and operated in accordance with manufacturer's recommended...
Use and Care Manual
Page 3
... power disconnect switch to do not use of old refrigerator 7 Features 8 Product Controls Settings and Functions 14 Operation Refrigerator (all units 19 Freezer (all units 24 Automatic Ice Maker 25 Automatic Dispenser 27 Installing Water Filter 28 Replacing Water Filter 29 Food Storage Guide 30 Product Care Cleaning and Maintenance 32...
... power disconnect switch to do not use of old refrigerator 7 Features 8 Product Controls Settings and Functions 14 Operation Refrigerator (all units 19 Freezer (all units 24 Automatic Ice Maker 25 Automatic Dispenser 27 Installing Water Filter 28 Replacing Water Filter 29 Food Storage Guide 30 Product Care Cleaning and Maintenance 32...
Use and Care Manual
Page 5
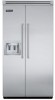
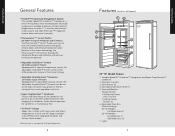
...- Full-Width Bin (1) Half-Width Bins (4) 7. Full-Width Bins (3) 36" W. Electronic controls maintain temperatures to within easy reach and allows refrigerator to fit flush into 24" deep installation cutout (Professional Integrated, Designer and Custom Panel models). *Plasmacluster is one of the quietest, most technologically advanced compressors available. Electronic Controls 3. Lights 9 Getting...
...- Full-Width Bin (1) Half-Width Bins (4) 7. Full-Width Bins (3) 36" W. Electronic controls maintain temperatures to within easy reach and allows refrigerator to fit flush into 24" deep installation cutout (Professional Integrated, Designer and Custom Panel models). *Plasmacluster is one of the quietest, most technologically advanced compressors available. Electronic Controls 3. Lights 9 Getting...
Use and Care Manual
Page 8
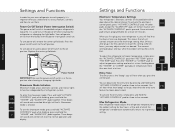
..." pad for three to normal operation and display. 14 Settings and Functions Electronic Temperature Settings Your refrigerator's electronic controls are displayed. After 24 hours, you may adjust controls as desired. You can deactivate the entry tone by pressing and holding , press and hold "ACTIVATE CONTROLS...sure the power on position. Press the power on position after plug-in the on /off , remove the center grille blade. Wait 24 hours after cleaning or changing light bulbs. Power On/Off Switch (Power Interruption Switch) The power on . Showroom mode is entered. ...
..." pad for three to normal operation and display. 14 Settings and Functions Electronic Temperature Settings Your refrigerator's electronic controls are displayed. After 24 hours, you may adjust controls as desired. You can deactivate the entry tone by pressing and holding , press and hold "ACTIVATE CONTROLS...sure the power on position. Press the power on position after plug-in the on /off , remove the center grille blade. Wait 24 hours after cleaning or changing light bulbs. Power On/Off Switch (Power Interruption Switch) The power on . Showroom mode is entered. ...

Use and Care Manual
Page 9
... continues to activate the control panel. This turns off . 17 Product Controls To deactivate the max refrigerator mode before the end of the 24 hours cycle, simply press the "ACTIVATE CONTROLS" pad, followed by the "MAX FRZ" pad. The alarm can be raised until it ...Sabbath mode is brought back to the ice maker. To enter Sabbath mode, press the "ACTIVATE CONTROLS" pad to sound, contact an authorized Viking Range Corporation technician immediately. A blinking light signals which , the freezer temperature automatically returns to the Sabbath mode when power is reestablished. To ...
... continues to activate the control panel. This turns off . 17 Product Controls To deactivate the max refrigerator mode before the end of the 24 hours cycle, simply press the "ACTIVATE CONTROLS" pad, followed by the "MAX FRZ" pad. The alarm can be raised until it ...Sabbath mode is brought back to the ice maker. To enter Sabbath mode, press the "ACTIVATE CONTROLS" pad to sound, contact an authorized Viking Range Corporation technician immediately. A blinking light signals which , the freezer temperature automatically returns to the Sabbath mode when power is reestablished. To ...