Installation Instructions
Page 1
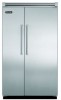
Viking Installation Guide Viking Range Corporation 111 Front Street Greenwood, Mississippi 38930 USA (662) 455-1200 For product information, call 1-888-VIKING1 (845-4641) or visit the Viking Web site at vikingrange.com F20605B EN UL C UL (061410) Side-By-Side & Bottom-Mount Refrigerator/Freezer
Viking Installation Guide Viking Range Corporation 111 Front Street Greenwood, Mississippi 38930 USA (662) 455-1200 For product information, call 1-888-VIKING1 (845-4641) or visit the Viking Web site at vikingrange.com F20605B EN UL C UL (061410) Side-By-Side & Bottom-Mount Refrigerator/Freezer
Installation Instructions
Page 4
... bottom Overall depth from rear Cutout width Cutout height Cutout depth Electrical requirements Maximum amp usage Inlet water Requirements Overall interior dimensions Refrigerator Freezer Total capacity Approximate shipping weight VCSB542 VCSB542D 42" (106.7 cm) 82-3/4" (210.2 cm) min. ft. (252...bottom Overall depth from rear Cutout width Cutout height Cutout depth Electrical requirements Maximum amp usage Inlet water Requirements Overall interior dimensions Refrigerator Freezer Total capacity Approximate shipping weight VCSB548 VCSB548D 48" (121.9 cm) 82-3/4" (210.2 cm) min. to 84...
... bottom Overall depth from rear Cutout width Cutout height Cutout depth Electrical requirements Maximum amp usage Inlet water Requirements Overall interior dimensions Refrigerator Freezer Total capacity Approximate shipping weight VCSB542 VCSB542D 42" (106.7 cm) 82-3/4" (210.2 cm) min. ft. (252...bottom Overall depth from rear Cutout width Cutout height Cutout depth Electrical requirements Maximum amp usage Inlet water Requirements Overall interior dimensions Refrigerator Freezer Total capacity Approximate shipping weight VCSB548 VCSB548D 48" (121.9 cm) 82-3/4" (210.2 cm) min. to 84...

Installation Instructions
Page 5
...Overall height from bottom Overall depth from rear Cutout width Cutout height Cutout depth Electrical requirements Maximum amp usage Inlet water requirements Overall interior dimensions Refrigerator Freezer Total capacity Approximate shipping weight VISB542 VISB542D 42" (106.7 cm) 82-3/4" (210.2 cm) min. To front edge of side ...rear Cutout width Cutout height Cutout depth Electrical requirements Maximum amp usage Inlet water requirements Overall interior dimensions Refrigerator Freezer Total capacity Approximate shipping weight VISB548 VISB548D 48" (121.9 cm) 82-3/4" (210.2 cm) min.
...Overall height from bottom Overall depth from rear Cutout width Cutout height Cutout depth Electrical requirements Maximum amp usage Inlet water requirements Overall interior dimensions Refrigerator Freezer Total capacity Approximate shipping weight VISB542 VISB542D 42" (106.7 cm) 82-3/4" (210.2 cm) min. To front edge of side ...rear Cutout width Cutout height Cutout depth Electrical requirements Maximum amp usage Inlet water requirements Overall interior dimensions Refrigerator Freezer Total capacity Approximate shipping weight VISB548 VISB548D 48" (121.9 cm) 82-3/4" (210.2 cm) min.

Installation Instructions
Page 8
...height from bottom Overall depth from rear Cutout wdth Cutout height Cutout depth Electrical requirements Maximum amp usage Inlet water requirements Overall interior dimensions Refrigerator Freezer Total capacity Approximate shipping weight VIBB536 36" (91.5 cm) 82-3/4" (210.2 cm) min. to product 9.9 amps 1/4" copper...from rear Cutout wdth Cutout height Cutout depth Electrical requirements Maximum amp usage Inlet water requirements Overall interior dimensions Refrigerator Freezer Total capacity Approximate shipping weight VCBB536 36" (91.5 cm) 82-3/4" (210.2 cm) min. to 84-1/16" (213...
...height from bottom Overall depth from rear Cutout wdth Cutout height Cutout depth Electrical requirements Maximum amp usage Inlet water requirements Overall interior dimensions Refrigerator Freezer Total capacity Approximate shipping weight VIBB536 36" (91.5 cm) 82-3/4" (210.2 cm) min. to product 9.9 amps 1/4" copper...from rear Cutout wdth Cutout height Cutout depth Electrical requirements Maximum amp usage Inlet water requirements Overall interior dimensions Refrigerator Freezer Total capacity Approximate shipping weight VCBB536 36" (91.5 cm) 82-3/4" (210.2 cm) min. to 84-1/16" (213...

Installation Instructions
Page 12
...Overall depth from rear Cutout width Cutout height Cutout depth Electrical requirements Maximum amp usage Inlet water Requirements Overall interior dimensions Refrigerator Freezer Total capacity Approximate shipping weight DDSB542 DDSB542D 42" (106.7 cm) 82-3/4" (210.2 cm) min. maximum ...Overall depth from rear Cutout width Cutout height Cutout depth Electrical requirements Maximum amp usage Inlet water Requirements Overall interior dimensions Refrigerator Freezer Total capacity Approximate shipping weight DDSB548 DDSB548D 48" (121.9 cm) 82-3/4" (210.2 cm) min. maximum 120...
...Overall depth from rear Cutout width Cutout height Cutout depth Electrical requirements Maximum amp usage Inlet water Requirements Overall interior dimensions Refrigerator Freezer Total capacity Approximate shipping weight DDSB542 DDSB542D 42" (106.7 cm) 82-3/4" (210.2 cm) min. maximum ...Overall depth from rear Cutout width Cutout height Cutout depth Electrical requirements Maximum amp usage Inlet water Requirements Overall interior dimensions Refrigerator Freezer Total capacity Approximate shipping weight DDSB548 DDSB548D 48" (121.9 cm) 82-3/4" (210.2 cm) min. maximum 120...

Installation Instructions
Page 15
... Overall height from bottom Overall depth from rear Cutout width Cutout height Cutout depth Electrical requirements Maximum amp usage Inlet water Requirements Overall interior dimensions Refrigerator Freezer Total capacity Approximate shipping weight DDBB536 36" (91.5 cm) 82-3/4" (210.2 cm) min.
... Overall height from bottom Overall depth from rear Cutout width Cutout height Cutout depth Electrical requirements Maximum amp usage Inlet water Requirements Overall interior dimensions Refrigerator Freezer Total capacity Approximate shipping weight DDBB536 36" (91.5 cm) 82-3/4" (210.2 cm) min.

Installation Instructions
Page 19
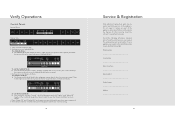
... are accurate. • Electrical outlet is in correct location. • Water line is in correct location. • Do not install a refrigeration unit near water area. • Run water line through doorways. • Floors can support unit's weight plus food weight (approximately 1200 pounds... Area Requirements Verify the following: • Unit can fit into a bucket to remove any particles in the water line. • Viking Range Corporation is not responsible for property damage due to improper installation or water connection. • Connect 1/4" (6 mm) flexible copper tubing...
... are accurate. • Electrical outlet is in correct location. • Water line is in correct location. • Do not install a refrigeration unit near water area. • Run water line through doorways. • Floors can support unit's weight plus food weight (approximately 1200 pounds... Area Requirements Verify the following: • Unit can fit into a bucket to remove any particles in the water line. • Viking Range Corporation is not responsible for property damage due to improper installation or water connection. • Connect 1/4" (6 mm) flexible copper tubing...
Installation Instructions
Page 21
Wall 2x4 Refrigerator If needed, depending on unit). 12 Pull supply tubing forward under unit. NOTE: To avoid cabinet damage, place cardboard between cabinets and unit. When moving ... of unit 2 1 3 Loosen the four hinge screws. Turn water off. Retighten four hinge screws. 2 Replace unit top. Replace four side screws. 8a 8b Wall 2x4 Refrigerator Attach one 2x4 to wall stud (refer to dimensions page for exact location). Adjust door. NOTE: Make sure power switch is in the "On" Position...
Wall 2x4 Refrigerator If needed, depending on unit). 12 Pull supply tubing forward under unit. NOTE: To avoid cabinet damage, place cardboard between cabinets and unit. When moving ... of unit 2 1 3 Loosen the four hinge screws. Turn water off. Retighten four hinge screws. 2 Replace unit top. Replace four side screws. 8a 8b Wall 2x4 Refrigerator Attach one 2x4 to wall stud (refer to dimensions page for exact location). Adjust door. NOTE: Make sure power switch is in the "On" Position...

Installation Instructions
Page 22
...on both ends of louvered panels and insert screws. Door Stop Adjustment (Bottom-Mount) 22 23 120˚ 110˚ 90˚ 1 3 2 1 2 Open refrigerator door so door stop and shoulder screw are accessible. Kickplate Installation 18 1 Verify that drain pan is installed and aligned. 19 1 2 3 2 Align holes on ... height and level unit using a 22" extension. NOTE: DO NOT use an electric device. Overtightening can cause damage. 17 Screw Wall 2x4 Refrigerator Attach positive secure self-tapping bolts to desired height. 42 Door Stop Adjustment (Side-by-Side) 20 21 1 3 2 Open...
...on both ends of louvered panels and insert screws. Door Stop Adjustment (Bottom-Mount) 22 23 120˚ 110˚ 90˚ 1 3 2 1 2 Open refrigerator door so door stop and shoulder screw are accessible. Kickplate Installation 18 1 Verify that drain pan is installed and aligned. 19 1 2 3 2 Align holes on ... height and level unit using a 22" extension. NOTE: DO NOT use an electric device. Overtightening can cause damage. 17 Screw Wall 2x4 Refrigerator Attach positive secure self-tapping bolts to desired height. 42 Door Stop Adjustment (Side-by-Side) 20 21 1 3 2 Open...
Installation Instructions
Page 25
... beep three times to a qualified technician. All other functions are located on the appliance. Record the following information indicated below for Refrigerator and Freezer - The Sabbath Mode will disable the refrigerator system but all other servicing should be referred to alert the user the Sabbath Mode has been exited.) 3. Verify unit is...
... beep three times to a qualified technician. All other functions are located on the appliance. Record the following information indicated below for Refrigerator and Freezer - The Sabbath Mode will disable the refrigerator system but all other servicing should be referred to alert the user the Sabbath Mode has been exited.) 3. Verify unit is...

Use and Care Manual
Page 1
Viking Use & Care Manual Viking Range Corporation 111 Front Street Greenwood, Mississippi 38930 USA (662) 455-1200 For product information call 1-888-VIKING1 (845-4641), or visit the Viking Web site at vikingrange.com F20603D EN (061011) Professional/Custom Panel Built-In Refrigerator/Freezer
Viking Use & Care Manual Viking Range Corporation 111 Front Street Greenwood, Mississippi 38930 USA (662) 455-1200 For product information call 1-888-VIKING1 (845-4641), or visit the Viking Web site at vikingrange.com F20603D EN (061011) Professional/Custom Panel Built-In Refrigerator/Freezer
Use and Care Manual
Page 2
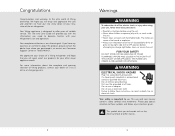
...8226; Never allow children to these symbols and follow any questions or comments about the complete and growing selection of Viking products, contact your refrigerator's care and operation. Your complete satisfaction is encountered, contact a qualified electrician. WARNING ELECTRICAL SHOCK HAZARD Plug into... We appreciate your other injuries. 3 Do not remove ground prong. Congratulations Congratulations and welcome to the elite world of a Viking refrigerator and hope that you will enjoy and appreciate the care and attention we have any instructions given. We hope you have put...
...8226; Never allow children to these symbols and follow any questions or comments about the complete and growing selection of Viking products, contact your refrigerator's care and operation. Your complete satisfaction is encountered, contact a qualified electrician. WARNING ELECTRICAL SHOCK HAZARD Plug into... We appreciate your other injuries. 3 Do not remove ground prong. Congratulations Congratulations and welcome to the elite world of a Viking refrigerator and hope that you will enjoy and appreciate the care and attention we have any instructions given. We hope you have put...
Use and Care Manual
Page 3
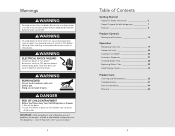
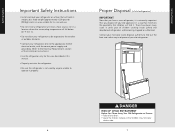
...can result in place so that children may not easily climb inside. DANGER RISK OF CHILD ENTRAPMENT Before You Throw Away Your Old Refrigerator or Freezer: • Take off the doors. • Leave the shelves in burns. WARNING ELECTRICAL SHOCK HAZARD Disconnect power or... turn power disconnect switch to ON position. Junked or abandoned refrigerators are not problems of old refrigerator 7 Features 8 Product Controls Settings and Functions 14 Operation Refrigerator (all units 19 Freezer (all units 24 Automatic Ice Maker 25 Automatic Dispenser 27 ...
...can result in place so that children may not easily climb inside. DANGER RISK OF CHILD ENTRAPMENT Before You Throw Away Your Old Refrigerator or Freezer: • Take off the doors. • Leave the shelves in burns. WARNING ELECTRICAL SHOCK HAZARD Disconnect power or... turn power disconnect switch to ON position. Junked or abandoned refrigerators are not problems of old refrigerator 7 Features 8 Product Controls Settings and Functions 14 Operation Refrigerator (all units 19 Freezer (all units 24 Automatic Ice Maker 25 Automatic Dispenser 27 ...
Use and Care Manual
Page 4
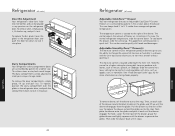
... find it. Getting Started Getting Started Important Safety Instructions • Install and level your refrigerator on a floor that children will find out the best and safest way to operate it properly. Proper Disposal (of old refrigerator) IMPORTANT: Now that you dispose of your old appliance in a way that minimizes the...hold its weight, plus food weight (approximately 1200 pounds [540kg]) and in an area suitable for its size and use. • Do not install a refrigeration unit near a heat source, nor in place so that children may not easily climb inside junked and abandoned...
... find it. Getting Started Getting Started Important Safety Instructions • Install and level your refrigerator on a floor that children will find out the best and safest way to operate it properly. Proper Disposal (of old refrigerator) IMPORTANT: Now that you dispose of your old appliance in a way that minimizes the...hold its weight, plus food weight (approximately 1200 pounds [540kg]) and in an area suitable for its size and use. • Do not install a refrigeration unit near a heat source, nor in place so that children may not easily climb inside junked and abandoned...
Use and Care Manual
Page 5
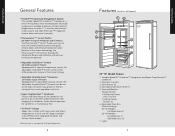
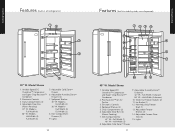
...Non-Adjusting Freezer Shelf (1) 5. Full-Width Bins (3) 36" W. Because of the unique technology, the Plasmacluster™ will continue to keep the refrigerator bateria and mold free without ever having to be replaced. • Adjustable Cold Zone™ Drawer (all models except all freezer) Equipped with a...and Odor Eliminator™ Evaporator remove odors and excess humidity. • Plasmacluster™* Ion Air Purifier (all models except all refrigerator and all freezer) Equipped with an adjustable humidity control, the Adjustable Humidity Zone™ Drawer(s) can be set for either ...
...Non-Adjusting Freezer Shelf (1) 5. Full-Width Bins (3) 36" W. Because of the unique technology, the Plasmacluster™ will continue to keep the refrigerator bateria and mold free without ever having to be replaced. • Adjustable Cold Zone™ Drawer (all models except all freezer) Equipped with a...and Odor Eliminator™ Evaporator remove odors and excess humidity. • Plasmacluster™* Ion Air Purifier (all models except all refrigerator and all freezer) Equipped with an adjustable humidity control, the Adjustable Humidity Zone™ Drawer(s) can be set for either ...
Use and Care Manual
Page 6
... (3) 15. Models- Electronic Controls 3. Variable Speed DC Overdrive™ Compressor and Super Clog-Resistant™ Condenser 2. Full-Width (4) 36" W. Lights 10 Features (built-in all refrigerator) 1 2 9 3 8 4 7 6 5 30" W. Spillproof Shelves (4) 5. Half-Width (2) 8. Getting Started Features (built-in side-by-side, non-dispenser) 1 23 4 15 5 14 13 6 12 7 11 10 98 48" W. Deli...
... (3) 15. Models- Electronic Controls 3. Variable Speed DC Overdrive™ Compressor and Super Clog-Resistant™ Condenser 2. Full-Width (4) 36" W. Lights 10 Features (built-in all refrigerator) 1 2 9 3 8 4 7 6 5 30" W. Spillproof Shelves (4) 5. Half-Width (2) 8. Getting Started Features (built-in side-by-side, non-dispenser) 1 23 4 15 5 14 13 6 12 7 11 10 98 48" W. Deli...
Use and Care Manual
Page 8
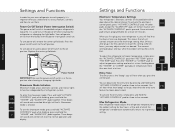
...CONTROLS" pad; To exit the showroom mode: press and hold the "HIGHER" and "ALARM OFF" pads together. When you first plug your refrigerator's top grille. Wait 24 hours after cleaning or changing light bulbs. To activate the entry tone, simply press and hold the "ACTIVATE CONTROLS...Entry Tone The entry tone is used to function independently of nine are pre-set at least ten minutes. Max Refrigerator Mode Max refrigerator mode adjusts the refrigerator temperature to the coldest setting for at the mid-range setting. Once activated, pad remains programmable for four hours, ...
...CONTROLS" pad; To exit the showroom mode: press and hold the "HIGHER" and "ALARM OFF" pads together. When you first plug your refrigerator's top grille. Wait 24 hours after cleaning or changing light bulbs. To activate the entry tone, simply press and hold the "ACTIVATE CONTROLS...Entry Tone The entry tone is used to function independently of nine are pre-set at least ten minutes. Max Refrigerator Mode Max refrigerator mode adjusts the refrigerator temperature to the coldest setting for at the mid-range setting. Once activated, pad remains programmable for four hours, ...

Use and Care Manual
Page 9
...light blinks if either door is reestablished. To enter Sabbath mode, press the "ACTIVATE CONTROLS" pad to sound, contact an authorized Viking Range Corporation technician immediately. To deactivate temperature display lights, press the "ACTIVATE CONTROLS" pad, followed by the "MAX REF" pad.... Display Lights To activate temperature display lights, press the "ACTIVATE CONTROLS" pad. When your refrigerator loses power while in Sabbath mode, interior lights, display (excluding the three right hand side lit blue squares), and alarms are disabled....
...light blinks if either door is reestablished. To enter Sabbath mode, press the "ACTIVATE CONTROLS" pad to sound, contact an authorized Viking Range Corporation technician immediately. To deactivate temperature display lights, press the "ACTIVATE CONTROLS" pad, followed by the "MAX REF" pad.... Display Lights To activate temperature display lights, press the "ACTIVATE CONTROLS" pad. When your refrigerator loses power while in Sabbath mode, interior lights, display (excluding the three right hand side lit blue squares), and alarms are disabled....
Use and Care Manual
Page 10
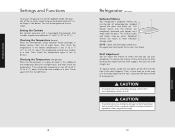
... shelves, guide the rear hooks of the shelf into the slots, and lower the front of shelf to match the way you use your refrigerator has left the Sabbath mode, the bale arm of water in the shelf supports. This will restore power to sudden temperature change. 19 Operation... Checking the Temperature (refrigerator) Place the thermometer in a glass of the ice maker needs to -16° C), adjust the temperature control one number at the front until it...
... shelves, guide the rear hooks of the shelf into the slots, and lower the front of shelf to match the way you use your refrigerator has left the Sabbath mode, the bale arm of water in the shelf supports. This will restore power to sudden temperature change. 19 Operation... Checking the Temperature (refrigerator) Place the thermometer in a glass of the ice maker needs to -16° C), adjust the temperature control one number at the front until it...
Use and Care Manual
Page 11
...compartments, simply grasp, lift up until the drawer snaps onto the glides. This area keeps food 3° to stay fresh much longer. For normal refrigerator temperature, slide the control down the drawer, slide the control up , and pull it out. 2 To replace the bin, place it over the... trim. See "Food Storage Guide" (pg. 30) for a tighter seal. The temperature control is contained by gaskets for more information on the refrigerator door. To cool down . Next, place the drawer onto the glides and push it stops. 21 Operation MOISTURE CONTROL LOW HIGH MOISTURE CONTROL LOW ...
...compartments, simply grasp, lift up until the drawer snaps onto the glides. This area keeps food 3° to stay fresh much longer. For normal refrigerator temperature, slide the control down the drawer, slide the control up , and pull it out. 2 To replace the bin, place it over the... trim. See "Food Storage Guide" (pg. 30) for a tighter seal. The temperature control is contained by gaskets for more information on the refrigerator door. To cool down . Next, place the drawer onto the glides and push it stops. 21 Operation MOISTURE CONTROL LOW HIGH MOISTURE CONTROL LOW ...


