Installation Instructions
Page 1
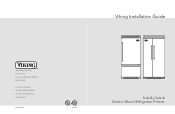
Viking Installation Guide Viking Range Corporation 111 Front Street Greenwood, Mississippi 38930 USA (662) 455-1200 For product information, call 1-888-VIKING1 (845-4641) or visit the Viking Web site at vikingrange.com F20605B EN UL C UL (061410) Side-By-Side & Bottom-Mount Refrigerator/Freezer
Viking Installation Guide Viking Range Corporation 111 Front Street Greenwood, Mississippi 38930 USA (662) 455-1200 For product information, call 1-888-VIKING1 (845-4641) or visit the Viking Web site at vikingrange.com F20605B EN UL C UL (061410) Side-By-Side & Bottom-Mount Refrigerator/Freezer
Installation Instructions
Page 4
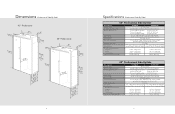
...bottom Overall depth from rear Cutout width Cutout height Cutout depth Electrical requirements Maximum amp usage Inlet water Requirements Overall interior dimensions Refrigerator Freezer Total capacity Approximate shipping weight VCSB542 VCSB542D 42" (106.7 cm) 82-3/4" (210.2 cm) min. to 47-3/4"...bottom Overall depth from rear Cutout width Cutout height Cutout depth Electrical requirements Maximum amp usage Inlet water Requirements Overall interior dimensions Refrigerator Freezer Total capacity Approximate shipping weight VCSB548 VCSB548D 48" (121.9 cm) 82-3/4" (210.2 cm) min. to 41...
...bottom Overall depth from rear Cutout width Cutout height Cutout depth Electrical requirements Maximum amp usage Inlet water Requirements Overall interior dimensions Refrigerator Freezer Total capacity Approximate shipping weight VCSB542 VCSB542D 42" (106.7 cm) 82-3/4" (210.2 cm) min. to 47-3/4"...bottom Overall depth from rear Cutout width Cutout height Cutout depth Electrical requirements Maximum amp usage Inlet water Requirements Overall interior dimensions Refrigerator Freezer Total capacity Approximate shipping weight VCSB548 VCSB548D 48" (121.9 cm) 82-3/4" (210.2 cm) min. to 41...

Installation Instructions
Page 5
... Overall height from bottom Overall depth from rear Cutout width Cutout height Cutout depth Electrical requirements Maximum amp usage Inlet water requirements Overall interior dimensions Refrigerator Freezer Total capacity Approximate shipping weight VISB542 VISB542D 42" (106.7 cm) 82-3/4" (210.2 cm) min. ft. (524 liters) 8.9 cu. ... Cutout width Cutout height Cutout depth Electrical requirements Maximum amp usage Inlet water requirements Overall interior dimensions Refrigerator Freezer Total capacity Approximate shipping weight VISB548 VISB548D 48" (121.9 cm) 82-3/4" (210.2 cm) min.
... Overall height from bottom Overall depth from rear Cutout width Cutout height Cutout depth Electrical requirements Maximum amp usage Inlet water requirements Overall interior dimensions Refrigerator Freezer Total capacity Approximate shipping weight VISB542 VISB542D 42" (106.7 cm) 82-3/4" (210.2 cm) min. ft. (524 liters) 8.9 cu. ... Cutout width Cutout height Cutout depth Electrical requirements Maximum amp usage Inlet water requirements Overall interior dimensions Refrigerator Freezer Total capacity Approximate shipping weight VISB548 VISB548D 48" (121.9 cm) 82-3/4" (210.2 cm) min.

Installation Instructions
Page 8
...bottom Overall depth from rear Cutout wdth Cutout height Cutout depth Electrical requirements Maximum amp usage Inlet water requirements Overall interior dimensions Refrigerator Freezer Total capacity Approximate shipping weight VCBB536 36" (91.5 cm) 82-3/4" (210.2 cm) min. minimum 20 psi;... from bottom Overall depth from rear Cutout wdth Cutout height Cutout depth Electrical requirements Maximum amp usage Inlet water requirements Overall interior dimensions Refrigerator Freezer Total capacity Approximate shipping weight VIBB536 36" (91.5 cm) 82-3/4" (210.2 cm) min. ft. (431 Liters) ...
...bottom Overall depth from rear Cutout wdth Cutout height Cutout depth Electrical requirements Maximum amp usage Inlet water requirements Overall interior dimensions Refrigerator Freezer Total capacity Approximate shipping weight VCBB536 36" (91.5 cm) 82-3/4" (210.2 cm) min. minimum 20 psi;... from bottom Overall depth from rear Cutout wdth Cutout height Cutout depth Electrical requirements Maximum amp usage Inlet water requirements Overall interior dimensions Refrigerator Freezer Total capacity Approximate shipping weight VIBB536 36" (91.5 cm) 82-3/4" (210.2 cm) min. ft. (431 Liters) ...

Installation Instructions
Page 12
...Overall depth from rear Cutout width Cutout height Cutout depth Electrical requirements Maximum amp usage Inlet water Requirements Overall interior dimensions Refrigerator Freezer Total capacity Approximate shipping weight DDSB542 DDSB542D 42" (106.7 cm) 82-3/4" (210.2 cm) min. minimum 20...from bottom Overall depth from rear Cutout width Cutout height Cutout depth Electrical requirements Maximum amp usage Inlet water Requirements Overall interior dimensions Refrigerator Freezer Total capacity Approximate shipping weight DDSB548 DDSB548D 48" (121.9 cm) 82-3/4" (210.2 cm) min. ft. (425...
...Overall depth from rear Cutout width Cutout height Cutout depth Electrical requirements Maximum amp usage Inlet water Requirements Overall interior dimensions Refrigerator Freezer Total capacity Approximate shipping weight DDSB542 DDSB542D 42" (106.7 cm) 82-3/4" (210.2 cm) min. minimum 20...from bottom Overall depth from rear Cutout width Cutout height Cutout depth Electrical requirements Maximum amp usage Inlet water Requirements Overall interior dimensions Refrigerator Freezer Total capacity Approximate shipping weight DDSB548 DDSB548D 48" (121.9 cm) 82-3/4" (210.2 cm) min. ft. (425...

Installation Instructions
Page 15
... Overall height from bottom Overall depth from rear Cutout width Cutout height Cutout depth Electrical requirements Maximum amp usage Inlet water Requirements Overall interior dimensions Refrigerator Freezer Total capacity Approximate shipping weight DDBB536 36" (91.5 cm) 82-3/4" (210.2 cm) min. to product 9.9 amps 1/4" copper tubing inlet waterline; ft. (576 Liters) 565...
... Overall height from bottom Overall depth from rear Cutout width Cutout height Cutout depth Electrical requirements Maximum amp usage Inlet water Requirements Overall interior dimensions Refrigerator Freezer Total capacity Approximate shipping weight DDBB536 36" (91.5 cm) 82-3/4" (210.2 cm) min. to product 9.9 amps 1/4" copper tubing inlet waterline; ft. (576 Liters) 565...

Installation Instructions
Page 19
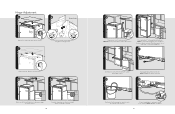
... 1/4" (6 mm) flexible copper tubing to household plumbing in several months, and water has an unpleasant taste or odor, flush system by dispensing 2-3 glasses of Viking units with a reverse osmosis system is acceptable as long as the water pressure remains within the allowable PSI as the water level of enclosure for... be greater than 20 psi and less than 120 psi on non-dispensers and greater than 35 psi and less than 120 psi on the refrigeration unit. • Do not use plastic water lines from water supply connection to the unit connection with an additional length to note that can...
... 1/4" (6 mm) flexible copper tubing to household plumbing in several months, and water has an unpleasant taste or odor, flush system by dispensing 2-3 glasses of Viking units with a reverse osmosis system is acceptable as long as the water pressure remains within the allowable PSI as the water level of enclosure for... be greater than 20 psi and less than 120 psi on non-dispensers and greater than 35 psi and less than 120 psi on the refrigeration unit. • Do not use plastic water lines from water supply connection to the unit connection with an additional length to note that can...
Installation Instructions
Page 21
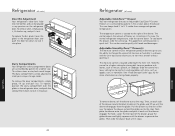
Adjust door. Wall 2x4 Refrigerator If needed, depending on unit). 12 Pull supply tubing forward under unit. NOTE: To avoid cabinet damage, place cardboard between cabinets and unit. Turn water ...off. Connect supply tube to dimensions page for exact location). Retighten four hinge screws. 2 Replace unit top. Replace four side screws. 8a 8b Wall 2x4 Refrigerator Attach one 2x4 to wall stud (refer to water valve using a 1/2" wrench. NOTE: DO NOT use plastic water lines. 13 Flush water line by running...
Adjust door. Wall 2x4 Refrigerator If needed, depending on unit). 12 Pull supply tubing forward under unit. NOTE: To avoid cabinet damage, place cardboard between cabinets and unit. Turn water ...off. Connect supply tube to dimensions page for exact location). Retighten four hinge screws. 2 Replace unit top. Replace four side screws. 8a 8b Wall 2x4 Refrigerator Attach one 2x4 to wall stud (refer to water valve using a 1/2" wrench. NOTE: DO NOT use plastic water lines. 13 Flush water line by running...

Installation Instructions
Page 22
...120° position. 14 15 Turn on both ends of louvered panels and insert screws. Overtightening can cause damage. 17 Screw Wall 2x4 Refrigerator Attach positive secure self-tapping bolts to desired height and level unit using a 22" extension. Using a Phillips screwdriver, attach the kickplate ...to the unit and adjust to desired height. 42 Door Stop Adjustment (Side-by-Side) 20 21 1 3 2 Open refrigerator door so door stop and shoulder screw are accessible. NOTE: DO NOT use an electric device. NOTE: Shoulder screw should be in 110˚...
...120° position. 14 15 Turn on both ends of louvered panels and insert screws. Overtightening can cause damage. 17 Screw Wall 2x4 Refrigerator Attach positive secure self-tapping bolts to desired height and level unit using a 22" extension. Using a Phillips screwdriver, attach the kickplate ...to the unit and adjust to desired height. 42 Door Stop Adjustment (Side-by-Side) 20 21 1 3 2 Open refrigerator door so door stop and shoulder screw are accessible. NOTE: DO NOT use an electric device. NOTE: Shoulder screw should be in 110˚...
Installation Instructions
Page 25
...referred to alert the user the Sabbath Mode has been exited.) 3. Record the following information indicated below for 3 seconds. (The control will disable the refrigerator system but all other servicing should be used in the manual. The Showroom Mode will beep three times to a qualified technician. Press and hold "Activate... number for visual indication of purchase Date installed Dealer's name Address 49 Press "Alarm Off" and "Display Off" at the 5th bar for Refrigerator and Freezer - Model number Serial number Date of Sabbath Mode.) To exit the Sabbath Mode: B.
...referred to alert the user the Sabbath Mode has been exited.) 3. Record the following information indicated below for 3 seconds. (The control will disable the refrigerator system but all other servicing should be used in the manual. The Showroom Mode will beep three times to a qualified technician. Press and hold "Activate... number for visual indication of purchase Date installed Dealer's name Address 49 Press "Alarm Off" and "Display Off" at the 5th bar for Refrigerator and Freezer - Model number Serial number Date of Sabbath Mode.) To exit the Sabbath Mode: B.

Use and Care Manual
Page 1
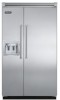
Viking Use & Care Manual Viking Range Corporation 111 Front Street Greenwood, Mississippi 38930 USA (662) 455-1200 For product information call 1-888-VIKING1 (845-4641), or visit the Viking Web site at vikingrange.com F20603D EN (061011) Professional/Custom Panel Built-In Refrigerator/Freezer
Viking Use & Care Manual Viking Range Corporation 111 Front Street Greenwood, Mississippi 38930 USA (662) 455-1200 For product information call 1-888-VIKING1 (845-4641), or visit the Viking Web site at vikingrange.com F20603D EN (061011) Professional/Custom Panel Built-In Refrigerator/Freezer
Use and Care Manual
Page 2
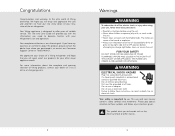
...contact our Consumer Support Center at 1-888-VIKING1. Your complete satisfaction is important to us online at all instructions before using your refrigerator's care and operation. Failure to follow these basic precautions: • Read all times. If you will enjoy and appreciate the...Guide will provide you with the information you will again select our products for your choice of Viking ownership. Congratulations Congratulations and welcome to the elite world of a Viking refrigerator and hope that you have put into a grounded 3-prong outlet. This use and care manual...
...contact our Consumer Support Center at 1-888-VIKING1. Your complete satisfaction is important to us online at all instructions before using your refrigerator's care and operation. Failure to follow these basic precautions: • Read all times. If you will enjoy and appreciate the...Guide will provide you with the information you will again select our products for your choice of Viking ownership. Congratulations Congratulations and welcome to the elite world of a Viking refrigerator and hope that you have put into a grounded 3-prong outlet. This use and care manual...
Use and Care Manual
Page 3
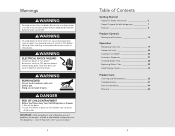
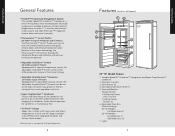
... so can cause severe personal injury or death, turn power disconnect switch to do not use of old refrigerator 7 Features 8 Product Controls Settings and Functions 14 Operation Refrigerator (all units 19 Freezer (all units 24 Automatic Ice Maker 25 Automatic Dispenser 27 Installing Water Filter 28...44 Warranty 45 5 DANGER RISK OF CHILD ENTRAPMENT Before You Throw Away Your Old Refrigerator or Freezer: • Take off the doors. • Leave the shelves in burns. Junked or abandoned refrigerators are not problems of the past. WARNING BURN HAZARD Do not touch condenser coils...
... so can cause severe personal injury or death, turn power disconnect switch to do not use of old refrigerator 7 Features 8 Product Controls Settings and Functions 14 Operation Refrigerator (all units 19 Freezer (all units 24 Automatic Ice Maker 25 Automatic Dispenser 27 Installing Water Filter 28...44 Warranty 45 5 DANGER RISK OF CHILD ENTRAPMENT Before You Throw Away Your Old Refrigerator or Freezer: • Take off the doors. • Leave the shelves in burns. Junked or abandoned refrigerators are not problems of the past. WARNING BURN HAZARD Do not touch condenser coils...
Use and Care Manual
Page 4
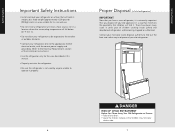
...outlet, with the correct power supply and grounding. (Refer to the Electrical Requirements section of the Installation Instructions.) • Use the refrigerator only for its weight, plus food weight (approximately 1200 pounds [540kg]) and in an area suitable for the uses described in this .... • Leave the shelves in place so that children may not easily climb inside junked and abandoned refrigerators and becoming trapped or suffocated. There have a new refrigerator, it is not used by anyone unable to operate it . Getting Started Getting Started Important Safety Instructions ...
...outlet, with the correct power supply and grounding. (Refer to the Electrical Requirements section of the Installation Instructions.) • Use the refrigerator only for its weight, plus food weight (approximately 1200 pounds [540kg]) and in an area suitable for the uses described in this .... • Leave the shelves in place so that children may not easily climb inside junked and abandoned refrigerators and becoming trapped or suffocated. There have a new refrigerator, it is not used by anyone unable to operate it . Getting Started Getting Started Important Safety Instructions ...
Use and Care Manual
Page 5
... and Odor Eliminator™ Evaporator remove odors and excess humidity. • Plasmacluster™* Ion Air Purifier (all models except all refrigerator and all freezer) The Plasmacluster™ Ion Air Purifier uses ions to fit flush into 24" deep installation cutout (Professional Integrated,...and other airborne particles from clogging the condenser. Models- Because of the unique technology, the Plasmacluster™ will continue to keep the refrigerator bateria and mold free without ever having to be replaced. • Adjustable Cold Zone™ Drawer (all models except all freezer...
... and Odor Eliminator™ Evaporator remove odors and excess humidity. • Plasmacluster™* Ion Air Purifier (all models except all refrigerator and all freezer) The Plasmacluster™ Ion Air Purifier uses ions to fit flush into 24" deep installation cutout (Professional Integrated,...and other airborne particles from clogging the condenser. Models- Because of the unique technology, the Plasmacluster™ will continue to keep the refrigerator bateria and mold free without ever having to be replaced. • Adjustable Cold Zone™ Drawer (all models except all freezer...
Use and Care Manual
Page 6
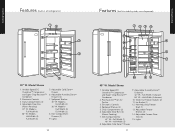
Dairy Compartments (2) 4. Models- Models- Lights 10 Features (built-in all refrigerator) 1 2 9 3 8 4 7 6 5 30" W. Plasmacluster™ Ion Air Purifier 3. Dairy Compartments (2) 6. Deli Compartment(s) 42" W.- Half-Width (2) 8. Adjustable Cold Zone™ Drawer 9. Adjustable Freezer Door Bins (3) 15. Models- Deli ...
Dairy Compartments (2) 4. Models- Models- Lights 10 Features (built-in all refrigerator) 1 2 9 3 8 4 7 6 5 30" W. Plasmacluster™ Ion Air Purifier 3. Dairy Compartments (2) 6. Deli Compartment(s) 42" W.- Half-Width (2) 8. Adjustable Cold Zone™ Drawer 9. Adjustable Freezer Door Bins (3) 15. Models- Deli ...
Use and Care Manual
Page 8
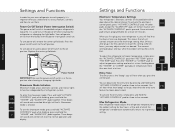
...on . Showroom Mode Initiation Showroom mode allows electronic controls and interior lights to function independently of nine are located behind your new refrigerator to five seconds. while holding the "ACTIVATE CONTROLS" pad for three to work properly, it is pressed. Once activated, pad ... inactive until the "ACTIVATE CONTROLS" pad is important that all unit controls are pre-set at a time. Max Refrigerator Mode Max refrigerator mode adjusts the refrigerator temperature to the off , remove the center grille blade. Three beeps will sound and control will hear three short ...
...on . Showroom Mode Initiation Showroom mode allows electronic controls and interior lights to function independently of nine are located behind your new refrigerator to five seconds. while holding the "ACTIVATE CONTROLS" pad for three to work properly, it is pressed. Once activated, pad ... inactive until the "ACTIVATE CONTROLS" pad is important that all unit controls are pre-set at a time. Max Refrigerator Mode Max refrigerator mode adjusts the refrigerator temperature to the off , remove the center grille blade. Three beeps will sound and control will hear three short ...

Use and Care Manual
Page 9
...off the power to its previous setting. Display Lights To activate temperature display lights, press the "ACTIVATE CONTROLS" pad. When your refrigerator's control panel. Then, press and hold "ACTIVATE CONTROLS" and "DISPLAY OFF" pads simultaneously for more than three minutes. Product ...door that electronically senses temperature problems. The thermistor alarm will sound and indicator lights will glow to sound, contact an authorized Viking Range Corporation technician immediately. Before the Sabbath mode is affected. To deactivate the max freezer mode before the end of ...
...off the power to its previous setting. Display Lights To activate temperature display lights, press the "ACTIVATE CONTROLS" pad. When your refrigerator's control panel. Then, press and hold "ACTIVATE CONTROLS" and "DISPLAY OFF" pads simultaneously for more than three minutes. Product ...door that electronically senses temperature problems. The thermistor alarm will sound and indicator lights will glow to sound, contact an authorized Viking Range Corporation technician immediately. Before the Sabbath mode is affected. To deactivate the max freezer mode before the end of ...
Use and Care Manual
Page 10
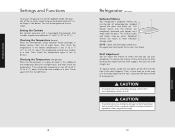
... the shelf supports. To remove the shelves, tilt the shelf up at the front until it is no longer in five to 8 hours. If the refrigerator temperature is not 38° to 40° F (3° to eight hours, and then check the temperature. NOTE: Foods and beverages placed on shelf. This... easier. Shelf Adjustment You can 't seep under the air vent may break suddenly if nicked, scratched, or exposed to match the way you use your refrigerator has left the Sabbath mode, the bale arm of the ice maker needs to be pushed downward until the hooks drop into the slots in...
... the shelf supports. To remove the shelves, tilt the shelf up at the front until it is no longer in five to 8 hours. If the refrigerator temperature is not 38° to 40° F (3° to eight hours, and then check the temperature. NOTE: Foods and beverages placed on shelf. This... easier. Shelf Adjustment You can 't seep under the air vent may break suddenly if nicked, scratched, or exposed to match the way you use your refrigerator has left the Sabbath mode, the bale arm of the ice maker needs to be pushed downward until the hooks drop into the slots in...
Use and Care Manual
Page 11
.... To cool down the drawer, slide the control up , and pull it out. 2 To replace the bin, place it over the glides in the refrigerator door, and push the door bin down . Slide the control to lock it 1 into place. Pull the drawer out the rest of the drawer. Then...humidity in this area. Next, place the drawer onto the glides and push it back until it . This allows items to 5° F colder than average refrigerator temperatures. The control adjusts the amount of the drawer, locate the black leveler on storing foods properly. The moisture control is located to change the...
.... To cool down the drawer, slide the control up , and pull it out. 2 To replace the bin, place it over the glides in the refrigerator door, and push the door bin down . Slide the control to lock it 1 into place. Pull the drawer out the rest of the drawer. Then...humidity in this area. Next, place the drawer onto the glides and push it back until it . This allows items to 5° F colder than average refrigerator temperatures. The control adjusts the amount of the drawer, locate the black leveler on storing foods properly. The moisture control is located to change the...


