Installation Instructions
Page 1
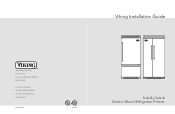
Viking Installation Guide Viking Range Corporation 111 Front Street Greenwood, Mississippi 38930 USA (662) 455-1200 For product information, call 1-888-VIKING1 (845-4641) or visit the Viking Web site at vikingrange.com F20605B EN UL C UL (061410) Side-By-Side & Bottom-Mount Refrigerator/Freezer
Viking Installation Guide Viking Range Corporation 111 Front Street Greenwood, Mississippi 38930 USA (662) 455-1200 For product information, call 1-888-VIKING1 (845-4641) or visit the Viking Web site at vikingrange.com F20605B EN UL C UL (061410) Side-By-Side & Bottom-Mount Refrigerator/Freezer
Installation Instructions
Page 2
... you and others is very important. Always read and obey all applicable codes and standards, including fire-rated construction. • The installer should leave these instructions with the consumer who should retain them for local inspector's use and for future reference. This is attached to persons..., installation work and electrical wiring must be preceded by the safety alert symbol and the word"DANGER" or "WARNING." We have provided many ...
... you and others is very important. Always read and obey all applicable codes and standards, including fire-rated construction. • The installer should leave these instructions with the consumer who should retain them for local inspector's use and for future reference. This is attached to persons..., installation work and electrical wiring must be preceded by the safety alert symbol and the word"DANGER" or "WARNING." We have provided many ...
Installation Instructions
Page 3
...8226; The required use self-piercing feature of water or moisture. • Viking Range Corporation will permit appliance doors to do so can result in death or electrical shock. It is completely installed and secured per UL 943 standard) • In good condition and free from...required) • 1- Failure to protect floor surface. 4 5 Use cardboard shipping material or plywood under unit until appliance is your unit), which are not installed properly or do not use of a GFI is normally related to the location of a receptacle with shutoff valve • 6- #8 x 3" (7.6 cm)...
...8226; The required use self-piercing feature of water or moisture. • Viking Range Corporation will permit appliance doors to do so can result in death or electrical shock. It is completely installed and secured per UL 943 standard) • In good condition and free from...required) • 1- Failure to protect floor surface. 4 5 Use cardboard shipping material or plywood under unit until appliance is your unit), which are not installed properly or do not use of a GFI is normally related to the location of a receptacle with shutoff valve • 6- #8 x 3" (7.6 cm)...
Installation Instructions
Page 6
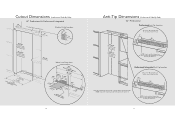
...difference. 11 Two 2"x 4" Mounting Boards 3" (7.6 cm) x 3-1/2" (8.9 cm) (7.63"cm) 3(8-.91/c2m") (883.95"cm) NOTE: If unit is installed deeper than 24" (61.0 cm),then shim behind the mounting board by the difference. Cutout Dimensions (Professional Side-By-Side) (612.04"cm) 42" Professional... & Professional Integrated See Anti-Tip board installation (22.99"cm) Electric Outlet Location (15.62"cm) (22.99"cm) (ao2np1t8e0i-nt.25iipn-cg7bm/oh8)aemr"igdihn&t. (a2on1p8t3ei-4.nt5i...
...difference. 11 Two 2"x 4" Mounting Boards 3" (7.6 cm) x 3-1/2" (8.9 cm) (7.63"cm) 3(8-.91/c2m") (883.95"cm) NOTE: If unit is installed deeper than 24" (61.0 cm),then shim behind the mounting board by the difference. Cutout Dimensions (Professional Side-By-Side) (612.04"cm) 42" Professional... & Professional Integrated See Anti-Tip board installation (22.99"cm) Electric Outlet Location (15.62"cm) (22.99"cm) (ao2np1t8e0i-nt.25iipn-cg7bm/oh8)aemr"igdihn&t. (a2on1p8t3ei-4.nt5i...

Installation Instructions
Page 7
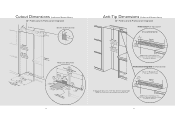
...shim behind the mounting board by the difference. Cutout Dimensions (Professional Side-By-Side) (612.04"cm) 48" Professional & Professional Integrated See Anti-Tip board installation (22.99"cm) Electric Outlet Location (15.62"cm) (22.99"cm) (ao2np1t8e0i-nt.25iipn-cg7bm/oh8)aemr"igdihn&t. (a2on1p8t3ei-4.nt5i-ipn1cgbm/oh1)ae6mrigd... (7.6 cm) x 3-1/2" (8.9 cm) (7.63"cm) 3(8-.91/c2m") (1044.11"cm) NOTE: If unit is 3-7/8" (9.8 cm) below opening height. NOTE: Top of anti-tip board is installed deeper than 24" (61.0 cm), then shim behind the mounting board by the difference. 13
...shim behind the mounting board by the difference. Cutout Dimensions (Professional Side-By-Side) (612.04"cm) 48" Professional & Professional Integrated See Anti-Tip board installation (22.99"cm) Electric Outlet Location (15.62"cm) (22.99"cm) (ao2np1t8e0i-nt.25iipn-cg7bm/oh8)aemr"igdihn&t. (a2on1p8t3ei-4.nt5i-ipn1cgbm/oh1)ae6mrigd... (7.6 cm) x 3-1/2" (8.9 cm) (7.63"cm) 3(8-.91/c2m") (1044.11"cm) NOTE: If unit is 3-7/8" (9.8 cm) below opening height. NOTE: Top of anti-tip board is installed deeper than 24" (61.0 cm), then shim behind the mounting board by the difference. 13
Installation Instructions
Page 9
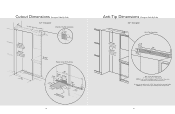
Cutout Dimensions (Professional Bottom-Mount) 36" Professional & Professional Integrated (612.04"cm) See Anti-Tip board installation (22.99"cm) Electric Outlet Location (15.62"cm) (22.99"cm) (ao2np1t8e0i-nt.25iipn-cg7bm/oh8)aemr"igdihn&t. (a2on1p8t3ei-4.nt5i-... is 3-7/8" (9.8 cm) below opening height. One 2"x 4" Mounting Board 3" (7.6 cm) x 3-1/2" (8.9 cm) (31.8.5c"m) 3(8-.91/c2m") 2(794-.91/c2m") NOTE: If unit is installed deeper than 24" (61.0 cm), then shim behind the mounting boards by the difference. 17 Professional Integrated Anti-Tip Location Bottom of unit must be...
Cutout Dimensions (Professional Bottom-Mount) 36" Professional & Professional Integrated (612.04"cm) See Anti-Tip board installation (22.99"cm) Electric Outlet Location (15.62"cm) (22.99"cm) (ao2np1t8e0i-nt.25iipn-cg7bm/oh8)aemr"igdihn&t. (a2on1p8t3ei-4.nt5i-... is 3-7/8" (9.8 cm) below opening height. One 2"x 4" Mounting Board 3" (7.6 cm) x 3-1/2" (8.9 cm) (31.8.5c"m) 3(8-.91/c2m") 2(794-.91/c2m") NOTE: If unit is installed deeper than 24" (61.0 cm), then shim behind the mounting boards by the difference. 17 Professional Integrated Anti-Tip Location Bottom of unit must be...
Installation Instructions
Page 13
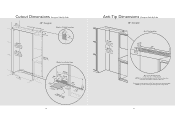
... unit must be placed firmly under anti-tip board. 25 Cutout Dimensions (Designer Side-By-Side) (612.04"cm) 42" Designer See Anti-Tip board installation (22.99"cm) Electric Outlet Location (15.62"cm) (22.99"cm) (ao2np1t8e0i-nt.25iipn-cg7bm/oh8)aemr"igdihn&t. (a2on1p8t3ei-4.nt5i-ipn1cgbm/oh1)ae6mrigd"ah...
... unit must be placed firmly under anti-tip board. 25 Cutout Dimensions (Designer Side-By-Side) (612.04"cm) 42" Designer See Anti-Tip board installation (22.99"cm) Electric Outlet Location (15.62"cm) (22.99"cm) (ao2np1t8e0i-nt.25iipn-cg7bm/oh8)aemr"igdihn&t. (a2on1p8t3ei-4.nt5i-ipn1cgbm/oh1)ae6mrigd"ah...
Installation Instructions
Page 14
NOTE: Top of anti-tip board is installed deeper than 24" (61.0 cm), then shim behind the mounting board by the difference. Bottom of unit must be placed firmly under anti-tip board. ...-By-Side) (612.04"cm) (ao2np1t8e0i-nt.25iipn-cg7bm/oh8)aemr"igdihn&t. (a2on1p8t3ei-4.nt5i-ipn1cgbm/oh1)ae6mrigd"ah&xt. 48" Designer See Anti-Tip board installation (22.99"cm) Electric Outlet Location (15.62"cm) (22.99"cm) (71836-.34/c8m") Water Line Entry Area (121.94c8m") (15.6/8c"m) (719-.54...
NOTE: Top of anti-tip board is installed deeper than 24" (61.0 cm), then shim behind the mounting board by the difference. Bottom of unit must be placed firmly under anti-tip board. ...-By-Side) (612.04"cm) (ao2np1t8e0i-nt.25iipn-cg7bm/oh8)aemr"igdihn&t. (a2on1p8t3ei-4.nt5i-ipn1cgbm/oh1)ae6mrigd"ah&xt. 48" Designer See Anti-Tip board installation (22.99"cm) Electric Outlet Location (15.62"cm) (22.99"cm) (71836-.34/c8m") Water Line Entry Area (121.94c8m") (15.6/8c"m) (719-.54...

Installation Instructions
Page 16
Cutout Dimensions (Designer Bottom-Mount) (612.04"cm) 36" Designer See Anti-Tip board installation (22.99"cm) Electric Outlet Location (15.62"cm) (ao2np1t8e0i-nt.25iipn-cg7bm/oh8)aemr"igdihn&t. (a2on1p8t3ei-4.nt5i-ipn1cgbm/oh1)ae6mrigd"ah&xt. (71836-.34/... unit is 3-7/8" (9.8 cm) below opening height. Bottom of unit must be placed firmly under anti-tip board. 31 NOTE: Top of anti-tip board is installed deeper than 24" (61.0 cm), then shim behind the mounting board by the difference.
Cutout Dimensions (Designer Bottom-Mount) (612.04"cm) 36" Designer See Anti-Tip board installation (22.99"cm) Electric Outlet Location (15.62"cm) (ao2np1t8e0i-nt.25iipn-cg7bm/oh8)aemr"igdihn&t. (a2on1p8t3ei-4.nt5i-ipn1cgbm/oh1)ae6mrigd"ah&xt. (71836-.34/... unit is 3-7/8" (9.8 cm) below opening height. Bottom of unit must be placed firmly under anti-tip board. 31 NOTE: Top of anti-tip board is installed deeper than 24" (61.0 cm), then shim behind the mounting board by the difference.

Installation Instructions
Page 19
It is required that with many reverse osmosis systems, the pressure starts off valve behind the unit. • The installation of Viking units with a solid soffit or wood block. Do not use unit where water is too small for the water flow ...must be used , it decreases as stated below 35˚ F (1.7˚ C). Electrical Requirements It is the customer's responsibility to: • Contact a qualified electrical installer. • Assure that may be considered when checking the water pressure coming into the unit. • Connect a vertical or horizontal 1/2" (1.2 cm) to 1-1/4" (3.2...
It is required that with many reverse osmosis systems, the pressure starts off valve behind the unit. • The installation of Viking units with a solid soffit or wood block. Do not use unit where water is too small for the water flow ...must be used , it decreases as stated below 35˚ F (1.7˚ C). Electrical Requirements It is the customer's responsibility to: • Contact a qualified electrical installer. • Assure that may be considered when checking the water pressure coming into the unit. • Connect a vertical or horizontal 1/2" (1.2 cm) to 1-1/4" (3.2...
Installation Instructions
Page 20
...of cutout. 2b (Professional) Lift center grille louver up and pull out. 3 (Designer) Pull the center grille louver up (0" adjustment). 38 Installation 1 2a Place unit in front of the unit's weight is at an angle and pull out. 4 Using an 8" magnetic nut driver, remove ... in death or serious injury. Remove grille assembly. 39 Keep doors closed until unit is completely installed and secured per installation instructions. Failure to move and install appliance. Save cardboard shipping material to protect decorative trim; Remove unit from skid by removing four bolts...
...of cutout. 2b (Professional) Lift center grille louver up and pull out. 3 (Designer) Pull the center grille louver up (0" adjustment). 38 Installation 1 2a Place unit in front of the unit's weight is at an angle and pull out. 4 Using an 8" magnetic nut driver, remove ... in death or serious injury. Remove grille assembly. 39 Keep doors closed until unit is completely installed and secured per installation instructions. Failure to move and install appliance. Save cardboard shipping material to protect decorative trim; Remove unit from skid by removing four bolts...

Installation Instructions
Page 22
...; door opening position. 1 90˚ 110˚ 120˚ 2 Remove shoulder screw and place in 90° or 120° position. Kickplate Installation 18 1 Verify that drain pan is installed and aligned. 19 1 2 3 2 Align holes on water supply and check for leaks. 16 Lift unit off rollers to 2x4 using a 5/16" head...
...; door opening position. 1 90˚ 110˚ 120˚ 2 Remove shoulder screw and place in 90° or 120° position. Kickplate Installation 18 1 Verify that drain pan is installed and aligned. 19 1 2 3 2 Align holes on water supply and check for leaks. 16 Lift unit off rollers to 2x4 using a 5/16" head...

Installation Instructions
Page 23
... 53 for the reduction of Lead, Lindane, Atrazine, Mercury, Toxaphene, Cyst, Turbidity, and Abestos. 45 Additional flushing may vary. Installation instructions, parts and service availability, and standard warranty are included with Dispenser) 24 25 Locate water filter door. Manufactured by: 3M ...Purification Inc. 400 Research Parkway Meriden, CT 06770 System tested and certified by -Side with the product when shipped. Water Filter Installation (Side-by NSF International against Standard 42 for the reduction of chlorine taste and odor, particulate Class I , >0.5 to < pts...
... 53 for the reduction of Lead, Lindane, Atrazine, Mercury, Toxaphene, Cyst, Turbidity, and Abestos. 45 Additional flushing may vary. Installation instructions, parts and service availability, and standard warranty are included with Dispenser) 24 25 Locate water filter door. Manufactured by: 3M ...Purification Inc. 400 Research Parkway Meriden, CT 06770 System tested and certified by -Side with the product when shipped. Water Filter Installation (Side-by NSF International against Standard 42 for the reduction of chlorine taste and odor, particulate Class I , >0.5 to < pts...

Installation Instructions
Page 24
...electrical supply and water supply (if applicable). h Plug-in cutout, level at desired height and secure unit. NOTE: There is secure. h Install anti-tip device(s) and verify unit is a 6 minute delay before the unit starts. 46 h Verify cabinet size. h Position unit in ...; Verify icemaker fill tube is properly inserted. • Verify icemaker bail arm is properly installed and no leaks on water connection. h Verify drain pan is down . Installer's information: Installer's name Installer's company Date 47 h Remove internal packaging and labels and wipe unit down . •...
...electrical supply and water supply (if applicable). h Plug-in cutout, level at desired height and secure unit. NOTE: There is secure. h Install anti-tip device(s) and verify unit is a 6 minute delay before the unit starts. 46 h Verify cabinet size. h Position unit in ...; Verify icemaker fill tube is properly inserted. • Verify icemaker bail arm is properly installed and no leaks on water connection. h Verify drain pan is down . Installer's information: Installer's name Installer's company Date 47 h Remove internal packaging and labels and wipe unit down . •...
Installation Instructions
Page 25
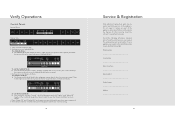
... of the appliance unless specifically recommended in Sabbath Mode: A. Press "Alarm Off" and "Display Off" at the 5th bar for visual indication of purchase Date installed Dealer's name Address 49 The Sabbath Mode will disable the interior lights, display (except three blue squares) and alarm. (See picture below for 3 seconds. (The...
... of the appliance unless specifically recommended in Sabbath Mode: A. Press "Alarm Off" and "Display Off" at the 5th bar for visual indication of purchase Date installed Dealer's name Address 49 The Sabbath Mode will disable the interior lights, display (except three blue squares) and alarm. (See picture below for 3 seconds. (The...
Use and Care Manual
Page 3
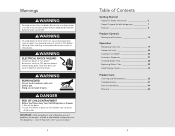
... old refrigerator 7 Features 8 Product Controls Settings and Functions 14 Operation Refrigerator (all units 19 Freezer (all units 24 Automatic Ice Maker 25 Automatic Dispenser 27 Installing Water Filter 28 Replacing Water Filter 29 Food Storage Guide 30 Product Care Cleaning and Maintenance 32 Troubleshooting 41 Service Information 44 Warranty 45 5 DANGER...
... old refrigerator 7 Features 8 Product Controls Settings and Functions 14 Operation Refrigerator (all units 19 Freezer (all units 24 Automatic Ice Maker 25 Automatic Dispenser 27 Installing Water Filter 28 Replacing Water Filter 29 Food Storage Guide 30 Product Care Cleaning and Maintenance 32 Troubleshooting 41 Service Information 44 Warranty 45 5 DANGER...
Use and Care Manual
Page 4
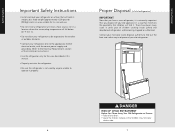
There have been many cases in years past of the Installation Instructions.) • Use the refrigerator only for its weight, plus food weight (approximately 1200 pounds [540kg]) and in an area suitable for the uses described... weather or outdoor elements. • Connect your old refrigerator. Getting Started Getting Started Important Safety Instructions • Install and level your refrigerator on a floor that will hold its size and use. • Do not install a refrigeration unit near a heat source, nor in a location where the surrounding temperature will find it properly. ...
There have been many cases in years past of the Installation Instructions.) • Use the refrigerator only for its weight, plus food weight (approximately 1200 pounds [540kg]) and in an area suitable for the uses described... weather or outdoor elements. • Connect your old refrigerator. Getting Started Getting Started Important Safety Instructions • Install and level your refrigerator on a floor that will hold its size and use. • Do not install a refrigeration unit near a heat source, nor in a location where the surrounding temperature will find it properly. ...
Use and Care Manual
Page 5
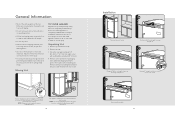
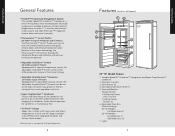
...;* Ion Air Purifier (all models except all refrigerator and all freezer) The Plasmacluster™ Ion Air Purifier uses ions to fit flush into 24" deep installation cutout (Professional Integrated, Designer and Custom Panel models). *Plasmacluster is one of the condenser coil prevents dust and other airborne particles from clogging the condenser...
...;* Ion Air Purifier (all models except all refrigerator and all freezer) The Plasmacluster™ Ion Air Purifier uses ions to fit flush into 24" deep installation cutout (Professional Integrated, Designer and Custom Panel models). *Plasmacluster is one of the condenser coil prevents dust and other airborne particles from clogging the condenser...
Use and Care Manual
Page 13
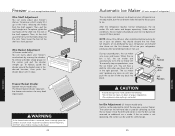
... ice drawer on the left -hand ice bin is full, the bins can be adjusted to match the way you use your refrigerator produces after installation before looking for easy access to ice maker, observe the following: • Do not force ice maker arm down until the hooks drop into place...
... ice drawer on the left -hand ice bin is full, the bins can be adjusted to match the way you use your refrigerator produces after installation before looking for easy access to ice maker, observe the following: • Do not force ice maker arm down until the hooks drop into place...
Use and Care Manual
Page 15
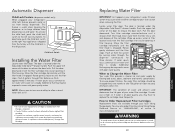
... fill. If water spurts occur, continue to Change the Water Filter Your water filter provides a cleaner ice and water supply by calling Viking Range Preferred Service at 1-888-845-4641, or online at filter location and insert the filter cartridge into circular opening in areas with ...latch. Insert the filter cartridge into a sink and dispose of water are available through your water filter cartridge. Crushed WATER Child Lock Switch Installing the Water Filter Locate water filter door. Pull the door downward. Push the upper left corner of the door to the left corner ...
... fill. If water spurts occur, continue to Change the Water Filter Your water filter provides a cleaner ice and water supply by calling Viking Range Preferred Service at 1-888-845-4641, or online at filter location and insert the filter cartridge into circular opening in areas with ...latch. Insert the filter cartridge into a sink and dispose of water are available through your water filter cartridge. Crushed WATER Child Lock Switch Installing the Water Filter Locate water filter door. Pull the door downward. Push the upper left corner of the door to the left corner ...