

Viking Product Line
Page 2
...are still in home kitchens everywhere. Born from the Professional line, the new Viking line delivers genuine Viking performance with products to complement your chance to refrigerators and dishwashers, the Viking line offers outstanding power and features, with sleek styling and standard sizes. In... 1987 Viking Range created commercial-style appliances that quickly started the stainless steel revolution in high demand...
...are still in home kitchens everywhere. Born from the Professional line, the new Viking line delivers genuine Viking performance with products to complement your chance to refrigerators and dishwashers, the Viking line offers outstanding power and features, with sleek styling and standard sizes. In... 1987 Viking Range created commercial-style appliances that quickly started the stainless steel revolution in high demand...

Viking Product Line
Page 4
... us. including the air. The electronic controls accurately maintain selected temperatures in form and function, quietly controlling temperatures and corralling odors. thankfully Viking dishwashers silently tackle the dreaded chore. DISHWASHERS Cleaning up after their job is done. REFRIGERATION Fresh ingredients are essential for healthy, tasty meals. VENTILATION You want to fill your kitchen...
... us. including the air. The electronic controls accurately maintain selected temperatures in form and function, quietly controlling temperatures and corralling odors. thankfully Viking dishwashers silently tackle the dreaded chore. DISHWASHERS Cleaning up after their job is done. REFRIGERATION Fresh ingredients are essential for healthy, tasty meals. VENTILATION You want to fill your kitchen...
Viking Product Line
Page 5
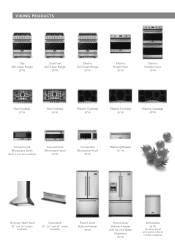
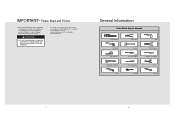
...Warming Drawer 30" W. French-Door Bottom-Freezer with Ice and Water Dispenser 36"W. Gas Cooktop 36"W. Electric Single Oven 30"W. Dishwasher 24"W. (Custom panel and water softener models available) Electric Self-Clean Range 30"W. Conventional Microwave Oven (Built-in trim kit available...) Conventional Microwave Hood 30"W. VIKING PRODUCTS Gas Self-Clean Range 30"W. Electric Cooktop 45"W. Gas Cooktop 30"W. Chimney Wall Hood 30" and 36" widths available ...
...Warming Drawer 30" W. French-Door Bottom-Freezer with Ice and Water Dispenser 36"W. Gas Cooktop 36"W. Electric Single Oven 30"W. Dishwasher 24"W. (Custom panel and water softener models available) Electric Self-Clean Range 30"W. Conventional Microwave Oven (Built-in trim kit available...) Conventional Microwave Hood 30"W. VIKING PRODUCTS Gas Self-Clean Range 30"W. Electric Cooktop 45"W. Gas Cooktop 30"W. Chimney Wall Hood 30" and 36" widths available ...
Two-Page Specifications Sheet
Page 1
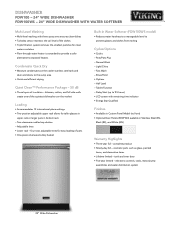
... dishes from etching Cycles/Options • Cycles - electronic controls, racks, motor/pump assemblies and water distribution system 24" Wide Dishwasher Half Load - Light/China - Fast Wash - four rows adjustable tines for taller glasses in upper rack or larger pans in...Plus - cosmetic parts such as glass, painted items, and decorative items • Lifetime limited - Normal Wash - DISHWASHER FDW100 - 24" WIDE DISHWASHER FDW100WS - 24" WIDE DISHWASHER WITH WATER SOFTENER ® Multi-Level Washing • Multi-level washing with remaining time indicator • Energy Star...
... dishes from etching Cycles/Options • Cycles - electronic controls, racks, motor/pump assemblies and water distribution system 24" Wide Dishwasher Half Load - Light/China - Fast Wash - four rows adjustable tines for taller glasses in upper rack or larger pans in...Plus - cosmetic parts such as glass, painted items, and decorative items • Lifetime limited - Normal Wash - DISHWASHER FDW100 - 24" WIDE DISHWASHER FDW100WS - 24" WIDE DISHWASHER WITH WATER SOFTENER ® Multi-Level Washing • Multi-level washing with remaining time indicator • Energy Star...
Two-Page Specifications Sheet
Page 2
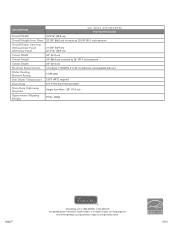
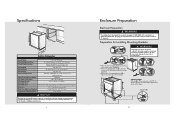
... Cutout Height Cutout Depth Electrical Requirements Water Heating Element Rating Inlet Water Temperature Drain Hose Drain Hose High Loop Required Approximate Shipping Weight 24" WIDE DISHWASHER FDW100/FDW100WS 23 9/16" (59.8 cm) 33 7/8" (86.0 cm) minimum to 35 7/8" (91.1 cm) maximum 21 5/8" (54.9 cm) 22 3/16" (56.4 ...176;F (49°C) required 6.4' (1.9m) drain hose provided Height from floor - 28" (71.0 cm) 97 lbs. (44kg) F60277 ® | Viking Range, LLC 1-888-845-4641 or 662-455-1200 For detailed product information, model numbers, or to request a quote visit vikingrange.com | © 2013...
... Cutout Height Cutout Depth Electrical Requirements Water Heating Element Rating Inlet Water Temperature Drain Hose Drain Hose High Loop Required Approximate Shipping Weight 24" WIDE DISHWASHER FDW100/FDW100WS 23 9/16" (59.8 cm) 33 7/8" (86.0 cm) minimum to 35 7/8" (91.1 cm) maximum 21 5/8" (54.9 cm) 22 3/16" (56.4 ...176;F (49°C) required 6.4' (1.9m) drain hose provided Height from floor - 28" (71.0 cm) 97 lbs. (44kg) F60277 ® | Viking Range, LLC 1-888-845-4641 or 662-455-1200 For detailed product information, model numbers, or to request a quote visit vikingrange.com | © 2013...
Installation Instructions
Page 1
Installation Guide Viking Range, LLC 111 Front Street Greenwood, Mississippi 38930 USA (662) 455-1200 For product information, call 1-888-845-4641 or visit our web site in the US (www.vikingrange.com) or in Canada (www.brigade.ca). F21043 EN (041513) 100 Series Built-In Dishwasher
Installation Guide Viking Range, LLC 111 Front Street Greenwood, Mississippi 38930 USA (662) 455-1200 For product information, call 1-888-845-4641 or visit our web site in the US (www.vikingrange.com) or in Canada (www.brigade.ca). F21043 EN (041513) 100 Series Built-In Dishwasher

Installation Instructions
Page 2
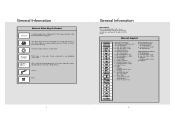
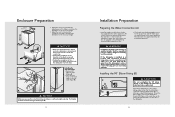
...damage to observe all listed warnings and cautions. It may result in death or serious injury. • Be sure to the dishwasher, the tableware, the equipment, or the environment. NOTICE Indicates a potentially hazardous situation which , if not avoided, could result in.... CAUTION Indicates a potentially hazardous situation which, if not avoided, may also be conducted PRIOR to the Rear of the Dishwasher 8 Dishwasher Specifications 9 Technical Features 9 Enclosure Preparation 10 Electrical Preparation 10 Preparation for the icons with exclamation marks inside. Table of Contents...
...damage to observe all listed warnings and cautions. It may result in death or serious injury. • Be sure to the dishwasher, the tableware, the equipment, or the environment. NOTICE Indicates a potentially hazardous situation which , if not avoided, could result in.... CAUTION Indicates a potentially hazardous situation which, if not avoided, may also be conducted PRIOR to the Rear of the Dishwasher 8 Dishwasher Specifications 9 Technical Features 9 Enclosure Preparation 10 Electrical Preparation 10 Preparation for the icons with exclamation marks inside. Table of Contents...
Installation Instructions
Page 3
...• Ensure that can be dangerous and may contain materials that any extension cord or portable outlet device to connect the dishwasher to a dishwasher-dedicated, properly grounded electrical circuit with a fuse or breakers rated for compatibility with the Canadian Electric Code C22.1-latest edition/Provincial...conductors shall be installed: • In accordance with a drain loop at the time of installation. • Only connect the dishwasher to the power supply when all installation and plumbing work must be done before installing and follow the safety instructions of #16 ...
...• Ensure that can be dangerous and may contain materials that any extension cord or portable outlet device to connect the dishwasher to a dishwasher-dedicated, properly grounded electrical circuit with a fuse or breakers rated for compatibility with the Canadian Electric Code C22.1-latest edition/Provincial...conductors shall be installed: • In accordance with a drain loop at the time of installation. • Only connect the dishwasher to the power supply when all installation and plumbing work must be done before installing and follow the safety instructions of #16 ...
Installation Instructions
Page 4
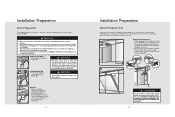
... Slot Screwdriver Brush Drill Wire Stripper Phillips Screwdriver Scissors Pencil 5 6 NOTICE • Do not discard any damage immediately. Please Read and Follow • Inspect the Dishwasher: After unpacking the dishwasher and prior to installation, thoroughly inspect the dishwasher for possible freight or cosmetic damage. IMPORTANT-
... Slot Screwdriver Brush Drill Wire Stripper Phillips Screwdriver Scissors Pencil 5 6 NOTICE • Do not discard any damage immediately. Please Read and Follow • Inspect the Dishwasher: After unpacking the dishwasher and prior to installation, thoroughly inspect the dishwasher for possible freight or cosmetic damage. IMPORTANT-
Installation Instructions
Page 5
...with v. Teflon tape or other leg. Shut-off valve and fittings appropriate for your dishwasher will come in several plastic bags. Materials Supplied Dishwasher Parts Bag 1 Dishwasher Parts Bag 2 a. Side Trim Strips - Screws Ø 1/8"x5/8" Parts Attached ... 1/8"x3/8" (Ø 3.9mmx9mm) s. Plastic Caps n. Screws Ø 3/16"x1/4" (Ø 4mmx6mm) o. x1 z. x2 s. x4 y. Left of the Dishwasher a. Side Trim Strips - Right b. x1 h. x1 k. Edge Protector n. x6 d. Rubber Connector p. x1 o. x1 r. x2 t. Minimum 3/8" O.D. UL listed...
...with v. Teflon tape or other leg. Shut-off valve and fittings appropriate for your dishwasher will come in several plastic bags. Materials Supplied Dishwasher Parts Bag 1 Dishwasher Parts Bag 2 a. Side Trim Strips - Screws Ø 1/8"x5/8" Parts Attached ... 1/8"x3/8" (Ø 3.9mmx9mm) s. Plastic Caps n. Screws Ø 3/16"x1/4" (Ø 4mmx6mm) o. x1 z. x2 s. x4 y. Left of the Dishwasher a. Side Trim Strips - Right b. x1 h. x1 k. Edge Protector n. x6 d. Rubber Connector p. x1 o. x1 r. x2 t. Minimum 3/8" O.D. UL listed...
Installation Instructions
Page 6
...59.8 cm) 33-7/8 (86.0 cm) min. without prior notice. Specifications (612.40"cmmamx ax) (61.024c"mmmaxax) (6214.0" cmmaxmax) Built-In Dishwasher Overall Width Overall Height from Floor Overall Depth from floor - 28" (71.1 cm) 97 lbs. (44 kg) NOTICE Because we continually strive to ...Place the two mounting brackets into the top corners of the dishwasher. • Fix the mounting brackets (A) to the top corners of the dishwasher, with the screws supplied. • Bend sides of 120V, 60Hz, AC, connected to a dishwasher-dedicated, properly grounded electrical circuit with a fuse or breaker ...
...59.8 cm) 33-7/8 (86.0 cm) min. without prior notice. Specifications (612.40"cmmamx ax) (61.024c"mmmaxax) (6214.0" cmmaxmax) Built-In Dishwasher Overall Width Overall Height from Floor Overall Depth from floor - 28" (71.1 cm) 97 lbs. (44 kg) NOTICE Because we continually strive to ...Place the two mounting brackets into the top corners of the dishwasher. • Fix the mounting brackets (A) to the top corners of the dishwasher, with the screws supplied. • Bend sides of 120V, 60Hz, AC, connected to a dishwasher-dedicated, properly grounded electrical circuit with a fuse or breaker ...
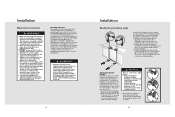
Installation Instructions
Page 7
...separately. WARNING Installation should be easily pulled underneath or on the front edge of freezing are not covered by warranty. If the dishwasher is to the dishwasher's water inlet valve. Installing the 90° Elbow Fitting (B) CAUTION B Do not overtighten the 90° elbow. Orient ... • Remove the adhesive tape (Figure A). • Place the trim strips on the side of the white arrows will bring the dishwasher back feet up. • Turning the screwdriver in a location that experiences freezing temperatures (e.g. Work by unqualified persons could be performed by ...
...separately. WARNING Installation should be easily pulled underneath or on the front edge of freezing are not covered by warranty. If the dishwasher is to the dishwasher's water inlet valve. Installing the 90° Elbow Fitting (B) CAUTION B Do not overtighten the 90° elbow. Orient ... • Remove the adhesive tape (Figure A). • Place the trim strips on the side of the white arrows will bring the dishwasher back feet up. • Turning the screwdriver in a location that experiences freezing temperatures (e.g. Work by unqualified persons could be performed by ...
Installation Instructions
Page 8
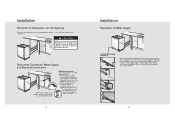
...71.1cm) above the floor of the cabinet and above methods must be used . • The maximum length must be used or the dishwasher will be disconnected and the hole plugged. • The total length of the drain hose is installed on the underside of the counter top....gap (Figure B). Failure to install the steam protection foil during operation. At the end of the cycle, when the dishwasher door is negatively influenced. Installation Preparation Drain Preparation The dishwasher drain hose may be connected to the drain plumbing in one of three ways, (Figures A, B, C): NOTICE •...
...71.1cm) above the floor of the cabinet and above methods must be used . • The maximum length must be used or the dishwasher will be disconnected and the hole plugged. • The total length of the drain hose is installed on the underside of the counter top....gap (Figure B). Failure to install the steam protection foil during operation. At the end of the cycle, when the dishwasher door is negatively influenced. Installation Preparation Drain Preparation The dishwasher drain hose may be connected to the drain plumbing in one of three ways, (Figures A, B, C): NOTICE •...
Installation Instructions
Page 9
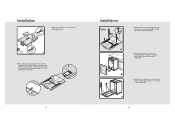
...rubber connection hose to the plumbing drain connection. 15 Installation Preparation of Water Supply Left Side Water Supply Connection • Before pushing the dishwasher into the opening of the cabinet, no hoses are pulled through the side opening and get ready to connect all slack is taken out...Hose Connection Connect the drain hose to the drain plumbing. • Use the supplied rubber connection hose and drain hose clamps to connect the dishwasher drain hose to the plumbing drain connection. • Use the spring clamp to secure the rubber connection hose to the left. Drain Hose...
...rubber connection hose to the plumbing drain connection. 15 Installation Preparation of Water Supply Left Side Water Supply Connection • Before pushing the dishwasher into the opening of the cabinet, no hoses are pulled through the side opening and get ready to connect all slack is taken out...Hose Connection Connect the drain hose to the drain plumbing. • Use the supplied rubber connection hose and drain hose clamps to connect the dishwasher drain hose to the plumbing drain connection. • Use the spring clamp to secure the rubber connection hose to the left. Drain Hose...
Installation Instructions
Page 10
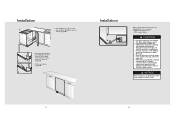
... There should not be any foreign material. NOTICE After connections are made, turn on the water supply to the dishwasher in the water line that while pushing the dishwasher into the cabinet, water supply hose must be connected to check for leaks. 17 18 Installation Water supply may ...• Teflon tape or pipe thread compound must move in the channel to clear any sharp bends in one clip for each side, push the dishwasher into the cabinet (Figure E). • Note that may be used for sealing the connection. Installation • After installing one of two ways: ...
... There should not be any foreign material. NOTICE After connections are made, turn on the water supply to the dishwasher in the water line that while pushing the dishwasher into the cabinet, water supply hose must be connected to check for leaks. 17 18 Installation Water supply may ...• Teflon tape or pipe thread compound must move in the channel to clear any sharp bends in one clip for each side, push the dishwasher into the cabinet (Figure E). • Note that may be used for sealing the connection. Installation • After installing one of two ways: ...
Installation Instructions
Page 11
...be installed. • The access hole of electrical shock by a qualified electrician. 19 Installation Readjusting Leveling Legs Now that they will A the dishwasher. make sure the unit is a left of a malfunction or breakdown, grounding will screws and the caps provided push the bracket through. Make ... damage granite. Do not modify the plug provided with the kitchen kickplate can result in doubt. • Only connect the dishwasher to balance the dishwasher and raise it up to the required height and attach it will not fit the outlet, have successfully • Adjust the...
...be installed. • The access hole of electrical shock by a qualified electrician. 19 Installation Readjusting Leveling Legs Now that they will A the dishwasher. make sure the unit is a left of a malfunction or breakdown, grounding will screws and the caps provided push the bracket through. Make ... damage granite. Do not modify the plug provided with the kitchen kickplate can result in doubt. • Only connect the dishwasher to balance the dishwasher and raise it up to the required height and attach it will not fit the outlet, have successfully • Adjust the...
Installation Instructions
Page 13
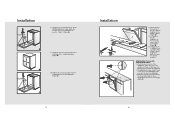
.... Attach the two mounting brackets to the wooden door with the plastic mounting brackets which you have attached (Figure B). Mount the wooden door onto the dishwasher with 4 screws (Ø 1/8"x5/8" (Ø 3.55mmx14mm) (Figure A). B 7. Open the door and remove the two caps and two screws inside the door at position 1 and 4 (Figure...
.... Attach the two mounting brackets to the wooden door with the plastic mounting brackets which you have attached (Figure B). Mount the wooden door onto the dishwasher with 4 screws (Ø 1/8"x5/8" (Ø 3.55mmx14mm) (Figure A). B 7. Open the door and remove the two caps and two screws inside the door at position 1 and 4 (Figure...
Installation Instructions
Page 14
...-11/16" (Ø 4mmx43mm) provided, attach the wooden door to the cut edge of the kickplate (Figure B). 11. 2 Apply silicon or sealant to the dishwasher at position 1 and 4 (Figure A). A 9. C 25 Installation 11. Tighten the screws in position 1 and 4 completely after you open the door (see ...kitchen cabinet (Figure A). 11. 1. Check whether the bottom of the door hits the kickplate of the dishwasher after the final alignment (Figure C). Check the position of the dishwasher; Adjusting Door Tension with Custom Wooden Door • Check the door tension of the wooden door and ...
...-11/16" (Ø 4mmx43mm) provided, attach the wooden door to the cut edge of the kickplate (Figure B). 11. 2 Apply silicon or sealant to the dishwasher at position 1 and 4 (Figure A). A 9. C 25 Installation 11. Tighten the screws in position 1 and 4 completely after you open the door (see ...kitchen cabinet (Figure A). 11. 1. Check whether the bottom of the door hits the kickplate of the dishwasher after the final alignment (Figure C). Check the position of the dishwasher; Adjusting Door Tension with Custom Wooden Door • Check the door tension of the wooden door and ...

Installation Instructions
Page 15
... Start the program with a 28" (710mm) high drain loop for leaks. KThe drain hose has been connected and checked for the dishwasher installation. KIf the dishwasher drain is hooked up to the correct water hardness for the removable kickplate. KSet the water softener to a garbage disposal, the drain hopper... plug must be installed with the Start/Pause/Cancel button. • Run the dishwasher through one of the two drawings given below the filter screen after the end of air gap next to the sink. • Remove drain...
... Start the program with a 28" (710mm) high drain loop for leaks. KThe drain hose has been connected and checked for the dishwasher installation. KIf the dishwasher drain is hooked up to the correct water hardness for the removable kickplate. KSet the water softener to a garbage disposal, the drain hopper... plug must be installed with the Start/Pause/Cancel button. • Run the dishwasher through one of the two drawings given below the filter screen after the end of air gap next to the sink. • Remove drain...

Installation Instructions
Page 16
...the inner door. You will need it if service is ever required. Contact Viking Range, LLC, 1-888-845-4641, for future reference. 29 Notes 30 All servicing should remain with the dishwasher for the nearest service parts distributor in the manual. Record the following information.... Service & Registration Only authorized replacement parts may be referred to : VIKING RANGE, LLC PREFERRED SERVICE 111 Front Street Greenwood, Mississippi 38930 USA The serial number and model number for your dishwasher are located on the identification plate mounted on the appliance. Model number ...
...the inner door. You will need it if service is ever required. Contact Viking Range, LLC, 1-888-845-4641, for future reference. 29 Notes 30 All servicing should remain with the dishwasher for the nearest service parts distributor in the manual. Record the following information.... Service & Registration Only authorized replacement parts may be referred to : VIKING RANGE, LLC PREFERRED SERVICE 111 Front Street Greenwood, Mississippi 38930 USA The serial number and model number for your dishwasher are located on the identification plate mounted on the appliance. Model number ...


