
One-Pack Handle Insert for All D3 Series Products - Installation Instructions
Page 2
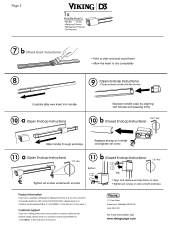
Ovens -Warming Drawers - Customer Support If you own a Viking product and have a question pertaining the Viking product line or if you have questions or require assistance with non-technical information, please speak to a customer service representative at 1-888-VIKING1 (1-888-845-4641), then press 2. Refrigerator/Freezers - Ranges - Dishwashers b (Wood Insert Instructions) 8 • Paint or...
Ovens -Warming Drawers - Customer Support If you own a Viking product and have a question pertaining the Viking product line or if you have questions or require assistance with non-technical information, please speak to a customer service representative at 1-888-VIKING1 (1-888-845-4641), then press 2. Refrigerator/Freezers - Ranges - Dishwashers b (Wood Insert Instructions) 8 • Paint or...

Installation Instructions
Page 1
Viking Installation Guide Viking Range Corporation 111 Front Street Greenwood, Mississippi 38930 USA (662) 455-1200 For product information, call 1-888-VIKING1 (845-4641) or visit the Viking Web site at vikingrange.com F20880B EN (092812) 301/451 Series Built-In Dishwashers
Viking Installation Guide Viking Range Corporation 111 Front Street Greenwood, Mississippi 38930 USA (662) 455-1200 For product information, call 1-888-VIKING1 (845-4641) or visit the Viking Web site at vikingrange.com F20880B EN (092812) 301/451 Series Built-In Dishwashers

Installation Instructions
Page 2
...the door panel is properly grounded. • The installer should retain for local inspector's use and for future reference. • The dishwasher has a factory installed backflow preventer. Do not add an additional check valve. • Failure to the cabinet. This may void warranty.... 3 Disconnect the electrical power supply and place a tag at circuit breaker or fuse box before making electrical connections. Wiring the dishwasher with applicable sanitary, safety and plumbing codes. WARNING Electrical power must comply with more voltage than it is the same as unit ...
...the door panel is properly grounded. • The installer should retain for local inspector's use and for future reference. • The dishwasher has a factory installed backflow preventer. Do not add an additional check valve. • Failure to the cabinet. This may void warranty.... 3 Disconnect the electrical power supply and place a tag at circuit breaker or fuse box before making electrical connections. Wiring the dishwasher with applicable sanitary, safety and plumbing codes. WARNING Electrical power must comply with more voltage than it is the same as unit ...

Installation Instructions
Page 3
...disconnect switch indicating that you are not installed properly or do so can result in a risk of water or moisture. • Viking Range Corporation will NOT warranty any loose-fitting gaskets (if applicable in outdoor situations) • Protected from GFI outlets which are ...connector in serious injury or cuts. Do Not add an additional check valve. WARNING Improper connection of a GFI is properly grounded. CAUTION The dishwasher has a factory installed backflow preventer. IMPORTANT-Please Read and Follow! WARNING TIP OVER HAZARD • DO NOT use an extension cord for ...
...disconnect switch indicating that you are not installed properly or do so can result in a risk of water or moisture. • Viking Range Corporation will NOT warranty any loose-fitting gaskets (if applicable in outdoor situations) • Protected from GFI outlets which are ...connector in serious injury or cuts. Do Not add an additional check valve. WARNING Improper connection of a GFI is properly grounded. CAUTION The dishwasher has a factory installed backflow preventer. IMPORTANT-Please Read and Follow! WARNING TIP OVER HAZARD • DO NOT use an extension cord for ...

Installation Instructions
Page 4
...)).. includes door panel With door open - 49" (124.5 cm) 24" (61.0 cm) 34" (86.4 cm) min. To edge of side - 23-5/8" (60.0 cm) - Dishwasher will vary. 10 to 125 psi (0.69 to 35" (89.0 cm) max. Note: A 2" (5.1 cm) cut-out is required for 5/8" (1.6 cm), 3/4" (1.9 cm) or 1"... element rating Inlet water temperature Inlet water pressure operating range Inlet water hose Drain hose Drain hose high loop required Approximate shipping weight Built-In Dishwasher 301 Models 451 Models 23-7/8" (60.6 cm) 33-7/8" (86.0 cm) min. Professional 26-5/8" (67.6 cm) 23-5/8" (60.0 cm) 3" (7.6 cm) Custom ...
...)).. includes door panel With door open - 49" (124.5 cm) 24" (61.0 cm) 34" (86.4 cm) min. To edge of side - 23-5/8" (60.0 cm) - Dishwasher will vary. 10 to 125 psi (0.69 to 35" (89.0 cm) max. Note: A 2" (5.1 cm) cut-out is required for 5/8" (1.6 cm), 3/4" (1.9 cm) or 1"... element rating Inlet water temperature Inlet water pressure operating range Inlet water hose Drain hose Drain hose high loop required Approximate shipping weight Built-In Dishwasher 301 Models 451 Models 23-7/8" (60.6 cm) 33-7/8" (86.0 cm) min. Professional 26-5/8" (67.6 cm) 23-5/8" (60.0 cm) 3" (7.6 cm) Custom ...

Installation Instructions
Page 5
...bottom of panel shown. Custom Door Panel (Specifications for wood screws to attach the panel to the dishwasher door using the dimensions shown in the figure. 4 1 1 Use locators to align the panel to the dishwasher door holes. 1 1 1 x4 1 2 Use non-marring clamps to hold custom panel in... Option) Have the overlay panel constructed per dimensions. Use caution not to reliably operate in the hardware package. 3 x4 Pre-drill other four locations for FDB451 Models) 14" (35.6 cm) 10-5/8" (27.0 cm) Locator ø1/8" 4 places (0.3 cm) 22-5/32" (56.3 cm) 29-3/4" (75.6 cm) to avoid ...
...bottom of panel shown. Custom Door Panel (Specifications for wood screws to attach the panel to the dishwasher door using the dimensions shown in the figure. 4 1 1 Use locators to align the panel to the dishwasher door holes. 1 1 1 x4 1 2 Use non-marring clamps to hold custom panel in... Option) Have the overlay panel constructed per dimensions. Use caution not to reliably operate in the hardware package. 3 x4 Pre-drill other four locations for FDB451 Models) 14" (35.6 cm) 10-5/8" (27.0 cm) Locator ø1/8" 4 places (0.3 cm) 22-5/32" (56.3 cm) 29-3/4" (75.6 cm) to avoid ...

Installation Instructions
Page 6
...refer to the "Counter Balance Spring" section. 10 General Information • Read these instructions carefully and completely before completing the installation. The dishwasher is supplied with a 5' (1.5 m) braided stainless steel water line with applicable sanitary, safety, and plumbing codes. • Water pressure for...line and the shut-off valve (not supplied) should be a minimum of 9" (22.9cm) from the floor. CAUTION The dishwasher has a factory installed backflow preventer. Site Preparation Note: It is recommended that are in the drain line that a thorough site inspection...
...refer to the "Counter Balance Spring" section. 10 General Information • Read these instructions carefully and completely before completing the installation. The dishwasher is supplied with a 5' (1.5 m) braided stainless steel water line with applicable sanitary, safety, and plumbing codes. • Water pressure for...line and the shut-off valve (not supplied) should be a minimum of 9" (22.9cm) from the floor. CAUTION The dishwasher has a factory installed backflow preventer. Site Preparation Note: It is recommended that are in the drain line that a thorough site inspection...
Installation Instructions
Page 7
...conductor can result in a risk of the equipment - Check with the circuit conductors and connected to pinch hoses or power cord beneath dishwasher. 3 Remove bottom pan. Note: Rapid removal of damage to a grounded metal, permanent wiring system; There should be exercised, when...2. The conductors should be plugged into an appropriate outlet that you are working on the appliance. • For a cord connected undercounter dishwasher: 1. Run wires through . Do not use only copper supply conductors. This cord should have a proper outlet installed by the manufacturer; ...
...conductor can result in a risk of the equipment - Check with the circuit conductors and connected to pinch hoses or power cord beneath dishwasher. 3 Remove bottom pan. Note: Rapid removal of damage to a grounded metal, permanent wiring system; There should be exercised, when...2. The conductors should be plugged into an appropriate outlet that you are working on the appliance. • For a cord connected undercounter dishwasher: 1. Run wires through . Do not use only copper supply conductors. This cord should have a proper outlet installed by the manufacturer; ...
Installation Instructions
Page 8
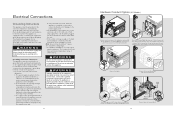
... 1 2 Remove terminal block cover. Remove bottom pan. Remove factory installed power cable from the moisture sensor, which is located in the dishwasher and carefully lay the dishwasher on its back. Note: Be careful not to terminal block. 7 Green (Ground) 1 8 2 2 3 Connect ground wire. White... (Neutral) 1 1 2 Black (Line) Connect wires to pinch hoses or power cord beneath dishwasher. Tighten screws on bottom pan. Note: Reinstall ...
... 1 2 Remove terminal block cover. Remove bottom pan. Remove factory installed power cable from the moisture sensor, which is located in the dishwasher and carefully lay the dishwasher on its back. Note: Be careful not to terminal block. 7 Green (Ground) 1 8 2 2 3 Connect ground wire. White... (Neutral) 1 1 2 Black (Line) Connect wires to pinch hoses or power cord beneath dishwasher. Tighten screws on bottom pan. Note: Reinstall ...
Installation Instructions
Page 9
... gasket to leading edge of side trim. 1b 2b 2 2 x6 1 To install dishwasher without trim, remove the 6 screws (3 per side) and remove trim. Trim Installation Options (451 Models) 1a Dishwasher ships with trim installed for flush install. Trim gasket to dishwasher by pulling protective film off adhesive back. If needed , attach wiper gasket...
... gasket to leading edge of side trim. 1b 2b 2 2 x6 1 To install dishwasher without trim, remove the 6 screws (3 per side) and remove trim. Trim Installation Options (451 Models) 1a Dishwasher ships with trim installed for flush install. Trim gasket to dishwasher by pulling protective film off adhesive back. If needed , attach wiper gasket...

Installation Instructions
Page 10
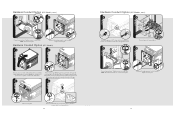
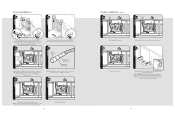
... handle, then adjust to appropriate height. Note: Be careful not to pinch hoses or power cord beneath dishwasher. 3 1 2 To adjust the depth of cutout. Tighten screws and repeat for other side. 4a 1 1 Using tie strap attached to feed water, electrical and discharge ... stationary and not move in the base. To check level, front to back. Note: Leveling is important for the brackets will already be sure to dishwasher, band water line, drain line, and power cord together. 4b 1 1 2 x2 For installation with trim, attach brackets with two screws (1 per bracket). 5 2 x2 For ...
... handle, then adjust to appropriate height. Note: Be careful not to pinch hoses or power cord beneath dishwasher. 3 1 2 To adjust the depth of cutout. Tighten screws and repeat for other side. 4a 1 1 Using tie strap attached to feed water, electrical and discharge ... stationary and not move in the base. To check level, front to back. Note: Leveling is important for the brackets will already be sure to dishwasher, band water line, drain line, and power cord together. 4b 1 1 2 x2 For installation with trim, attach brackets with two screws (1 per bracket). 5 2 x2 For ...
Installation Instructions
Page 11
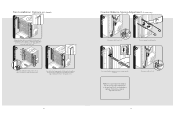
...High Loop Clip, which is provided, a minimum of "General Information" for proper installation requirements. 12a x2 For installation without trim, secure dishwasher by attaching provided mounting plugs and wood screws through top brackets into cabinets. 10 Minimum 20" (50.8 cm) from the floor. ...Attach screws through trim panels into dishwasher (select models only) and install kick plate. Plug LED light into cabinets. Clamp if necessary. 12b (Discharge with food waste disposer...
...High Loop Clip, which is provided, a minimum of "General Information" for proper installation requirements. 12a x2 For installation without trim, secure dishwasher by attaching provided mounting plugs and wood screws through top brackets into cabinets. 10 Minimum 20" (50.8 cm) from the floor. ...Attach screws through trim panels into dishwasher (select models only) and install kick plate. Plug LED light into cabinets. Clamp if necessary. 12b (Discharge with food waste disposer...

Installation Instructions
Page 12
... performing service on the bottom left side of purchase Date installed Dealer's name Address These installation instructions should remain with the dishwasher for leaks under the dishwasher. Record the following checks: h Remove packaging and parts. You will need to : Vari-P res s ure Intelli-Was...out the following information indicated below. h Turn on the water supply and check for your dishwasher are located on the identification plate mounted on the appliance. Contact Viking Range Corporation, 1-888-VIKING1 (845-4641), for the nearest service parts distributor in your...
... performing service on the bottom left side of purchase Date installed Dealer's name Address These installation instructions should remain with the dishwasher for leaks under the dishwasher. Record the following checks: h Remove packaging and parts. You will need to : Vari-P res s ure Intelli-Was...out the following information indicated below. h Turn on the water supply and check for your dishwasher are located on the identification plate mounted on the appliance. Contact Viking Range Corporation, 1-888-VIKING1 (845-4641), for the nearest service parts distributor in your...

Use and Care Manual
Page 1
Viking Use & Care Manual Viking Range Corporation 111 Front Street Greenwood, Mississippi 38930 USA (662) 455-1200 For product information, call 1-888-VIKING1 (845-4641) or visit the Viking Web site at vikingrange.com F20879B EN (092812 451 Series Built-In Dishwashers
Viking Use & Care Manual Viking Range Corporation 111 Front Street Greenwood, Mississippi 38930 USA (662) 455-1200 For product information, call 1-888-VIKING1 (845-4641) or visit the Viking Web site at vikingrange.com F20879B EN (092812 451 Series Built-In Dishwashers

Use and Care Manual
Page 2
... 12 Preparing Dishes 13 Operation Changing a Program 14 Washing Recommendations 15 Rack Adjustments 17 Two-Piece Silverware Basket 18 Loading the Dishwasher 19 Loading Two-Piece Silverware Basket 20 Sliding Side Utensil Basket 21 Loading Racks (10 Place Setting 22 Loading Racks (15 ... you need to offer years of reliable service. Your Viking dishwasher is our ultimate goal. If you have joined the elite world of Viking ownership. Congratulations With your purchase of the world's most powerful and intelligent dishwasher, you have any questions or comments about the complete ...
... 12 Preparing Dishes 13 Operation Changing a Program 14 Washing Recommendations 15 Rack Adjustments 17 Two-Piece Silverware Basket 18 Loading the Dishwasher 19 Loading Two-Piece Silverware Basket 20 Sliding Side Utensil Basket 21 Loading Racks (10 Place Setting 22 Loading Racks (15 ... you need to offer years of reliable service. Your Viking dishwasher is our ultimate goal. If you have joined the elite world of Viking ownership. Congratulations With your purchase of the world's most powerful and intelligent dishwasher, you have any questions or comments about the complete ...

Use and Care Manual
Page 3
...been properly connected to an appropriate electrical supply, water supply and drain. ° Has been securely mounted to run for several minutes before using your dishwasher, turn on all hot water faucets and allow water to the cabinet. ° Is properly maintained. ° Has had all shipping materials, ...packaging and temporary labels removed. • Install dishwasher so that they are not likely to damage the door seal and load sharp knives with the handles up to avoid the risk of personal...
...been properly connected to an appropriate electrical supply, water supply and drain. ° Has been securely mounted to run for several minutes before using your dishwasher, turn on all hot water faucets and allow water to the cabinet. ° Is properly maintained. ° Has had all shipping materials, ...packaging and temporary labels removed. • Install dishwasher so that they are not likely to damage the door seal and load sharp knives with the handles up to avoid the risk of personal...
Use and Care Manual
Page 4
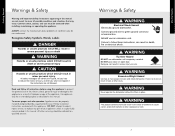
..., electric shock, personal injury or damage to cause cancer and/or birth defects or other injury WARNING Never operate the dishwasher without the filters in place. To ensure proper and safe operation: Appliance must be exercised when installing, maintaining, or ...result in death, fire or electrical shock. Failure to a qualified servicer. 6 Warnings & Safety WARNING Electrical Shock Hazard Electrically ground dishwasher. Follow installation instructions enclosed with this manual. Common sense, caution, and care must be referred to follow all possible conditions and...
..., electric shock, personal injury or damage to cause cancer and/or birth defects or other injury WARNING Never operate the dishwasher without the filters in place. To ensure proper and safe operation: Appliance must be exercised when installing, maintaining, or ...result in death, fire or electrical shock. Failure to a qualified servicer. 6 Warnings & Safety WARNING Electrical Shock Hazard Electrically ground dishwasher. Follow installation instructions enclosed with this manual. Common sense, caution, and care must be referred to follow all possible conditions and...

Use and Care Manual
Page 6
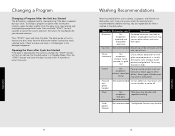
... varying pressures. If the "START" button is not pressed or if the door is not available with NSF/ANSI STANDARD 184 for Residential Dishwashers. Long heated prewash loosens up to the cycle. Note: Periods of 2 long beeps. Adds heat and time to 10 hours. This ...light will illuminate when the cycle has been completed. The "SANITIZED" indicator will not illuminate. If your dishwasher did not properly sanitize your dishes and glassware in removal of the dishwasher kickplate when a cycle is interrupted. Options TOP WASH Washes dishes on this cycle. ILLUMINATION OF BUTTONS Option...
... varying pressures. If the "START" button is not pressed or if the door is not available with NSF/ANSI STANDARD 184 for Residential Dishwashers. Long heated prewash loosens up to the cycle. Note: Periods of 2 long beeps. Adds heat and time to 10 hours. This ...light will illuminate when the cycle has been completed. The "SANITIZED" indicator will not illuminate. If your dishwasher did not properly sanitize your dishes and glassware in removal of the dishwasher kickplate when a cycle is interrupted. Options TOP WASH Washes dishes on this cycle. ILLUMINATION OF BUTTONS Option...

Use and Care Manual
Page 7
... vinegar, mustard, mayonnaise, and salad dressings-with the "LIGHT/CHINA" or "FAST WASH" cycles. • No options are dependent on Loading Dishwasher. 2. See section on Rinse Agent. 3. The "START" symbol will add approximately one hour to indicate the unit is ready. Note: Heating ...pressing the "START" button. 13 Product Controls See section on installation and environmental conditions. Push both top and bottom racks in the dishwasher, although larger solid particles, such as bones, seeds, skins, pits, and toothpicks should be extended. Close the door securely within ...
... vinegar, mustard, mayonnaise, and salad dressings-with the "LIGHT/CHINA" or "FAST WASH" cycles. • No options are dependent on Loading Dishwasher. 2. See section on Rinse Agent. 3. The "START" symbol will add approximately one hour to indicate the unit is ready. Note: Heating ...pressing the "START" button. 13 Product Controls See section on installation and environmental conditions. Push both top and bottom racks in the dishwasher, although larger solid particles, such as bones, seeds, skins, pits, and toothpicks should be extended. Close the door securely within ...
Use and Care Manual
Page 8
...To change a program or option after the cycle has started, the "START" button will flash to remove any dirty water from the dishwasher before washing. Yes exceptions: anodized and disposable aluminum Comments Anodized aluminum may discolor with glaze covered patterns is opened during a cycle. ...decoration or with repeated washing. Check to cancel the current selection, then press the touchpad(s) for what is still detergent in the dishwasher. Antique, handpainted and gold-leaf China may discolor or fade. Press and hold "START" for four seconds to make sure ...
...To change a program or option after the cycle has started, the "START" button will flash to remove any dirty water from the dishwasher before washing. Yes exceptions: anodized and disposable aluminum Comments Anodized aluminum may discolor with glaze covered patterns is opened during a cycle. ...decoration or with repeated washing. Check to cancel the current selection, then press the touchpad(s) for what is still detergent in the dishwasher. Antique, handpainted and gold-leaf China may discolor or fade. Press and hold "START" for four seconds to make sure ...


