
User Guide
Page 5
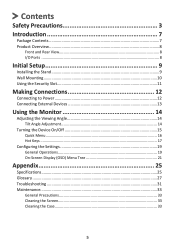
Contents Safety Precautions 3 Introduction 7 Package Contents...7 Product Overview...8 Front and Rear View 8 I/O Ports ...8 Initial Setup 9 Installing the Stand 9 Wall Mounting...10 Using the Security Slot 11 Making Connections 12 Connecting to Power 12 Connecting External Devices 13 Using the Monitor ...
Contents Safety Precautions 3 Introduction 7 Package Contents...7 Product Overview...8 Front and Rear View 8 I/O Ports ...8 Initial Setup 9 Installing the Stand 9 Wall Mounting...10 Using the Security Slot 11 Making Connections 12 Connecting to Power 12 Connecting External Devices 13 Using the Monitor ...

User Guide
Page 9
Failure to do so may cause the device to fall and become damaged, or result in personal injury. 9 Initial Setup Installing the Stand 1 1 2 2 3 NOTE: Always place the device on a flat, stable surface.
Failure to do so may cause the device to fall and become damaged, or result in personal injury. 9 Initial Setup Installing the Stand 1 1 2 2 3 NOTE: Always place the device on a flat, stable surface.

User Guide
Page 19
Input Select Audio Adjust ViewMode Color Adjust Manual Image Setup Menu Adjust HDMI 1 HDMI 2 DisplayPort 75% 1920 x 1080 @ 60Hz 2. Press the 1(«) or 2 key to display the On-Screen Display (OSD) Menu. Press the 2/3/4 key to select the main menu. Then press the 3 key to enter the selected menu. Configuring the Settings General Operations 1. Input Select Audio Adjust ViewMode Color Adjust Manual Image Setup Menu Adjust Contrast/Brightness Color Temperature Color Space Color Range Contrast Brightness 75% 1920 x 1080 @ 60Hz 19
Input Select Audio Adjust ViewMode Color Adjust Manual Image Setup Menu Adjust HDMI 1 HDMI 2 DisplayPort 75% 1920 x 1080 @ 60Hz 2. Press the 1(«) or 2 key to display the On-Screen Display (OSD) Menu. Press the 2/3/4 key to select the main menu. Then press the 3 key to enter the selected menu. Configuring the Settings General Operations 1. Input Select Audio Adjust ViewMode Color Adjust Manual Image Setup Menu Adjust Contrast/Brightness Color Temperature Color Space Color Range Contrast Brightness 75% 1920 x 1080 @ 60Hz 19

User Guide
Page 20
... Temperature Color Space Color Range sRGB Bluish Cool Native Warm User Color 75% 1920 x 1080 @ 60Hz 4. Input Select Audio Adjust ViewMode Color Adjust Manual Image Setup Menu Adjust Contrast/Brightness Color Temperature Color Space Color Range sRGB Bluish Cool Native Warm User Color 75% 1920 x 1080 @ 60Hz NOTE: Certain menu option...
... Temperature Color Space Color Range sRGB Bluish Cool Native Warm User Color 75% 1920 x 1080 @ 60Hz 4. Input Select Audio Adjust ViewMode Color Adjust Manual Image Setup Menu Adjust Contrast/Brightness Color Temperature Color Space Color Range sRGB Bluish Cool Native Warm User Color 75% 1920 x 1080 @ 60Hz NOTE: Certain menu option...
User Guide
Page 23
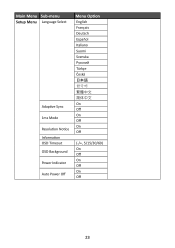
Main Menu Sub-menu Setup Menu Language Select Adaptive Sync 1ms Mode Resolution Notice Information OSD Timeout OSD Background Power Indicator Auto Power Off Menu Option English Français Deutsch Español Italiano Suomi Svenska Türkçe Česk On Off On Off On Off (-/+, 5/15/30/60) On Off On Off On Off 23
Main Menu Sub-menu Setup Menu Language Select Adaptive Sync 1ms Mode Resolution Notice Information OSD Timeout OSD Background Power Indicator Auto Power Off Menu Option English Français Deutsch Español Italiano Suomi Svenska Türkçe Česk On Off On Off On Off (-/+, 5/15/30/60) On Off On Off On Off 23

User Guide
Page 24
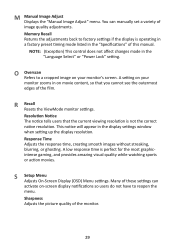
Main Menu Sub-menu Setup Menu Sleep ECO Mode Auto Detect DDC/CI Memory Recall Menu Option 30 Minutes 45 Minutes 60 Minutes 120 Minutes Off Standard Optimize Conserve On Off On Off 24
Main Menu Sub-menu Setup Menu Sleep ECO Mode Auto Detect DDC/CI Memory Recall Menu Option 30 Minutes 45 Minutes 60 Minutes 120 Minutes Off Standard Optimize Conserve On Off On Off 24
User Guide
Page 29
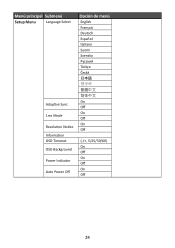
O Overscan Refers to a cropped image on your monitor zooms in the "Specifications" of the monitor. 29 R Recall Resets the ViewMode monitor settings. S Setup Menu Adjusts On-Screen Display (OSD) Menu settings. Many of image quality adjustments. Response Time Adjusts the response time, creating smooth images without streaking, blurring, ...
O Overscan Refers to a cropped image on your monitor zooms in the "Specifications" of the monitor. 29 R Recall Resets the ViewMode monitor settings. S Setup Menu Adjusts On-Screen Display (OSD) Menu settings. Many of image quality adjustments. Response Time Adjusts the response time, creating smooth images without streaking, blurring, ...
User Guide Spanish/Espanol
Page 24
Menú principal Submenú Setup Menu Language Select Adaptive Sync 1ms Mode Resolution Notice Information OSD Timeout OSD Background Power Indicator Auto Power Off Opción de menú English Français Deutsch Español Italiano Suomi Svenska Türkçe Česk On Off On Off On Off (-/+, 5/15/30/60) On Off On Off On Off 24
Menú principal Submenú Setup Menu Language Select Adaptive Sync 1ms Mode Resolution Notice Information OSD Timeout OSD Background Power Indicator Auto Power Off Opción de menú English Français Deutsch Español Italiano Suomi Svenska Türkçe Česk On Off On Off On Off (-/+, 5/15/30/60) On Off On Off On Off 24

User Guide Spanish/Espanol
Page 25
Menú principal Submenú Setup Menu Sleep ECO Mode Auto Detect DDC/CI Memory Recall Opción de menú 30 Minutes 45 Minutes 60 Minutes 120 Minutes Off Standard Optimize Conserve On Off On Off 25
Menú principal Submenú Setup Menu Sleep ECO Mode Auto Detect DDC/CI Memory Recall Opción de menú 30 Minutes 45 Minutes 60 Minutes 120 Minutes Off Standard Optimize Conserve On Off On Off 25