English Owners Manual
Page 3
USA 21 Marine Channels - International 23 Marine Channels - Contents Controls and Indicators 2 Warning 4 Introduction 5 Features 5 Technical Support and Service 6 Maritime Radio Services Operation 6 Included in Your Package 7 Getting Started 8 Mounting the Charging Cradle 8 Attaching the Antenna 8 Attaching the Rechargeable Battery Pack 8 Attaching the Beltclip 9 Charging the ...
USA 21 Marine Channels - International 23 Marine Channels - Contents Controls and Indicators 2 Warning 4 Introduction 5 Features 5 Technical Support and Service 6 Maritime Radio Services Operation 6 Included in Your Package 7 Getting Started 8 Mounting the Charging Cradle 8 Attaching the Antenna 8 Attaching the Rechargeable Battery Pack 8 Attaching the Beltclip 9 Charging the ...
English Owners Manual
Page 6
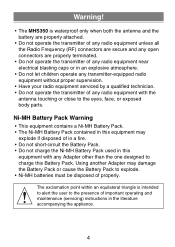
... only when both the antenna and the battery are properly attached. • Do not operate the transmitter of any radio equipment unless all the Radio Frequency (RF) connectors are secure and any open connectors are properly terminated. • Do not operate the transmitter of ...MH Battery Pack contained in this Battery Pack. Warning! • The MHS350 is intended to alert the user to the presence of any radio equipment with any transmitter-equipped radio equipment without proper supervision. • Have your radio equipment serviced by a qualified technician. • Do not operate the ...
... only when both the antenna and the battery are properly attached. • Do not operate the transmitter of any radio equipment unless all the Radio Frequency (RF) connectors are secure and any open connectors are properly terminated. • Do not operate the transmitter of ...MH Battery Pack contained in this Battery Pack. Warning! • The MHS350 is intended to alert the user to the presence of any radio equipment with any transmitter-equipped radio equipment without proper supervision. • Have your radio equipment serviced by a qualified technician. • Do not operate the ...
English Owners Manual
Page 7
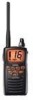
.... To ensure that you consistent, outstanding performance in your hand. This handheld VHF marine radio will give you get the most from the MHS350's features, please read this operating guide carefully before using the unit. Features • Waterproof (meets JIS7 waterproof specifications) • Triple Watch Mode • Programmable ... Save Operation • Key Lock • Back-Lit Keys and Display • Belt Clip • Wrist Strap • TX Power 1W/5W 5 Introduction The MHS350 is compact, lightweight, rugged and fits easily in virtually all conditions and situations.
.... To ensure that you consistent, outstanding performance in your hand. This handheld VHF marine radio will give you get the most from the MHS350's features, please read this operating guide carefully before using the unit. Features • Waterproof (meets JIS7 waterproof specifications) • Triple Watch Mode • Programmable ... Save Operation • Key Lock • Back-Lit Keys and Display • Belt Clip • Wrist Strap • TX Power 1W/5W 5 Introduction The MHS350 is compact, lightweight, rugged and fits easily in virtually all conditions and situations.
English Owners Manual
Page 8
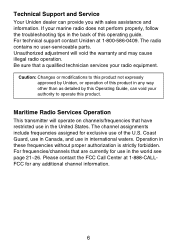
...and use in any additional channel information. 6 Maritime Radio Services Operation This transmitter will void the warranty and may cause illegal radio operation. Operation in international waters. Technical Support and Service Your Uniden dealer can void your authority to this product not ...can provide you with sales assistance and information. If your radio equipment. For technical support contact Uniden at 1-888-CALLFCC for any way other than as detailed by Uniden, or operation of the U.S. The radio contains no user-serviceable parts. Caution: Changes or modifications...
...and use in any additional channel information. 6 Maritime Radio Services Operation This transmitter will void the warranty and may cause illegal radio operation. Operation in international waters. Technical Support and Service Your Uniden dealer can void your authority to this product not ...can provide you with sales assistance and information. If your radio equipment. For technical support contact Uniden at 1-888-CALLFCC for any way other than as detailed by Uniden, or operation of the U.S. The radio contains no user-serviceable parts. Caution: Changes or modifications...
English Owners Manual
Page 10
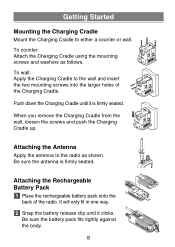
... tightly against the body. 8 To wall: Apply the Charging Cradle to the wall and insert the two mounting screws into the larger holes of the radio. Attaching the Antenna Apply the antenna to either a counter or wall. When you remove the Charging Cradle from the wall, loosen the screws and push...
... tightly against the body. 8 To wall: Apply the Charging Cradle to the wall and insert the two mounting screws into the larger holes of the radio. Attaching the Antenna Apply the antenna to either a counter or wall. When you remove the Charging Cradle from the wall, loosen the screws and push...
English Owners Manual
Page 11
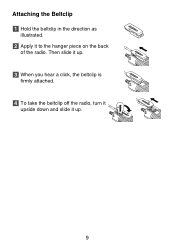
Then slide it up . 9 Attaching the Beltclip 1 Hold the beltclip in the direction as illustrated. 2 Apply it up . 3 When you hear a click, the beltclip is firmly attached. 4 To take the beltclip off the radio, turn it upside down and slide it to the hanger piece on the back of the radio.
Then slide it up . 9 Attaching the Beltclip 1 Hold the beltclip in the direction as illustrated. 2 Apply it up . 3 When you hear a click, the beltclip is firmly attached. 4 To take the beltclip off the radio, turn it upside down and slide it to the hanger piece on the back of the radio.
English Owners Manual
Page 12
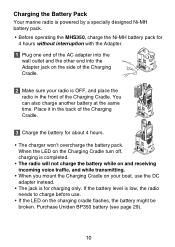
...incoming voice traffic, and while transmitting. • When you mount the Charging Cradle on the charging cradle flashes, the battery might be broken. Purchase Uniden BP350 battery (see page 29). 10 Place it in the front of the Charging Cradle. 3 Charge the battery for about 4 hours. •...; The charger won't overcharge the battery pack. Charging the Battery Pack Your marine radio is powered by a specially designed Ni-MH battery pack. • Before operating the MHS350, charge the Ni-MH battery pack for 4 hours without interruption with the Adapter. 1 Plug one end ...
...incoming voice traffic, and while transmitting. • When you mount the Charging Cradle on the charging cradle flashes, the battery might be broken. Purchase Uniden BP350 battery (see page 29). 10 Place it in the front of the Charging Cradle. 3 Charge the battery for about 4 hours. •...; The charger won't overcharge the battery pack. Charging the Battery Pack Your marine radio is powered by a specially designed Ni-MH battery pack. • Before operating the MHS350, charge the Ni-MH battery pack for 4 hours without interruption with the Adapter. 1 Plug one end ...
English Owners Manual
Page 13
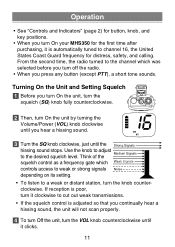
.... If reception is poor, turn it clockwise to cut out weak transmissions. • If the squelch control is adjusted so that you turn On your MHS350 for distress, safety, and calling. Operation • See "Controls and Indicators" (page 2) for button, knob, and key positions. • When you continually hear...to channel 16, the United States Coast Guard frequency for the first time after purchasing, it clicks. 11 From the second time, the radio turned to the channel which Weak Signals controls access to weak or strong signals Noise depending on its setting. • To listen to the...
.... If reception is poor, turn it clockwise to cut out weak transmissions. • If the squelch control is adjusted so that you turn On your MHS350 for distress, safety, and calling. Operation • See "Controls and Indicators" (page 2) for button, knob, and key positions. • When you continually hear...to channel 16, the United States Coast Guard frequency for the first time after purchasing, it clicks. 11 From the second time, the radio turned to the channel which Weak Signals controls access to weak or strong signals Noise depending on its setting. • To listen to the...

English Owners Manual
Page 14
Selecting a Channel 1 Turn On your radio. 2 To select a higher channel, press the L button. [UP ] 3 To select a lower channel, press the M button. • To change the channel continuously, press and hold the L or M button for more than 1 second. [DOWN ] One-touch Channel 16/9/TRI Example: While you are monitoring channel 20, you want to check channel 16 or channel 9. 1 You are now on channel 20. 2 To monitor channel 16, press the 16/9/TRI button. 3 To monitor channel 9, press the 16/9/TRI button again. 4 To return to channel 20, press the 16/9/TRI button again. 12
Selecting a Channel 1 Turn On your radio. 2 To select a higher channel, press the L button. [UP ] 3 To select a lower channel, press the M button. • To change the channel continuously, press and hold the L or M button for more than 1 second. [DOWN ] One-touch Channel 16/9/TRI Example: While you are monitoring channel 20, you want to check channel 16 or channel 9. 1 You are now on channel 20. 2 To monitor channel 16, press the 16/9/TRI button. 3 To monitor channel 9, press the 16/9/TRI button again. 4 To return to channel 20, press the 16/9/TRI button again. 12

English Owners Manual
Page 15
... on channel 9 if you listen to the Triple Watch mode, simply press the button again. 13 To return to the currently selected channel. The marine radio checks channel 16 and 9 for activity every 2 seconds. 1 To select Triple Watch mode, press and hold the 16/9/TRI button for 2 seconds. Triple Watch Triple...
... on channel 9 if you listen to the Triple Watch mode, simply press the button again. 13 To return to the currently selected channel. The marine radio checks channel 16 and 9 for activity every 2 seconds. 1 To select Triple Watch mode, press and hold the 16/9/TRI button for 2 seconds. Triple Watch Triple...
English Owners Manual
Page 17
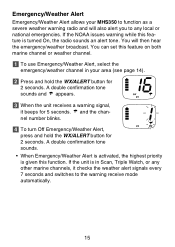
... signal, it checks the weather alert signals every 7 seconds and switches to the warning receive mode automatically. 15 If the unit is turned On, the radio sounds an alert tone. Emergency/Weather Alert Emergency/Weather Alert allows your area (see page 14). 2 Press and hold the WX/ALERT button for 2 seconds.... If the NOAA issues warning while this feature is in your MHS350 to any other marine channels, it beeps for 5 seconds. You will also alert you to function as a severe weather warning...
... signal, it checks the weather alert signals every 7 seconds and switches to the warning receive mode automatically. 15 If the unit is turned On, the radio sounds an alert tone. Emergency/Weather Alert Emergency/Weather Alert allows your area (see page 14). 2 Press and hold the WX/ALERT button for 2 seconds.... If the NOAA issues warning while this feature is in your MHS350 to any other marine channels, it beeps for 5 seconds. You will also alert you to function as a severe weather warning...
English Owners Manual
Page 19
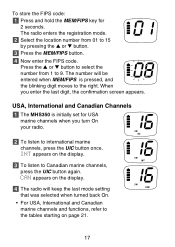
... when you enter the last digit, the confirmation screen appears. INT appears on the display. 3 To listen to the tables starting on the display. 4 The radio will be entered when MEM/FIPS is initially set for 2 seconds. CAN appears on page 21. 17 Press the L or M button to select the number...; For USA, International and Canadian marine channels and functions, refer to Canadian marine channels, press the UIC button again. USA, International and Canadian Channels 1 The MHS350 is pressed, and the blinking digit moves to international marine channels, press the UIC button once.
... when you enter the last digit, the confirmation screen appears. INT appears on the display. 3 To listen to the tables starting on the display. 4 The radio will be entered when MEM/FIPS is initially set for 2 seconds. CAN appears on page 21. 17 Press the L or M button to select the number...; For USA, International and Canadian marine channels and functions, refer to Canadian marine channels, press the UIC button again. USA, International and Canadian Channels 1 The MHS350 is pressed, and the blinking digit moves to international marine channels, press the UIC button once.
English Owners Manual
Page 21
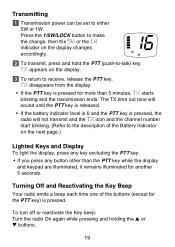
...is released. • If the battery indicator level is 0 and the PTT key is pressed, the radio will not transmit and the TX icon and the channel number start blinking. (Refer to receive, release... the PTT key. To turn off or reactivate the Key beep: Turn the radio On again while pressing and holding the L or M buttons. 19 TX disappears from the display. •...; If the PTT key is pressed. Turning Off and Reactivating the Key Beep Your radio emits a beep each time one of the Battery Indicator on the next page.) Lighted Keys and Display To...
...is released. • If the battery indicator level is 0 and the PTT key is pressed, the radio will not transmit and the TX icon and the channel number start blinking. (Refer to receive, release... the PTT key. To turn off or reactivate the Key beep: Turn the radio On again while pressing and holding the L or M buttons. 19 TX disappears from the display. •...; If the PTT key is pressed. Turning Off and Reactivating the Key Beep Your radio emits a beep each time one of the Battery Indicator on the next page.) Lighted Keys and Display To...
English Owners Manual
Page 22
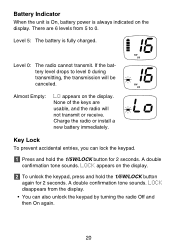
...and hold the 1/5W/LOCK button for 2 seconds. Battery Indicator When the unit is On, battery power is fully charged. Level 0: The radio cannot transmit. Charge the radio or install a new battery immediately. LOCK disappears from 5 to level 0 during transmitting, the transmission will not transmit or receive. If the battery... hold the 1/5W/LOCK button again for 2 seconds. Key Lock To prevent accidental entries, you can also unlock the keypad by turning the radio Off and then On again. 20 A double confirmation tone sounds. LOCK appears on the display. There are usable, and the...
...and hold the 1/5W/LOCK button for 2 seconds. Battery Indicator When the unit is On, battery power is fully charged. Level 0: The radio cannot transmit. Charge the radio or install a new battery immediately. LOCK disappears from 5 to level 0 during transmitting, the transmission will not transmit or receive. If the battery... hold the 1/5W/LOCK button again for 2 seconds. Key Lock To prevent accidental entries, you can also unlock the keypad by turning the radio Off and then On again. 20 A double confirmation tone sounds. LOCK appears on the display. There are usable, and the...
English Owners Manual
Page 33
Will not transmit on the 1 watt range. Cause: Low voltage ⇒ Do not to transmit while charging. The adapter does not supply enough power for transmitting. Cause: Low voltage ⇒ The radio is not designed to transmit while charging. Troubleshooting Not enough range Cause: Line of sight blocked ⇒ Increase antenna height. Battery will transmit on 5 watt range but will not charge. Cause: Low voltage ⇒ Recharge or replace the batteries. DC or AC adapter does not supply enough power for transmitting. 31 Will not transmit while charging.
Will not transmit on the 1 watt range. Cause: Low voltage ⇒ Do not to transmit while charging. The adapter does not supply enough power for transmitting. Cause: Low voltage ⇒ The radio is not designed to transmit while charging. Troubleshooting Not enough range Cause: Line of sight blocked ⇒ Increase antenna height. Battery will transmit on 5 watt range but will not charge. Cause: Low voltage ⇒ Recharge or replace the batteries. DC or AC adapter does not supply enough power for transmitting. 31 Will not transmit while charging.
English Owners Manual
Page 34
...FCC regulations. If a damaged antenna comes into contact with the safety standard previously set by FCC regulated transmitters. For hand-held operation, the radio should be held 1 inch from the user's face. and international standards bodies. WARNING! It is up to the user to properly operate this... safe operation. Do not use of any other accessory for typical body-worn operations using an external speaker microphone, USE ONLY THE UNIDEN MODEL HHVTA07 (black) or HHVTAW07 (white). Please contact your authority to the supplied belt-clip. Body-worn Operation This device was tested ...
...FCC regulations. If a damaged antenna comes into contact with the safety standard previously set by FCC regulated transmitters. For hand-held operation, the radio should be held 1 inch from the user's face. and international standards bodies. WARNING! It is up to the user to properly operate this... safe operation. Do not use of any other accessory for typical body-worn operations using an external speaker microphone, USE ONLY THE UNIDEN MODEL HHVTA07 (black) or HHVTAW07 (white). Please contact your authority to the supplied belt-clip. Body-worn Operation This device was tested ...


