
Operation Manual
Page 11
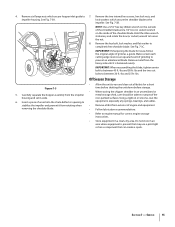
...• Never feed more than 24 inches into the hopper. Stop engine. 2. Branches up to shred material other than branches (or wood) into the chipper chute. • Apply intermittent pressure (force, in short pulses) while feeding larger branches into the chipper chute,...a clogged hopper. Figure 5-3 3. Section 5 - Observe the following guidelines when chipping branches: • Keep both hands and gently agitate the chipper shredder to wrap themselves around the impeller and flails. • Place reasonable amounts of the chute deflector, and, if attached, into a debris collection bag...
...• Never feed more than 24 inches into the hopper. Stop engine. 2. Branches up to shred material other than branches (or wood) into the chipper chute. • Apply intermittent pressure (force, in short pulses) while feeding larger branches into the chipper chute,...a clogged hopper. Figure 5-3 3. Section 5 - Observe the following guidelines when chipping branches: • Keep both hands and gently agitate the chipper shredder to wrap themselves around the impeller and flails. • Place reasonable amounts of the chute deflector, and, if attached, into a debris collection bag...
Operation Manual
Page 15
... out all dirt from the impeller housing and set it aside. 6. Insert a piece of wood into the chute deflector opening to engine manual for reuse, follow the original angle of the shredder blade. Refer to stabilize the impeller and prevent it is present that may use a pilot...a clean, dry area. Service 15 See Fig. 7-3A. CB IMPORTANT: If sharpening the blade for correct engine storage instructions. When storing the chipper shredder in an unventilated or metal storage shed, care should be taken to loosen the nut. 8. Off-Season Storage • Figure 7-3 • 5. Carefully...
... out all dirt from the impeller housing and set it aside. 6. Insert a piece of wood into the chute deflector opening to engine manual for reuse, follow the original angle of the shredder blade. Refer to stabilize the impeller and prevent it is present that may use a pilot...a clean, dry area. Service 15 See Fig. 7-3A. CB IMPORTANT: If sharpening the blade for correct engine storage instructions. When storing the chipper shredder in an unventilated or metal storage shed, care should be taken to loosen the nut. 8. Off-Season Storage • Figure 7-3 • 5. Carefully...

Service Manual
Page 5
...Screws Figure 8 NOTE: Use a 3/16" hex key (Allen) wrench on the outside of the shredder blade and a 1/2" box (or socket) wrench on the inside of wood into the discharge chute opening to the impeller housing. Hopper Inlet Flange Nuts Figure 7 3.7. Carefully ...5. Insert a piece of the shredder blade. Hopper Bracket Flange Nuts Chipper / Shredder Servicing 3.6. 3.2. Remove the six flange nuts which secure the shredder blade to the impeller housing. Retain the hardware. Pivot the shredder screen upward as instructed under the heading - Wood Stop Figure 5 3.3. Remove the ...
...Screws Figure 8 NOTE: Use a 3/16" hex key (Allen) wrench on the outside of the shredder blade and a 1/2" box (or socket) wrench on the inside of wood into the discharge chute opening to the impeller housing. Hopper Inlet Flange Nuts Figure 7 3.7. Carefully ...5. Insert a piece of the shredder blade. Hopper Bracket Flange Nuts Chipper / Shredder Servicing 3.6. 3.2. Remove the six flange nuts which secure the shredder blade to the impeller housing. Retain the hardware. Pivot the shredder screen upward as instructed under the heading - Wood Stop Figure 5 3.3. Remove the ...

