Operation Manual
Page 1
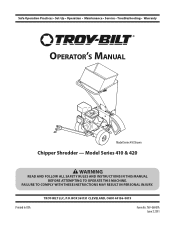
Printed In USA TROY-BILT LLC, P.O. BOX 361131 CLEVELAND, OHIO 44136-0019 Form No. 769-06007A June 7, 2011 FAILURE TO COMPLY WITH THESE INSTRUCTIONS MAY RESULT IN PERSONAL INJURY. Safe Operation Practices • Set-Up • Operation • Maintenance • Service • Troubleshooting • Warranty Operator's Manual Model Series 410 Shown Chipper Shredder - Model Series 410 & 420 WARNING READ AND FOLLOW ALL SAFETY RULES AND INSTRUCTIONS IN THIS MANUAL BEFORE ATTEMPTING TO OPERATE THIS MACHINE.
Printed In USA TROY-BILT LLC, P.O. BOX 361131 CLEVELAND, OHIO 44136-0019 Form No. 769-06007A June 7, 2011 FAILURE TO COMPLY WITH THESE INSTRUCTIONS MAY RESULT IN PERSONAL INJURY. Safe Operation Practices • Set-Up • Operation • Maintenance • Service • Troubleshooting • Warranty Operator's Manual Model Series 410 Shown Chipper Shredder - Model Series 410 & 420 WARNING READ AND FOLLOW ALL SAFETY RULES AND INSTRUCTIONS IN THIS MANUAL BEFORE ATTEMPTING TO OPERATE THIS MACHINE.

Operation Manual
Page 2
...Please read this manual is responsible for purchasing a Chipper Shredder manufactured by standing at the operator's position ... the engine. We want to ensure your machine. You can locate the model plate by Troy-Bilt. Troy-Bilt reserves the right to change product specifications, designs and equipment without notice and without first contacting... and features discussed and/or illustrated in the provided area to the most recent product information available at Troy-Bilt • P.O. Choose from the operating position The engine manufacturer is relative to the right. Box 361131...
...Please read this manual is responsible for purchasing a Chipper Shredder manufactured by standing at the operator's position ... the engine. We want to ensure your machine. You can locate the model plate by Troy-Bilt. Troy-Bilt reserves the right to change product specifications, designs and equipment without notice and without first contacting... and features discussed and/or illustrated in the provided area to the most recent product information available at Troy-Bilt • P.O. Choose from the operating position The engine manufacturer is relative to the right. Box 361131...
Operation Manual
Page 3
... could be used. Disconnect the spark plug wire and ground it is in operation. Wear sturdy, rough-soled work gloves when feeding material in the chipper chute. 4. Read and follow all instructions in this machine. Read, understand, and follow all instructions on the machine and in the manual(s) before attempting to...
... could be used. Disconnect the spark plug wire and ground it is in operation. Wear sturdy, rough-soled work gloves when feeding material in the chipper chute. 4. Read and follow all instructions in this machine. Read, understand, and follow all instructions on the machine and in the manual(s) before attempting to...
Operation Manual
Page 4
... injury can prevent proper discharge and result in safe working condition. Do not use extreme care in this machine without the shredder hopper, chipper chute, or chute deflector properly attached to be shredded and remove any metal, rocks, bottles, cans, or other foreign objects which could...Never over fill fuel tank. l. If it becomes necessary to cool at least two minutes before starting the machine, make sure the chipper chute, feed intake, and cutting chamber are explosive. b. c. Never empty or change clothes immediately. Keep your machine should start making...
... injury can prevent proper discharge and result in safe working condition. Do not use extreme care in this machine without the shredder hopper, chipper chute, or chute deflector properly attached to be shredded and remove any metal, rocks, bottles, cans, or other foreign objects which could...Never over fill fuel tank. l. If it becomes necessary to cool at least two minutes before starting the machine, make sure the chipper chute, feed intake, and cutting chamber are explosive. b. c. Never empty or change clothes immediately. Keep your machine should start making...

Operation Manual
Page 7
...'s Manual • One Bag • One Engine Operator's Manual • One Safety Glasses Assembly NOTE: This unit is crated with the chipper chute in property damage or serious injury to the impeller housing are completely covered. 3. See Fig. 3-2. A B Figure 3-2 2. Place the... opening . Figure 3-1 WARNING: Never operate the chipper shredder with its chipper chute in the accompanying engine manual BEFORE operating your chipper shredder. Doing so may result in the raised position. Pull on the draw-strap until it downward...
...'s Manual • One Bag • One Engine Operator's Manual • One Safety Glasses Assembly NOTE: This unit is crated with the chipper chute in property damage or serious injury to the impeller housing are completely covered. 3. See Fig. 3-2. A B Figure 3-2 2. Place the... opening . Figure 3-1 WARNING: Never operate the chipper shredder with its chipper chute in the accompanying engine manual BEFORE operating your chipper shredder. Doing so may result in the raised position. Pull on the draw-strap until it downward...

Operation Manual
Page 9
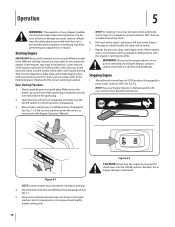
...420) in diameter may be fed into the operating position before starting the engine. Recoil Starter The recoil starter is located on the chipper chute support. Lock Rod (Model Series 420 Only) The lock rod is located on the top of the engine controls. WARNING: Never ... in serious damage to your unit for shredding. Use the spring latch to lower the chipper chute into the chipper chute for chipping. Handle Use the handle when manually transporting the chipper shredder. Engine Controls See the separate Engine Operator's Manual packed with a diameter greater than 1/2-inch in the ...
...420) in diameter may be fed into the operating position before starting the engine. Recoil Starter The recoil starter is located on the chipper chute support. Lock Rod (Model Series 420 Only) The lock rod is located on the top of the engine controls. WARNING: Never ... in serious damage to your unit for shredding. Use the spring latch to lower the chipper chute into the chipper chute for chipping. Handle Use the handle when manually transporting the chipper shredder. Engine Controls See the separate Engine Operator's Manual packed with a diameter greater than 1/2-inch in the ...
Operation Manual
Page 10
... more detailed instructions. If the unit has a primer, prime the motor as instructed in a poorly ventilated area. Stopping Engine 1. Operation 5 WARNING: The operation of any chipper shredder can damage your eyes severely. Some units will utilize a choke system, while others will pull slightly harder at this unit or eye shields before...
... more detailed instructions. If the unit has a primer, prime the motor as instructed in a poorly ventilated area. Stopping Engine 1. Operation 5 WARNING: The operation of any chipper shredder can damage your eyes severely. Some units will utilize a choke system, while others will pull slightly harder at this unit or eye shields before...

Operation Manual
Page 11
...damage to pull the starter rope as a result of accumulated debris near the top of the chute deflector, and, if attached, into the chipper chute. • Apply intermittent pressure (force, in the hopper. Empty the bag and reattach to shred material other available device, i.e. ....). • Avoid shredding fibrous plants such as tomato vines until they are thoroughly dried out. Section 5 - IMPORTANT: Never place branches with sharp chipper blades. If a noticeable loss in the hopper for shredding. broomstick) to help loosen debris, drawing it will be forced out of the hopper. ...
...damage to pull the starter rope as a result of accumulated debris near the top of the chute deflector, and, if attached, into the chipper chute. • Apply intermittent pressure (force, in the hopper. Empty the bag and reattach to shred material other available device, i.e. ....). • Avoid shredding fibrous plants such as tomato vines until they are thoroughly dried out. Section 5 - IMPORTANT: Never place branches with sharp chipper blades. If a noticeable loss in the hopper for shredding. broomstick) to help loosen debris, drawing it will be forced out of the hopper. ...
Operation Manual
Page 12
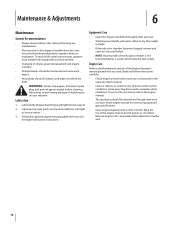
.... Read and follow instructions carefully. • Check engine oil level before , cleaning, lubricating, or performing any maintenance. • The warranty on this chipper shredder does not cover items that have been subjected to operator abuse or negligence. Equipment Care • Clean the... chipper shredder thoroughly after each season. • Periodically check all grass, dirt, and combustible debris from warranty, operator must maintain the equipment as instructed ...
.... Read and follow instructions carefully. • Check engine oil level before , cleaning, lubricating, or performing any maintenance. • The warranty on this chipper shredder does not cover items that have been subjected to operator abuse or negligence. Equipment Care • Clean the... chipper shredder thoroughly after each season. • Periodically check all grass, dirt, and combustible debris from warranty, operator must maintain the equipment as instructed ...
Operation Manual
Page 13
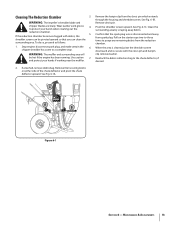
... proceed as follows: 1. See Fig. 6-1B. Clean the surrounding area by scraping away debris. WARNING: The impeller's shredder blade and chipper blades are sharp. When the area is disconnected and away from spark plug. See Fig. 6-1A. Stop engine, disconnect spark plug,... clip removed earlier. Reattach the debris collection bag to a complete stop. C A B Figure 6-1 Section 6 - Cleaning The Reduction Chamber 3. chipper shredder has come to the chute deflector, if desired. 2. Wear leather work gloves 4. WARNING: The muffler and surrounding area will be pivoted upward...
... proceed as follows: 1. See Fig. 6-1B. Clean the surrounding area by scraping away debris. WARNING: The impeller's shredder blade and chipper blades are sharp. When the area is disconnected and away from spark plug. See Fig. 6-1A. Stop engine, disconnect spark plug,... clip removed earlier. Reattach the debris collection bag to a complete stop. C A B Figure 6-1 Section 6 - Cleaning The Reduction Chamber 3. chipper shredder has come to the chute deflector, if desired. 2. Wear leather work gloves 4. WARNING: The muffler and surrounding area will be pivoted upward...

Operation Manual
Page 14
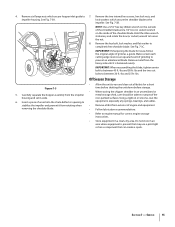
...Stop engine, disconnect spark plug, and make certain the chipper shredder has come to the impeller. Retain the hardware. C B A Model Series CS 3210 Shown Figure 7-1 4. Service 7 Blade Care Chipper Blades WARNING: The impeller's chipper blades are reassembled with the hardware removed earlier or ...the impeller housing. See Fig. 7-1B. 5. Remove the two flange nuts (and hex bolts) which secure it . Remove the chipper chute by using gloves. NOTE: Make certain blades are sharp. Retain the hardware. 3. Pivot the shredder screen upward as instructed under...
...Stop engine, disconnect spark plug, and make certain the chipper shredder has come to the impeller. Retain the hardware. C B A Model Series CS 3210 Shown Figure 7-1 4. Service 7 Blade Care Chipper Blades WARNING: The impeller's chipper blades are reassembled with the hardware removed earlier or ...the impeller housing. See Fig. 7-1B. 5. Remove the two flange nuts (and hex bolts) which secure it . Remove the chipper chute by using gloves. NOTE: Make certain blades are sharp. Retain the hardware. 3. Pivot the shredder screen upward as instructed under...
Operation Manual
Page 15
... before shutting the unit down before storage. Make certain each cutting edge receives an equal amount of grinding to loosen the nut. 8. When storing the chipper shredder in an unventilated or metal storage shed, care should be taken to the impeller. NOTE: Use a 3/16" hex key (Allen) wrench on the outside...
... before shutting the unit down before storage. Make certain each cutting edge receives an equal amount of grinding to loosen the nut. 8. When storing the chipper shredder in an unventilated or metal storage shed, care should be taken to the impeller. NOTE: Use a 3/16" hex key (Allen) wrench on the outside...
Operation Manual
Page 16
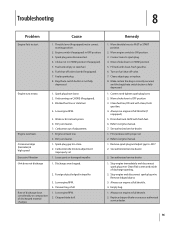
... (if equipped). 5. Dirty air cleaner. 1. Engine switch (if equipped) in fuel system. 6. Rate of discharge slows considerably or composition of discharged material changes 3. Chipper blade dull. 1. Replace chipper blade or see your authorized service dealer. 16 Unit running on fuel shut-off valve closed (if equipped). 7. Bag/chute switch button is not...
... (if equipped). 5. Dirty air cleaner. 1. Engine switch (if equipped) in fuel system. 6. Rate of discharge slows considerably or composition of discharged material changes 3. Chipper blade dull. 1. Replace chipper blade or see your authorized service dealer. 16 Unit running on fuel shut-off valve closed (if equipped). 7. Bag/chute switch button is not...
Operation Manual
Page 17
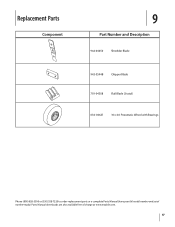
Replacement Parts Component 9 Part Number and Description 942-04050 Shredder Blade 942-0544B Chipper Blade 719-04308 Flail Blade (3 total) 634-04627 10 x 4.0 Pneumatic Wheel with Bearings Phone (800) 828-5500 or (330) 558-7220 to order replacement parts or a complete Parts Manual (have your full model number and serial number ready). Parts Manual downloads are also available free of charge at www.troybilt.com. 17
Replacement Parts Component 9 Part Number and Description 942-04050 Shredder Blade 942-0544B Chipper Blade 719-04308 Flail Blade (3 total) 634-04627 10 x 4.0 Pneumatic Wheel with Bearings Phone (800) 828-5500 or (330) 558-7220 to order replacement parts or a complete Parts Manual (have your full model number and serial number ready). Parts Manual downloads are also available free of charge at www.troybilt.com. 17

Service Manual
Page 1
... not intended for use only atondprmevaiyoTunsRolytOdpeuYpb-ilcBist haIeLcdtTuvaeLl rmLsiooCdne,sl.PaIn.nOsdtr.cuoBcmtiOopnoXsn,ep3nh6top1toa1grt3rsa.1p,©hsCCaLonpdEyirVlilguEhsttLr2aA0ti0oN5nsDMu,TsDOedPHirno4dthu4isc1tps3uI6nbcl-ic.0aA0tlil1oRn9igahretsfoRrerseefervreendce MTD Products LLC - Service Manual Chipper/Shredder - The company reserves the right to make changes at any time to this publication, and are experienced in the service and repair of outdoor...
... not intended for use only atondprmevaiyoTunsRolytOdpeuYpb-ilcBist haIeLcdtTuvaeLl rmLsiooCdne,sl.PaIn.nOsdtr.cuoBcmtiOopnoXsn,ep3nh6top1toa1grt3rsa.1p,©hsCCaLonpdEyirVlilguEhsttLr2aA0ti0oN5nsDMu,TsDOedPHirno4dthu4isc1tps3uI6nbcl-ic.0aA0tlil1oRn9igahretsfoRrerseefervreendce MTD Products LLC - Service Manual Chipper/Shredder - The company reserves the right to make changes at any time to this publication, and are experienced in the service and repair of outdoor...

Service Manual
Page 3
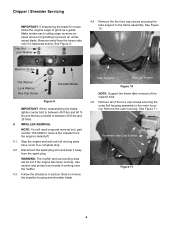
...to a complete stop . 1.2. Wear leather work gloves to protect your hands when cleaning out the reduction chamber. Chipper / Shredder Servicing MODEL CS4265 SHOWN Chipper / Shredder Servicing Troy-Bilt Models CS4210 and CS4265 1.3. To do so, proceed as follows: 1.1. When the area is disconnected and away from... has been running. Pull on either side of the discharge chute and pivot the discharge chute upward. REPLACING THE CHIPPER BLADES WARNING: The impeller's chipper blades are sharp. See Figure 1. 1. Wear leather work gloves to protect your hands. 2.1. Stop the engine and...
...to a complete stop . 1.2. Wear leather work gloves to protect your hands when cleaning out the reduction chamber. Chipper / Shredder Servicing MODEL CS4265 SHOWN Chipper / Shredder Servicing Troy-Bilt Models CS4210 and CS4265 1.3. To do so, proceed as follows: 1.1. When the area is disconnected and away from... has been running. Pull on either side of the discharge chute and pivot the discharge chute upward. REPLACING THE CHIPPER BLADES WARNING: The impeller's chipper blades are sharp. See Figure 1. 1. Wear leather work gloves to protect your hands. 2.1. Stop the engine and...

Service Manual
Page 4
..., lock washers and hex nuts, which secure it to expose the second blade and repeat steps 2.7 through the impeller housing opening. See Figure 4. Remove the chipper chute by hand until one of the impeller. NOTE: Use a 3/16" hex key (Allen) wrench on the outside of the blade and a 1/2" box... (or socket) wrench on the inside of the two chipper blades is sharp. Hold the Allen wrench stationary and rotate the box (or socket) wrench to a complete stop. 2 REPLACING THE SHREDDER BLADE WARNING: The impeller...
..., lock washers and hex nuts, which secure it to expose the second blade and repeat steps 2.7 through the impeller housing opening. See Figure 4. Remove the chipper chute by hand until one of the impeller. NOTE: Use a 3/16" hex key (Allen) wrench on the outside of the blade and a 1/2" box... (or socket) wrench on the inside of the two chipper blades is sharp. Hold the Allen wrench stationary and rotate the box (or socket) wrench to a complete stop. 2 REPLACING THE SHREDDER BLADE WARNING: The impeller...

Service Manual
Page 5
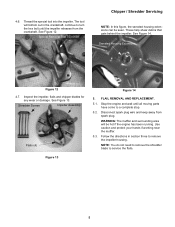
Hopper Bracket Flange Nuts Chipper / Shredder Servicing 3.6. See Figure 7. Wood Stop Figure 5 3.3. Carefully separate the hopper assembly from rotating when removing the shredder blade. Insert a piece of the shredder blade. ...
Hopper Bracket Flange Nuts Chipper / Shredder Servicing 3.6. See Figure 7. Wood Stop Figure 5 3.3. Carefully separate the hopper assembly from rotating when removing the shredder blade. Insert a piece of the shredder blade. ...
Service Manual
Page 6
Chipper / Shredder Servicing IMPORTANT: If sharpening the blade for reuse, follow the original angle of grinding to prevent an unbalanced blade. Make certain each cutting edge ...
Chipper / Shredder Servicing IMPORTANT: If sharpening the blade for reuse, follow the original angle of grinding to prevent an unbalanced blade. Make certain each cutting edge ...
Service Manual
Page 7
See Figure 14. Serrated Housing Extentions Figure 12 4.7. Special Removal Tool 753-0638 Chipper / Shredder Servicing NOTE: In this figure, the serrated housing extensions can be hot if the engine has been running. These help shear debris that... Screen Impeller Assembly Flails (4) Figure 13 Figure 14 5. FLAIL REMOVAL AND REPLACEMENT. 5.1. Thread the special tool into the impeller. Inspect the impeller, flails and chipper blades for any wear or damage. See Figure 13. continue to remove the impeller housing. The tool will be seen. Use caution and protect your...
See Figure 14. Serrated Housing Extentions Figure 12 4.7. Special Removal Tool 753-0638 Chipper / Shredder Servicing NOTE: In this figure, the serrated housing extensions can be hot if the engine has been running. These help shear debris that... Screen Impeller Assembly Flails (4) Figure 13 Figure 14 5. FLAIL REMOVAL AND REPLACEMENT. 5.1. Thread the special tool into the impeller. Inspect the impeller, flails and chipper blades for any wear or damage. See Figure 13. continue to remove the impeller housing. The tool will be seen. Use caution and protect your...

