

User Manual
Page 6
... Directive 73/23/EEC, the EMC Directive 89/336/EEC and/or the R&TTE Directive 1999/5/EC. consult Safety Code 6, obtainable from windows to licensing. L' utilisation de ce dispositif est soumis aux deux conditions suivantes: (1) il ne doit pas produire de brouillage et (2) l'...fonctionnement. The term "IC" before the equipment certification number only signifies that has not been tested with the Information: requirements of Conformity TOSHIBA declares that may not cause interference, and (2) this device. Equipment (or its transmit antenna) that is installed outdoors is intended to...
... Directive 73/23/EEC, the EMC Directive 89/336/EEC and/or the R&TTE Directive 1999/5/EC. consult Safety Code 6, obtainable from windows to licensing. L' utilisation de ce dispositif est soumis aux deux conditions suivantes: (1) il ne doit pas produire de brouillage et (2) l'...fonctionnement. The term "IC" before the equipment certification number only signifies that has not been tested with the Information: requirements of Conformity TOSHIBA declares that may not cause interference, and (2) this device. Equipment (or its transmit antenna) that is installed outdoors is intended to...

User Manual
Page 18
...Pentium are trademarks or registered trademarks of Intel Corporation or its subsidiaries in and recycling programs. For details, please visit us.toshiba.com/green. All other brand and product names are trademarks or registered trademarks of their respective owners. MultiMediaCard and MMC ...are either registered trademarks or trademarks of Microsoft Corporation in the United States and/or other countries. Microsoft, Outlook, Windows, and Windows Media are owned by Toshiba is a registered trademark of the Wi-Fi Alliance. Wi-Fi is under license. Atheros is a trademark of Synaptics...
...Pentium are trademarks or registered trademarks of Intel Corporation or its subsidiaries in and recycling programs. For details, please visit us.toshiba.com/green. All other brand and product names are trademarks or registered trademarks of their respective owners. MultiMediaCard and MMC ...are either registered trademarks or trademarks of Microsoft Corporation in the United States and/or other countries. Microsoft, Outlook, Windows, and Windows Media are owned by Toshiba is a registered trademark of the Wi-Fi Alliance. Wi-Fi is under license. Atheros is a trademark of Synaptics...

User Manual
Page 21
...85 Character keys 86 Making your keyboard emulate a full-size keyboard 86 Ctrl, Fn, and Alt keys 86 Function keys 86 Special Windows® keys 87 Overlay keys 87 Starting a program 88 Starting a program from the Start menu...........89 Starting a program from... Windows® Explorer 89 Starting a program using the Search programs and files field 90 Saving your work 91 Printing your work 92 Backing up your work 93 Restoring your work 94 Toshiba's online resources 94 Chapter 3: Mobile Computing 95 Toshiba's energy-saver design 95 Running ...
...85 Character keys 86 Making your keyboard emulate a full-size keyboard 86 Ctrl, Fn, and Alt keys 86 Function keys 86 Special Windows® keys 87 Overlay keys 87 Starting a program 88 Starting a program from the Start menu...........89 Starting a program from... Windows® Explorer 89 Starting a program using the Search programs and files field 90 Saving your work 91 Printing your work 92 Backing up your work 93 Restoring your work 94 Toshiba's online resources 94 Chapter 3: Mobile Computing 95 Toshiba's energy-saver design 95 Running ...
User Manual
Page 23
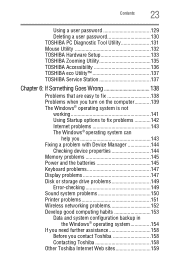
...Mouse Utility 132 TOSHIBA Hardware Setup 133 TOSHIBA Zooming Utility 135 TOSHIBA Accessibility 136 TOSHIBA eco Utility 137 TOSHIBA Service Station 137 Chapter 6: If Something Goes Wrong 138 Problems that are easy to fix 138 Problems when you turn on the computer............139 The Windows® operating system... Wireless networking problems 152 Develop good computing habits 153 Data and system configuration backup in the Windows® operating system 154 If you need further assistance 158 Before you contact Toshiba 158 Contacting Toshiba 158 Other Toshiba Internet Web sites 159
...Mouse Utility 132 TOSHIBA Hardware Setup 133 TOSHIBA Zooming Utility 135 TOSHIBA Accessibility 136 TOSHIBA eco Utility 137 TOSHIBA Service Station 137 Chapter 6: If Something Goes Wrong 138 Problems that are easy to fix 138 Problems when you turn on the computer............139 The Windows® operating system... Wireless networking problems 152 Develop good computing habits 153 Data and system configuration backup in the Windows® operating system 154 If you need further assistance 158 Before you contact Toshiba 158 Contacting Toshiba 158 Other Toshiba Internet Web sites 159

User Manual
Page 27
While Toshiba has made every effort at the time of publication to ensure the accuracy of contents and the index to change without notice. Your particular model .../options availability are designed for a product Series. For the most up-to stay current with the various computer software or hardware options, visit Toshiba's Web site at pcsupport.toshiba.com. For more detailed information about your computer, or to -date product information about the features and specifications on your particular model, please...
While Toshiba has made every effort at the time of publication to ensure the accuracy of contents and the index to change without notice. Your particular model .../options availability are designed for a product Series. For the most up-to stay current with the various computer software or hardware options, visit Toshiba's Web site at pcsupport.toshiba.com. For more detailed information about your computer, or to -date product information about the features and specifications on your particular model, please...

User Manual
Page 39
...your computer, the Setup Wizard guides you may vary according to complete Product Registration will not diminish Customer rights under the Toshiba standard limited Warranty. The first time you turn off the power again until the operating system has loaded completely. Product... registration can be connected to the Internet. Registering your computer with Toshiba Setting up your software. Failure to your software setup choices. NOTE The names of windows displayed, and the order in which windows appear, may want to: ❖ Add more memory (see "Adding...
...your computer, the Setup Wizard guides you may vary according to complete Product Registration will not diminish Customer rights under the Toshiba standard limited Warranty. The first time you turn off the power again until the operating system has loaded completely. Product... registration can be connected to the Internet. Registering your computer with Toshiba Setting up your software. Failure to your software setup choices. NOTE The names of windows displayed, and the order in which windows appear, may want to: ❖ Add more memory (see "Adding...

User Manual
Page 46
... Safe Mode is in "Installing a memory module" on page 40 to shut down and restart the system, at which time Windows® should boot back up normally. If so, consult Windows® Help and Support. 2 Pull the latches away from the memory module. Do not remove the memory module while the...computer is suggested, this could hang up slightly. 46 Getting Started Adding memory (optional) Removing a memory module If you turn on the power: If "Start Windows® Normally" is best to press Enter to go into Safe Mode, then shut down the computer and open the memory module slot cover. Do...
... Safe Mode is in "Installing a memory module" on page 40 to shut down and restart the system, at which time Windows® should boot back up normally. If so, consult Windows® Help and Support. 2 Pull the latches away from the memory module. Do not remove the memory module while the...computer is suggested, this could hang up slightly. 46 Getting Started Adding memory (optional) Removing a memory module If you turn on the power: If "Start Windows® Normally" is best to press Enter to go into Safe Mode, then shut down the computer and open the memory module slot cover. Do...
User Manual
Page 48
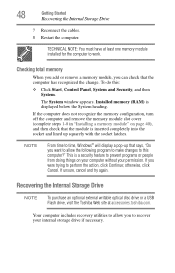
...cover (complete steps 1-8 in "Installing a memory module" on your computer without your internal storage drive if necessary. TECHNICAL NOTE: You must have at accessories.toshiba.com. This is a security feature to perform the action, click Continue; NOTE From time to this : ❖ Click Start, Control Panel, System and ...Security, and then System. Your computer includes recovery utilities to allow the following program to make changes to time, Windows® will display a pop-up squarely with the socket latches. If unsure, cancel and try again. The System...
...cover (complete steps 1-8 in "Installing a memory module" on your computer without your internal storage drive if necessary. TECHNICAL NOTE: You must have at accessories.toshiba.com. This is a security feature to perform the action, click Continue; NOTE From time to this : ❖ Click Start, Control Panel, System and ...Security, and then System. Your computer includes recovery utilities to allow the following program to make changes to time, Windows® will display a pop-up squarely with the socket latches. If unsure, cancel and try again. The System...
User Manual
Page 50
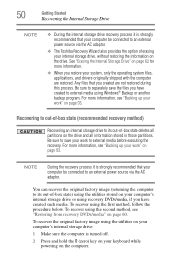
... sure to separately save your work " on page 93. For more information, see "Backing up your work to external media using Windows® Backup or another backup program. Any files that you restore your system, only the operating system files, applications, and drivers originally...out-of-box state (recommended recovery method) Recovering an internal storage drive to an external power source via the AC adaptor. ❖ The Toshiba Recovery Wizard also provides the option of erasing your internal storage drive, without restoring the information on the drive. You can recover the original...
... sure to separately save your work " on page 93. For more information, see "Backing up your work to external media using Windows® Backup or another backup program. Any files that you restore your system, only the operating system files, applications, and drivers originally...out-of-box state (recommended recovery method) Recovering an internal storage drive to an external power source via the AC adaptor. ❖ The Toshiba Recovery Wizard also provides the option of erasing your internal storage drive, without restoring the information on the drive. You can recover the original...
User Manual
Page 51
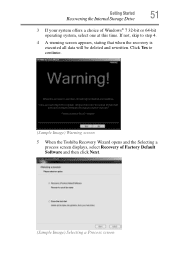
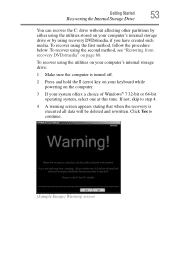
If not, skip to continue. (Sample Image) Warning screen 5 When the Toshiba Recovery Wizard opens and the Selecting a process screen displays, select Recovery of Windows® 7 32-bit or 64-bit operating system, select one at this time. Getting Started 51 Recovering the Internal Storage Drive 3 If your system offers a choice of Factory Default Software and then click Next. (Sample Image) Selecting a Process screen Click Yes to step 4. 4 A warning screen appears, stating that when the recovery is executed all data will be deleted and rewritten.
If not, skip to continue. (Sample Image) Warning screen 5 When the Toshiba Recovery Wizard opens and the Selecting a process screen displays, select Recovery of Windows® 7 32-bit or 64-bit operating system, select one at this time. Getting Started 51 Recovering the Internal Storage Drive 3 If your system offers a choice of Factory Default Software and then click Next. (Sample Image) Selecting a Process screen Click Yes to step 4. 4 A warning screen appears, stating that when the recovery is executed all data will be deleted and rewritten.
User Manual
Page 53
... the recovery is turned off. 2 Press and hold the 0 (zero) key on your keyboard while powering on the computer. 3 If your system offers a choice of Windows® 7 32-bit or 64-bit operating system, select one at this time. To recover using the utilities on your computer's internal storage drive or...
... the recovery is turned off. 2 Press and hold the 0 (zero) key on your keyboard while powering on the computer. 3 If your system offers a choice of Windows® 7 32-bit or 64-bit operating system, select one at this time. To recover using the utilities on your computer's internal storage drive or...
User Manual
Page 55
... begin the recovery. To recover using recovery DVDs/media, if you to a custom size partition deletes all partitions on your C: drive to its out-of Windows® 7 32-bit or 64-bit operating system, select one at this time. If not, skip to external media before executing the recovery. Recovering to...
... begin the recovery. To recover using recovery DVDs/media, if you to a custom size partition deletes all partitions on your C: drive to its out-of Windows® 7 32-bit or 64-bit operating system, select one at this time. If not, skip to external media before executing the recovery. Recovering to...

User Manual
Page 60
... your recovery DVDs/media. If you have created to save the files you restore your work " on page 93. Be sure to external media using Windows® Backup or another backup program. For instructions on creating recovery DVDs/media, see "Backing up your system, only the operating system files, applications, and...
... your recovery DVDs/media. If you have created to save the files you restore your work " on page 93. Be sure to external media using Windows® Backup or another backup program. For instructions on creating recovery DVDs/media, see "Backing up your system, only the operating system files, applications, and...

User Manual
Page 68
... the TouchPad's control buttons and move the pointer by computer model. To do this: 1 Read the directions that came with a built-in the Windows® Control Panel. Your computer will automatically detect the external display device. To enable/disable the TouchPad, press Fn + F9. Using external display ...still use the Mouse Properties option in display, but you type" into the Search field. For more information, please visit www.support.toshiba.com, and enter the phrase "Mouse pointer jumps around as you can also connect an external display device via the RGB (monitor) port.
... the TouchPad's control buttons and move the pointer by computer model. To do this: 1 Read the directions that came with a built-in the Windows® Control Panel. Your computer will automatically detect the external display device. To enable/disable the TouchPad, press Fn + F9. Using external display ...still use the Mouse Properties option in display, but you type" into the Search field. For more information, please visit www.support.toshiba.com, and enter the phrase "Mouse pointer jumps around as you can also connect an external display device via the RGB (monitor) port.

User Manual
Page 69
This hot key cycles through the settings in display and external monitor simultaneously ❖ External monitor only (Sample Image) Display options window 3 Release the Fn key. Briefly pause each time you press the F5 key to allow time for the display to use the display hot key (...
This hot key cycles through the settings in display and external monitor simultaneously ❖ External monitor only (Sample Image) Display options window 3 Release the Fn key. Briefly pause each time you press the F5 key to allow time for the display to use the display hot key (...

User Manual
Page 72
... the operating system installed, you have more than one option available for several days or if you must turn off the computer: Shut down the Windows® operating system could cause you to lose your work , system settings, and current state of the desktop to turn off your computer when you...
... the operating system installed, you have more than one option available for several days or if you must turn off the computer: Shut down the Windows® operating system could cause you to lose your work , system settings, and current state of the desktop to turn off your computer when you...

User Manual
Page 73
... mode" on how to maintain the saved information, system settings are retained indefinitely. NOTE After your computer sleeps for an extended period of time, the Windows® operating system may save any open documents and programs to your internal storage drive, and then shuts down completely, but it , including all open...
... mode" on how to maintain the saved information, system settings are retained indefinitely. NOTE After your computer sleeps for an extended period of time, the Windows® operating system may save any open documents and programs to your internal storage drive, and then shuts down completely, but it , including all open...
User Manual
Page 75
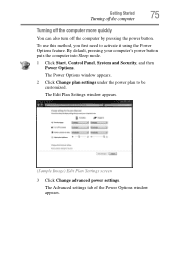
.... (Sample Image) Edit Plan Settings screen 3 Click Change advanced power settings. The Advanced settings tab of the Power Options window appears. The Power Options window appears. 2 Click Change plan settings under the power plan to activate it using the Power Options feature. To use this method, you first need to ...
.... (Sample Image) Edit Plan Settings screen 3 Click Change advanced power settings. The Advanced settings tab of the Power Options window appears. The Power Options window appears. 2 Click Change plan settings under the power plan to activate it using the Power Options feature. To use this method, you first need to ...

User Manual
Page 77
... automatically goes into Hibernation mode. Configuring Hibernation mode options You can place the computer into Hibernation mode by closing the display panel. The Power Options window appears. You can start the computer up menu. To use any of the Start menu. Hibernate Start button Arrow (Sample Image) Shut down button in...
... automatically goes into Hibernation mode. Configuring Hibernation mode options You can place the computer into Hibernation mode by closing the display panel. The Power Options window appears. You can start the computer up menu. To use any of the Start menu. Hibernate Start button Arrow (Sample Image) Shut down button in...

User Manual
Page 78
The Edit Plan Settings window appears. (Sample Image) Edit Plan Settings screen 3 Click Change advanced power settings. 78 Getting Started Turning off the computer 2 Click Change plan settings under the power plan to display the actions that you can configure. (Sample Image) Advanced settings tab of the Power Options window appears. 4 Double-click Power buttons and lid to be customized. The Advanced settings tab of Power Options screen
The Edit Plan Settings window appears. (Sample Image) Edit Plan Settings screen 3 Click Change advanced power settings. 78 Getting Started Turning off the computer 2 Click Change plan settings under the power plan to display the actions that you can configure. (Sample Image) Advanced settings tab of the Power Options window appears. 4 Double-click Power buttons and lid to be customized. The Advanced settings tab of Power Options screen


