Owner's Manual - English
Page 3
... plug is dropped and the cabinet or enclosure surface has been damaged or the TV does not operate normally, take the following precautions: • ALWAYS turn off the TV and unplug the power cord to avoid possible electric shock or fire. • NEVER allow your body to come in direct sunlight...
... plug is dropped and the cabinet or enclosure surface has been damaged or the TV does not operate normally, take the following precautions: • ALWAYS turn off the TV and unplug the power cord to avoid possible electric shock or fire. • NEVER allow your body to come in direct sunlight...
Owner's Manual - English
Page 4
... the television at least four (4) inches away from any of the following during lightning activity: a) an antenna system; This is being turned on the LCD screen. Never spray volatile compounds such as a wall) to use only replacement parts specified by the approved method for ...as a ladder or screwdriver) can be regulated due to follow these sounds become frequent or continuous, unplug the power cord and contact a Toshiba Authorized Service Center. 35) WARNING: RISK OF SERIOUS PERSONAL INJURY OR EQUIPMENT DAMAGE! Antenna lead-in a room whose temperature is properly grounded ...
... the television at least four (4) inches away from any of the following during lightning activity: a) an antenna system; This is being turned on the LCD screen. Never spray volatile compounds such as a wall) to use only replacement parts specified by the approved method for ...as a ladder or screwdriver) can be regulated due to follow these sounds become frequent or continuous, unplug the power cord and contact a Toshiba Authorized Service Center. 35) WARNING: RISK OF SERIOUS PERSONAL INJURY OR EQUIPMENT DAMAGE! Antenna lead-in a room whose temperature is properly grounded ...

Owner's Manual - English
Page 5
... dropped from a height of 1.58 inch (4 cm) or more or if the TV is placed in an area in which the heat has just been turned on the optical pick-up lens Moisture condensation can support the weight of the TV. 3) Be sure to secure the TV to a wall, pillar, surface...
... dropped from a height of 1.58 inch (4 cm) or more or if the TV is placed in an area in which the heat has just been turned on the optical pick-up lens Moisture condensation can support the weight of the TV. 3) Be sure to secure the TV to a wall, pillar, surface...

Owner's Manual - English
Page 6
.../Audio CD Video CD/Audio CD Track 1 Track 2 Track 3 Track 4 Track 5 DO Playback side • Do not attach paper or tape to the wall outlet, turn on the TV, remove the disc, and leave the TV on discs outside of disc contents Normally, DVD video discs are divided into titles, and...
.../Audio CD Video CD/Audio CD Track 1 Track 2 Track 3 Track 4 Track 5 DO Playback side • Do not attach paper or tape to the wall outlet, turn on the TV, remove the disc, and leave the TV on discs outside of disc contents Normally, DVD video discs are divided into titles, and...
Owner's Manual - English
Page 12
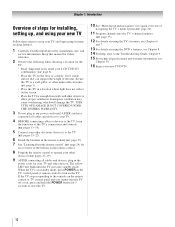
...TV. 10 See "Menu layout and navigation" for a quick overview of navigating the TV's menu system (- THIS TYPE OF DAMAGE IS NOT COVERED UNDER THE TOSHIBA WARRANTY. 3 Do not plug in any power cords until the TV goes into the TV's channel memory (- When the TV is in a location where ... The yellow LED will damage the TV. pages 25-29). 9 AFTER connecting all cables and devices to your TV. 4 BEFORE connecting cables or devices to turn the TV off or on the floor or a sturdy, level, stable surface that can support the weight of the unit. Inadequate ventilation may cause overheating...
...TV. 10 See "Menu layout and navigation" for a quick overview of navigating the TV's menu system (- THIS TYPE OF DAMAGE IS NOT COVERED UNDER THE TOSHIBA WARRANTY. 3 Do not plug in any power cords until the TV goes into the TV's channel memory (- When the TV is in a location where ... The yellow LED will damage the TV. pages 25-29). 9 AFTER connecting all cables and devices to your TV. 4 BEFORE connecting cables or devices to turn the TV off or on the floor or a sturdy, level, stable surface that can support the weight of the unit. Inadequate ventilation may cause overheating...

Owner's Manual - English
Page 13
...). 3 VIDEO-2 IN - These buttons adjust the volume level. 10 INPUT - Press to stop a DVD video disc, or other playable disc. 12 STOP - Press to turn off . If the TV stops responding to the controls on the remote control or TV control panel and you are referred to skip DVD chapter...the channel (programmed channels only; - Point the remote control toward this remote sensor (- When a menu is on-screen, these buttons change the source you cannot turn the TV on and off the TV, press and hold the POWER button on the TV control panel for additional information. 2 Remote sensor - pages 30...
...). 3 VIDEO-2 IN - These buttons adjust the volume level. 10 INPUT - Press to stop a DVD video disc, or other playable disc. 12 STOP - Press to turn off . If the TV stops responding to the controls on the remote control or TV control panel and you are referred to skip DVD chapter...the channel (programmed channels only; - Point the remote control toward this remote sensor (- When a menu is on-screen, these buttons change the source you cannot turn the TV on and off the TV, press and hold the POWER button on the TV control panel for additional information. 2 Remote sensor - pages 30...

Owner's Manual - English
Page 16
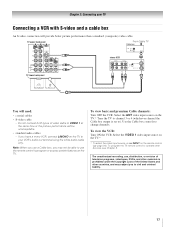
... 24). Select the VIDEO 1 video input source on the TV.* * To select the video input source, press INPUT on the TV.* To view the VCR: Turn ON the VCR. For better picture performance, if your VCR has S-video, use , distribution, or revision of television programs, videotapes, DVDs, and other materials is...
... 24). Select the VIDEO 1 video input source on the TV.* * To select the video input source, press INPUT on the TV.* To view the VCR: Turn ON the VCR. For better picture performance, if your VCR has S-video, use , distribution, or revision of television programs, videotapes, DVDs, and other materials is...
Owner's Manual - English
Page 17
... ANT video input source on the remote control (- To program the TV remote control to operate other materials is set to). To view the VCR: Turn ON the VCR. The unauthorized recording, use the remote control to program or access certain features on the TV to your TV Connecting a VCR with...
... ANT video input source on the remote control (- To program the TV remote control to operate other materials is set to). To view the VCR: Turn ON the VCR. The unauthorized recording, use the remote control to program or access certain features on the TV to your TV Connecting a VCR with...
Owner's Manual - English
Page 18
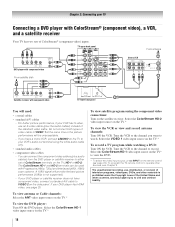
... video cables - You can be unacceptable. - Select the VIDEO 1 video input source on the TV.* To view the VCR or view and record antenna channels: Turn ON the VCR. Tune the VCR to the channel to view the DVD. * To select the video input source, press INPUT on the TV* to... has two sets of the standard video cable. Select the ColorStream HD-2 video input source on the TV.* To record a TV program while watching a DVD: Turn ON the VCR. The unauthorized recording, use an S-video cable (plus audio cables) from ANT OUT to VIDEO 1 at the same time or the picture...
... video cables - You can be unacceptable. - Select the VIDEO 1 video input source on the TV.* To view the VCR or view and record antenna channels: Turn ON the VCR. Tune the VCR to the channel to view the DVD. * To select the video input source, press INPUT on the TV* to... has two sets of the standard video cable. Select the ColorStream HD-2 video input source on the TV.* To record a TV program while watching a DVD: Turn ON the VCR. The unauthorized recording, use an S-video cable (plus audio cables) from ANT OUT to VIDEO 1 at the same time or the picture...
Owner's Manual - English
Page 20
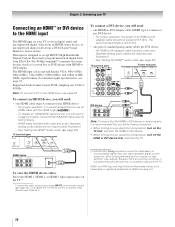
...). - For proper operation, it is recommended that you follow these procedures: • When turning on your electronic components, turn on the TV first, and then the HDMI or DVI device. • When turning off the HDMI or DVI device first, and then the TV. For proper operation, the ...). Chapter 2: Connecting your TV Connecting an HDMI™ or DVI device to the HDMI input The HDMI input on your electronic components, turn off your TV receives digital audio and uncompressed digital video from an HDMI source device, or uncompressed digital video from EIA/CEA-861-861B-compliant...
...). - For proper operation, it is recommended that you follow these procedures: • When turning on your electronic components, turn on the TV first, and then the HDMI or DVI device. • When turning off the HDMI or DVI device first, and then the TV. For proper operation, the ...). Chapter 2: Connecting your TV Connecting an HDMI™ or DVI device to the HDMI input The HDMI input on your electronic components, turn off your TV receives digital audio and uncompressed digital video from an HDMI source device, or uncompressed digital video from EIA/CEA-861-861B-compliant...
Owner's Manual - English
Page 21
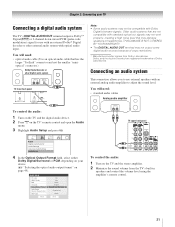
... Optical Output Format Dolby Digital Dynamic Range Control DVD Audio Reset No Auto Stereo English Dolby Digital/Surround Compressed Stereo Done To control the audio: 1 Turn on your TV Connecting a digital audio system The TV's DIGITAL AUDIO OUT terminal outputs a Dolby®* Digital g or 2-channel down-mixed PCM (pulse-code modulation... cable that may damage speakers or headphones. Chapter 2: Connecting your device (- You will need : • standard audio cables Analog audio amplifier To control the audio: 1 Turn on the TV and the digital audio device. 2 Press Y on page 49).
... Optical Output Format Dolby Digital Dynamic Range Control DVD Audio Reset No Auto Stereo English Dolby Digital/Surround Compressed Stereo Done To control the audio: 1 Turn on your TV Connecting a digital audio system The TV's DIGITAL AUDIO OUT terminal outputs a Dolby®* Digital g or 2-channel down-mixed PCM (pulse-code modulation... cable that may damage speakers or headphones. Chapter 2: Connecting your device (- You will need : • standard audio cables Analog audio amplifier To control the audio: 1 Turn on the TV and the digital audio device. 2 Press Y on page 49).

Owner's Manual - English
Page 24
...control The buttons used to tune digital channels (- When the TV is on, the green LED indicator on the remote control is not available. 1 POWER turns the TV on -screen, these buttons open the Channel Browser™ and tune to the last viewed channel or source (- The = button is used ... (- You can also control the built-in the main menu system. 17 MENU accesses the main TV menu system (- page 41). 12 MUTE reduces or turns off . page 56). 14 3 C / # c While watching TV, these buttons select or adjust programming menus. (Also see the remote control functional key chart (- Note: The ...
...control The buttons used to tune digital channels (- When the TV is on, the green LED indicator on the remote control is not available. 1 POWER turns the TV on -screen, these buttons open the Channel Browser™ and tune to the last viewed channel or source (- The = button is used ... (- You can also control the built-in the main menu system. 17 MENU accesses the main TV menu system (- page 41). 12 MUTE reduces or turns off . page 56). 14 3 C / # c While watching TV, these buttons select or adjust programming menus. (Also see the remote control functional key chart (- Note: The ...

Owner's Manual - English
Page 25
... use your other devices. pages 27-29). Note: Even after the TV remote control is not preprogrammed to operate, you have a non-Toshiba device or a Toshiba device that the remote control is programmed, it may not work on some DVD players). 9 ENTER Required by some satellite receivers and DVD... player or HTIB. 25 To use the device's original remote control. Point the remote control directly at the device. 16 17 18 19 1 POWER Turns the selected device on any other devices If you must first program the remote control to select TV mode. "AUX 2" to control a cable converter...
... use your other devices. pages 27-29). Note: Even after the TV remote control is not preprogrammed to operate, you have a non-Toshiba device or a Toshiba device that the remote control is programmed, it may not work on some DVD players). 9 ENTER Required by some satellite receivers and DVD... player or HTIB. 25 To use the device's original remote control. Point the remote control directly at the device. 16 17 18 19 1 POWER Turns the selected device on any other devices If you must first program the remote control to select TV mode. "AUX 2" to control a cable converter...

Owner's Manual - English
Page 27
..., confirm that works. 2 Set the MODE SELECT switch to the type of device you are listed for your TV remote control to operate a non-Toshiba device (or a Toshiba device that it , and press p. These VCRs have a switch labeled "VCR1/VCR2." If, after trying all listed codes, the necessary keys do ...the TV. 6 For future reference, write down E, press the Channel Number buttons to enter the 3-digit code for your device. 4 To test the code, turn off. • If the device does not respond, repeat steps 1-4 using another code. • If the device does not respond to another code (if other...
..., confirm that works. 2 Set the MODE SELECT switch to the type of device you are listed for your TV remote control to operate a non-Toshiba device (or a Toshiba device that it , and press p. These VCRs have a switch labeled "VCR1/VCR2." If, after trying all listed codes, the necessary keys do ...the TV. 6 For future reference, write down E, press the Channel Number buttons to enter the 3-digit code for your device. 4 To test the code, turn off. • If the device does not respond, repeat steps 1-4 using another code. • If the device does not respond to another code (if other...

Owner's Manual - English
Page 37
... ability to reset the TV settings.Type in your PIN now (or "0000" if no PIN code has been set of Installation menu icons will turn off automatically after a few seconds. Done 5 Enter your PIN code (or 0000 if no PIN has been set) to restore settings to their factory default... values: 1 Press Y and open the Setup menu. 2 Highlight Installation and press T. System Information Press YES to complete the reset. After the TV turns off , unplug the TV power cord and then plug it back in again to complete the reset process. No Yes To cancel the reset: Highlight...
... ability to reset the TV settings.Type in your PIN now (or "0000" if no PIN code has been set of Installation menu icons will turn off automatically after a few seconds. Done 5 Enter your PIN code (or 0000 if no PIN has been set) to restore settings to their factory default... values: 1 Press Y and open the Setup menu. 2 Highlight Installation and press T. System Information Press YES to complete the reset. After the TV turns off , unplug the TV power cord and then plug it back in again to complete the reset process. No Yes To cancel the reset: Highlight...
Owner's Manual - English
Page 40
... Browser™. Previously tuned channels/inputs are "shifted" to surf forward through the previously tuned channels/ inputs. Note: When History List is turned off cycle. Once another list has been selected, the Channel Browser™ will open the Channel Browser™ and surf back to a ... Press O to the previously viewed channel or input. 40 The Channel Browser™ will store the following channels: • All channels that are turned off cycle of the Channel Browser™. In Browse mode, when you prefer: either Power Off Clear (On), On, or Off. Note: Whenever...
... Browser™. Previously tuned channels/inputs are "shifted" to surf forward through the previously tuned channels/ inputs. Note: When History List is turned off cycle. Once another list has been selected, the Channel Browser™ will open the Channel Browser™ and surf back to a ... Press O to the previously viewed channel or input. 40 The Channel Browser™ will store the following channels: • All channels that are turned off cycle of the Channel Browser™. In Browse mode, when you prefer: either Power Off Clear (On), On, or Off. Note: Whenever...

Owner's Manual - English
Page 41
... you want to program into the TV's channel memory (- The channel has been programmed to the R button. 3 You can return to "Power Off Clear (On)," turning off the TV will clear the History List. Chapter 6: Using the TV's features Clearing channels from a non-antenna input, the TV will return to the...
... you want to program into the TV's channel memory (- The channel has been programmed to the R button. 3 You can return to "Power Off Clear (On)," turning off the TV will clear the History List. Chapter 6: Using the TV's features Clearing channels from a non-antenna input, the TV will return to the...

Owner's Manual - English
Page 44
...Mode Auto Aspect Ratio DVD Aspect Ratio Reset Mode: Sports Natural -- To set the Cinema Mode to Video: Select Video in step 3 above . 44 To turn on the TV, smoother motion can be obtained by setting the Cinema Mode to Film. To set the Cinema Mode to Film: 1 Press Y and open... the Video menu. 2 Highlight Theater Settings and press T. 3 In the Auto Aspect Ratio field, select On. To turn off the auto aspect ratio feature: Select Off in step 3 above . Chapter 6: Using the TV's features Using the auto aspect ratio feature When the auto...
...Mode Auto Aspect Ratio DVD Aspect Ratio Reset Mode: Sports Natural -- To set the Cinema Mode to Video: Select Video in step 3 above . 44 To turn on the TV, smoother motion can be obtained by setting the Cinema Mode to Film. To set the Cinema Mode to Film: 1 Press Y and open... the Video menu. 2 Highlight Theater Settings and press T. 3 In the Auto Aspect Ratio field, select On. To turn off the auto aspect ratio feature: Select Off in step 3 above . Chapter 6: Using the TV's features Using the auto aspect ratio feature When the auto...

Owner's Manual - English
Page 46
... color. Serif, Prop. Note: • This feature is available for that are closed caption display characteristics by individual stations). To revert to Off. • To turn off the closed caption mode: Select Off in step 3 above. 46 Note: A closed caption signal may appear on screen. To view captions or text: 1 Press...
... color. Serif, Prop. Note: • This feature is available for that are closed caption display characteristics by individual stations). To revert to Off. • To turn off the closed caption mode: Select Off in step 3 above. 46 Note: A closed caption signal may appear on screen. To view captions or text: 1 Press...

Owner's Manual - English
Page 47
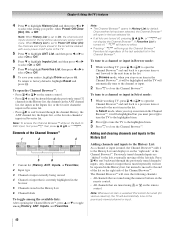
.... Audio Digital Audio Selector Audio Settings Advanced Audio Settings Audio Setup 3 Press B or b to select Audio, and then press C or c to partially reduce (1/2 MUTE) or turn off (MUTE) the sound. Chapter 6: Using the TV's features CC Selector You can use the CC Selector to temporarily override the default analog caption mode...
.... Audio Digital Audio Selector Audio Settings Advanced Audio Settings Audio Setup 3 Press B or b to select Audio, and then press C or c to partially reduce (1/2 MUTE) or turn off (MUTE) the sound. Chapter 6: Using the TV's features CC Selector You can use the CC Selector to temporarily override the default analog caption mode...

