

Operation Manual
Page 5
...• Keep people and pets away from an Authorized Toro Service Dealer. To reduce line wear and and improve trimming performance, use , feed out some line to wear too short. • Keep the line length at the eyelet, stop the trimmer, remove the spool as possible. • If the line is spinning. ... clothes and skin causing injury and/or overload the motor, possibly causing a fire or electrical shock. Lengthening the Line The tip of the line, tap the spool on the ground. • Tap the spool only once to the bottom in a cool, dry location away from the top to lengthen the...
...• Keep people and pets away from an Authorized Toro Service Dealer. To reduce line wear and and improve trimming performance, use , feed out some line to wear too short. • Keep the line length at the eyelet, stop the trimmer, remove the spool as possible. • If the line is spinning. ... clothes and skin causing injury and/or overload the motor, possibly causing a fire or electrical shock. Lengthening the Line The tip of the line, tap the spool on the ground. • Tap the spool only once to the bottom in a cool, dry location away from the top to lengthen the...
Operation Manual
Page 6
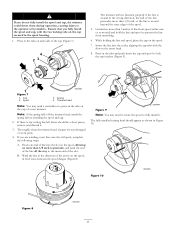
...push the end of the line all the way to fully install it . 3. Note: If the spring falls off the trimmer head, install the spring before installing the spool and cap. 2. Wind the line in the direction of the cap (Figure 7). Insert the line into the slot on the...the cap tabs with the two locking tabs on the spool, in level rows, between the spool flanges (Figure 8). Spool 3. If you are winding a new line onto the old spool, complete the following steps: A. Figure 10 Figure 8 6 Cap 2. B. Thoroughly clean the trimmer head. Inspect for any cutting line left (there should...
...push the end of the line all the way to fully install it . 3. Note: If the spring falls off the trimmer head, install the spring before installing the spool and cap. 2. Wind the line in the direction of the cap (Figure 7). Insert the line into the slot on the...the cap tabs with the two locking tabs on the spool, in level rows, between the spool flanges (Figure 8). Spool 3. If you are winding a new line onto the old spool, complete the following steps: A. Figure 10 Figure 8 6 Cap 2. B. Thoroughly clean the trimmer head. Inspect for any cutting line left (there should...
Operation Manual
Page 7
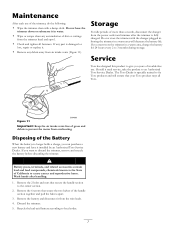
... grass and debris to local codes. 7 Figure 11 Important: Keep the air intake vents free of dirt or cuttings from the trimmer head and spool. • Check and tighten all Toro. Wash hands after the trimmer is fully charged. Remove the 6 screws that secure the handle section to give you want to an Authorized...
... grass and debris to local codes. 7 Figure 11 Important: Keep the air intake vents free of dirt or cuttings from the trimmer head and spool. • Check and tighten all Toro. Wash hands after the trimmer is fully charged. Remove the 6 screws that secure the handle section to give you want to an Authorized...

Parts Catalog
Page 2
3360-127 Rev A 2 Ref 26 27 28 29 32 33 Part No. 73-8270 100-9718 105-6946 114-9004 112-1567 112-1570 Battery and Spool Assembly Qty. Description 1 Spring-Compression 1 Spool ASM 1 Cap-Spool, 7 Inch 1 8 Inch Shield ASM 1 Charger-Battery, 120V 60Hz (Not Illustrated) 1 Battery ASM
3360-127 Rev A 2 Ref 26 27 28 29 32 33 Part No. 73-8270 100-9718 105-6946 114-9004 112-1567 112-1570 Battery and Spool Assembly Qty. Description 1 Spring-Compression 1 Spool ASM 1 Cap-Spool, 7 Inch 1 8 Inch Shield ASM 1 Charger-Battery, 120V 60Hz (Not Illustrated) 1 Battery ASM


