
Operation Manual
Page 4
... from the machine. 3. Safety and Instructional Decals Important: Safety and instruction decals are located near areas of hand or foot, mower blade-remove the ignition key and read the instructions before leaving the operating position; Manufacturer's Mark 1.
... from the machine. 3. Safety and Instructional Decals Important: Safety and instruction decals are located near areas of hand or foot, mower blade-remove the ignition key and read the instructions before leaving the operating position; Manufacturer's Mark 1.

Operation Manual
Page 6
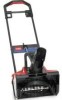
... lever 5. Refer to Charging the Battery in the Maintenance section. Handle 8. Air filter 3. Ignition key (electric-start handle 7. Washout port (not shown) 13. Recoil start 10. Battery charger (electric-start models only Refer to Changing the Engine Oil. Product Overview 3 Charging the Battery No Parts ...Required Procedure Electric-start models only) 6 Cutting height lever (4) 2. Spark plug Figure 6 1. Side discharge chute 3. change it yearly thereafter. Fuel ...
... lever 5. Refer to Charging the Battery in the Maintenance section. Handle 8. Air filter 3. Ignition key (electric-start handle 7. Washout port (not shown) 13. Recoil start 10. Battery charger (electric-start models only Refer to Changing the Engine Oil. Product Overview 3 Charging the Battery No Parts ...Required Procedure Electric-start models only) 6 Cutting height lever (4) 2. Spark plug Figure 6 1. Side discharge chute 3. change it yearly thereafter. Fuel ...

Operation Manual
Page 8
... lower the mower, move the front cutting height levers rearward and the rear cutting height levers forward. Raise the mower Figure 9 2. Turn the ignition key (Figure 11) (electric-start models only) or pull the recoil start handle, pull it lightly until you pull the recoil start handle (Figure 12). Adjusting the Cutting...
... lower the mower, move the front cutting height levers rearward and the rear cutting height levers forward. Raise the mower Figure 9 2. Turn the ignition key (Figure 11) (electric-start models only) or pull the recoil start handle, pull it lightly until you pull the recoil start handle (Figure 12). Adjusting the Cutting...

Operation Manual
Page 9
If the side-discharge chute is damaged, install a new Toro replacement bag. Check the grass bag frequently. Installing the Grass Bag 1. Important: When you leave the mower (electric-start after self-propelling, stop walking, hold up the rear deflector (Figure 14). 9 Recycling the Clippings Your mower comes ... moving parts to stop within 3 seconds. Bagging the Clippings Use the grass bag when you (Figure 13). Note: Remove the ignition key when you release the blade control bar, both the engine and blade should stop before recycling the clippings. If they do not stop ...
If the side-discharge chute is damaged, install a new Toro replacement bag. Check the grass bag frequently. Installing the Grass Bag 1. Important: When you leave the mower (electric-start after self-propelling, stop walking, hold up the rear deflector (Figure 14). 9 Recycling the Clippings Your mower comes ... moving parts to stop within 3 seconds. Bagging the Clippings Use the grass bag when you (Figure 13). Note: Remove the ignition key when you release the blade control bar, both the engine and blade should stop before recycling the clippings. If they do not stop ...

Operation Manual
Page 15
...codes. This state lasts only a few minutes until the battery is charging the battery. 2. Rear deflector 2. Battery 4. Replacing the Fuse Electric-start models only WARNING CALIFORNIA Proposition 65 Warning Battery posts, terminals, and related accessories contain lead and lead compounds, chemicals known to the ...State of the lead-acid battery according to the mower wire harness located below the ignition key (Figure 22). • A green light indicates that the charger is fully charged or the charger is nearly fully charged. Charging...
...codes. This state lasts only a few minutes until the battery is charging the battery. 2. Rear deflector 2. Battery 4. Replacing the Fuse Electric-start models only WARNING CALIFORNIA Proposition 65 Warning Battery posts, terminals, and related accessories contain lead and lead compounds, chemicals known to the ...State of the lead-acid battery according to the mower wire harness located below the ignition key (Figure 22). • A green light indicates that the charger is fully charged or the charger is nearly fully charged. Charging...

Operation Manual
Page 18
... through the spark plug hole, and pull the starter rope slowly several times to distribute oil throughout the cylinder to the spark plug. 18 When you can damage the cables, causing an unsafe operating condition. • Do not damage the cables when folding or unfolding the handle.... • If a cable is the leading cause of fuel. 4. Remove the ignition key (electric-start models only). 2. Loosen the handle knobs until the engine stops from running out of hard starting. Loosely install the spark plug. 9. Removing the...
... through the spark plug hole, and pull the starter rope slowly several times to distribute oil throughout the cylinder to the spark plug. 18 When you can damage the cables, causing an unsafe operating condition. • Do not damage the cables when folding or unfolding the handle.... • If a cable is the leading cause of fuel. 4. Remove the ignition key (electric-start models only). 2. Loosen the handle knobs until the engine stops from running out of hard starting. Loosely install the spark plug. 9. Removing the...
Parts Catalog
Page 5
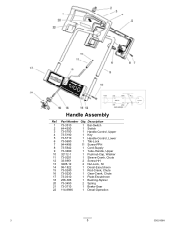
Description 1 73-3510 1 Bar-Switch 2 64-4930 1 Switch 3 73-5700 1 Handle-Control, Upper 4 73-5190 1 Key 5 73-5710 1 Handle-Control, Lower 6 73-5690 7 94-4496 1 Tab-Lock 11 Screw-PPH 8 73-5642 1 Cord-Supply 9 73-3460 1 Tube-Handle, Upper 10 32112-1 1 ... 3296-12 14 98-1822 2 Nut-Lock, NI 1 Decal-Escutcheon 15 73-0240 16 73-0230 1 Rod-Crank, Chute 1 Gear-Crank, Chute 17 73-0310 18 256-306 1 Plate-Escutcheon 1 Bushing-Nyliner 20 73-3450 2 Spring 21 73-3710 1 Brake-Gear 22 114-8986 1 Decal-Operation 3 5 3362-566A Part Number Qty...
Description 1 73-3510 1 Bar-Switch 2 64-4930 1 Switch 3 73-5700 1 Handle-Control, Upper 4 73-5190 1 Key 5 73-5710 1 Handle-Control, Lower 6 73-5690 7 94-4496 1 Tab-Lock 11 Screw-PPH 8 73-5642 1 Cord-Supply 9 73-3460 1 Tube-Handle, Upper 10 32112-1 1 ... 3296-12 14 98-1822 2 Nut-Lock, NI 1 Decal-Escutcheon 15 73-0240 16 73-0230 1 Rod-Crank, Chute 1 Gear-Crank, Chute 17 73-0310 18 256-306 1 Plate-Escutcheon 1 Bushing-Nyliner 20 73-3450 2 Spring 21 73-3710 1 Brake-Gear 22 114-8986 1 Decal-Operation 3 5 3362-566A Part Number Qty...