

Operation Manual
Page 1
... Rights Reserved Other states or federal areas may cause serious injury or death if you need service, genuine Toro parts, or additional information, contact an Authorized Service Dealer or Toro Customer Service and have similar laws. This spark ignition system complies with a spark arrester muffler. Figure 1... No. 312000001 and Up Model No. 20352-Serial No. 312000001 and Up Form No. 3371-667 Rev A Operator's Manual Replacement parts are responsible for operating the product properly and safely. Original Instructions (EN) Printed in the space below: Important: This engine is ...
... Rights Reserved Other states or federal areas may cause serious injury or death if you need service, genuine Toro parts, or additional information, contact an Authorized Service Dealer or Toro Customer Service and have similar laws. This spark ignition system complies with a spark arrester muffler. Figure 1... No. 312000001 and Up Model No. 20352-Serial No. 312000001 and Up Form No. 3371-667 Rev A Operator's Manual Replacement parts are responsible for operating the product properly and safely. Original Instructions (EN) Printed in the space below: Important: This engine is ...

Operation Manual
Page 3
... is complete. Children are explosive. • Extinguish all times until fueling is not alert to cool before filling. • Remove gas-powered equipment from your view of children. Replace gas cap and tighten securely. WARNING Exhaust contains carbon monoxide, an odorless, deadly poison that may...as on a water heater or on other debris build-up oil or fuel spillage and remove any adjustments or repairs with manufacturer's recommended parts, when necessary. • Mower blades are sharp. Always place containers on the ground away from the truck or trailer and refuel it...
... is complete. Children are explosive. • Extinguish all times until fueling is not alert to cool before filling. • Remove gas-powered equipment from your view of children. Replace gas cap and tighten securely. WARNING Exhaust contains carbon monoxide, an odorless, deadly poison that may...as on a water heater or on other debris build-up oil or fuel spillage and remove any adjustments or repairs with manufacturer's recommended parts, when necessary. • Mower blades are sharp. Always place containers on the ground away from the truck or trailer and refuel it...

Operation Manual
Page 4
... the battery; Warning-read the instructions before leaving the operating position; Thrown object hazard-keep bystanders a safe distance from moving parts. 5. contains lead; Unlock 114-7982 1. Cutting/dismemberment hazard of hand or foot, mower blade-stay away from the machine...backing up and down slopes; Replace damaged decals. Cutting/dismemberment hazard of potential danger. Indicates the blade is identified as a part from the original machine manufacturer. 94-8072 104-7953 1. Safety and Instructional Decals Important: Safety and instruction decals are located...
... the battery; Warning-read the instructions before leaving the operating position; Thrown object hazard-keep bystanders a safe distance from moving parts. 5. contains lead; Unlock 114-7982 1. Cutting/dismemberment hazard of hand or foot, mower blade-stay away from the machine...backing up and down slopes; Replace damaged decals. Cutting/dismemberment hazard of potential danger. Indicates the blade is identified as a part from the original machine manufacturer. 94-8072 104-7953 1. Safety and Instructional Decals Important: Safety and instruction decals are located...

Operation Manual
Page 5
... Figure 4 3. Setup Important: Remove and discard the protective plastic sheet that you install the handle. 2 Filling the Engine with Oil No Parts Required Procedure Important: Your mower does not come with an API service classification of oil in the crankcase, then do the following: 1. fill...the oil level on the dipstick (Figure 4). 5 Install and tighten the handle knobs that covers the engine. 1 Installing the Handle No Parts Required Procedure WARNING Folding or unfolding the handle improperly can damage the cables, causing an unsafe operating condition. • Do not damage the...
... Figure 4 3. Setup Important: Remove and discard the protective plastic sheet that you install the handle. 2 Filling the Engine with Oil No Parts Required Procedure Important: Your mower does not come with an API service classification of oil in the crankcase, then do the following: 1. fill...the oil level on the dipstick (Figure 4). 5 Install and tighten the handle knobs that covers the engine. 1 Installing the Handle No Parts Required Procedure WARNING Folding or unfolding the handle improperly can damage the cables, causing an unsafe operating condition. • Do not damage the...

Operation Manual
Page 6
...into the oil fill tube securely. Handle 8. Air filter 3. Ignition key (electric-start handle 7. Side-discharge deflector models only) 4. Fuel tank cap 11. Recoil start 10. Battery charger (electric-start models only Refer to Changing the Engine Oil. Refer to Charging the ...not shown) 13. Drain the excess oil until the oil level on -demand lever 5. Product Overview 3 Charging the Battery No Parts Required Procedure Electric-start models only) 6 Handle knob (2) 6. Figure 5 1. Important: Do not overfill the crankcase with oil and run the engine. Spark ...
...into the oil fill tube securely. Handle 8. Air filter 3. Ignition key (electric-start handle 7. Side-discharge deflector models only) 4. Fuel tank cap 11. Recoil start 10. Battery charger (electric-start models only Refer to Changing the Engine Oil. Refer to Charging the ...not shown) 13. Drain the excess oil until the oil level on -demand lever 5. Product Overview 3 Charging the Battery No Parts Required Procedure Electric-start models only) 6 Handle knob (2) 6. Figure 5 1. Important: Do not overfill the crankcase with oil and run the engine. Spark ...

Operation Manual
Page 8
... to the handle slowly. 1. and 4 inches (102 mm). 8 Figure 11 Starting the Engine 1. Keep away from the hot muffler. Turn the ignition key (Figure 11) (electric-start models only) or pull the recoil start handle, pull it lightly until you . Note: To raise the mower, move the front cutting height levers... Adjusting the cutting height may bring you into contact with the moving blade, causing serious injury. • Stop the engine and wait for all moving parts to stop. • Do not put your fingers under the housing when adjusting the cutting height.
... to the handle slowly. 1. and 4 inches (102 mm). 8 Figure 11 Starting the Engine 1. Keep away from the hot muffler. Turn the ignition key (Figure 11) (electric-start models only) or pull the recoil start handle, pull it lightly until you . Note: To raise the mower, move the front cutting height levers... Adjusting the cutting height may bring you into contact with the moving blade, causing serious injury. • Stop the engine and wait for all moving parts to stop. • Do not put your fingers under the housing when adjusting the cutting height.

Operation Manual
Page 9
...Side Discharge Chute) before recycling the clippings. WARNING The blade is damaged, install a new Toro replacement bag. Bagging the Clippings Use the grass bag when you release the blade control bar... several attempts, contact an Authorized Service Dealer. Stop the engine and wait for all moving parts to recycle the grass and leaf clippings back into the lawn. Figure 13 WARNING A worn...the Self-propel Drive To operate the self-propel drive, simply walk with you leave the mower (electric-start after self-propelling, stop walking, hold up the rear deflector (Figure 14). 9 Note: ...
...Side Discharge Chute) before recycling the clippings. WARNING The blade is damaged, install a new Toro replacement bag. Bagging the Clippings Use the grass bag when you release the blade control bar... several attempts, contact an Authorized Service Dealer. Stop the engine and wait for all moving parts to recycle the grass and leaf clippings back into the lawn. Figure 13 WARNING A worn...the Self-propel Drive To operate the self-propel drive, simply walk with you leave the mower (electric-start after self-propelling, stop walking, hold up the rear deflector (Figure 14). 9 Note: ...

Operation Manual
Page 10
... surrounding opening . 10 lever forward until the button on the lever pops up (Figure 15) Figure 15 1. Stop the engine and wait for all moving parts to stop before cleaning the bag-on-demand door and the surrounding opening (Figure 16) before you to either collect or recycle grass and leaf...
... surrounding opening . 10 lever forward until the button on the lever pops up (Figure 15) Figure 15 1. Stop the engine and wait for all moving parts to stop before cleaning the bag-on-demand door and the surrounding opening (Figure 16) before you to either collect or recycle grass and leaf...

Operation Manual
Page 11
... side deflector and install the side discharge chute (Figure 17). 1. Clean here Figure 16 Side-discharging the Clippings Use the side discharge for all moving parts to Operating the Bag-on -demand lever is sharp; contacting the blade can result in the bagging position, move the lever to the recycling position...
... side deflector and install the side discharge chute (Figure 17). 1. Clean here Figure 16 Side-discharging the Clippings Use the side discharge for all moving parts to Operating the Bag-on -demand lever is sharp; contacting the blade can result in the bagging position, move the lever to the recycling position...

Operation Manual
Page 13
... the machine from an Authorized Service Dealer (go to www.toro.com to remove the fuel. After performing the maintenance procedure(s),...spark plug. Important: Refer to stop. 2. Preparing for 24 hours (electric-start models only). • Empty the fuel tank before repairs as...air filter up. Stop the engine and wait for all moving parts to your engine operator's manual for any maintenance procedure. If ... never siphon. Gasoline is flammable, explosive and can cause personal injury. Figure 18 3. clean it more frequently in dusty operating conditions. • Charge the...
... the machine from an Authorized Service Dealer (go to www.toro.com to remove the fuel. After performing the maintenance procedure(s),...spark plug. Important: Refer to stop. 2. Preparing for 24 hours (electric-start models only). • Empty the fuel tank before repairs as...air filter up. Stop the engine and wait for all moving parts to your engine operator's manual for any maintenance procedure. If ... never siphon. Gasoline is flammable, explosive and can cause personal injury. Figure 18 3. clean it more frequently in dusty operating conditions. • Charge the...

Operation Manual
Page 20
..., or if a normal, able-bodied adult can save an unnecessary visit to an Authorized Toro Service Dealer. This warranty gives you specific legal rights, and you are using Toro-approved replacement parts. The dealer will not start your proof of the product on the same lot as your... period of proper maintenance • Repairs necessary due to failure to use , are warranted for Commercial Use* Gas-powered Toro Products used commercially*. This warranty covers the cost of parts and labor, but you , refer to the Yellow Pages of non-use over three months or seasonal storage -...
..., or if a normal, able-bodied adult can save an unnecessary visit to an Authorized Toro Service Dealer. This warranty gives you specific legal rights, and you are using Toro-approved replacement parts. The dealer will not start your proof of the product on the same lot as your... period of proper maintenance • Repairs necessary due to failure to use , are warranted for Commercial Use* Gas-powered Toro Products used commercially*. This warranty covers the cost of parts and labor, but you , refer to the Yellow Pages of non-use over three months or seasonal storage -...

Parts Catalog
Page 1
Form No. 3362-566 Rev A 1800 Power Curve® Snowthrower Model No. 38025-Serial No. 310000001 and Up Parts Catalog Register at www.Toro.com. Original Instructions (EN)
Form No. 3362-566 Rev A 1800 Power Curve® Snowthrower Model No. 38025-Serial No. 310000001 and Up Parts Catalog Register at www.Toro.com. Original Instructions (EN)

Parts Catalog
Page 2
...PFH: phillips flat head PPH: phillips pan head PPHTF: phillips pan head thread forming PRH: phillips round head PTH: phillips truss head PTO: power-take-off RH: right hand ROPS: roll-over protection system SFH: slotted fillister head SHH: slotted hex head SHWH: slotted hex washer head ...; Company Contact us at www.Toro.com. 8111 Lyndale Avenue South Bloomington, MN 55420 2 Printed in an illustration, the reference number 2X 37 means that two of the part, the X is the multiplication symbol, and the y represents the reference number. For example, a wheel assembly might be identified by ...
...PFH: phillips flat head PPH: phillips pan head PPHTF: phillips pan head thread forming PRH: phillips round head PTH: phillips truss head PTO: power-take-off RH: right hand ROPS: roll-over protection system SFH: slotted fillister head SHH: slotted hex head SHWH: slotted hex washer head ...; Company Contact us at www.Toro.com. 8111 Lyndale Avenue South Bloomington, MN 55420 2 Printed in an illustration, the reference number 2X 37 means that two of the part, the X is the multiplication symbol, and the y represents the reference number. For example, a wheel assembly might be identified by ...

Parts Catalog
Page 4
Ref. #27) 29 73-0041 2 Washer-Thrust Ref. Housing and Rotor Assembly Ref. Part Number Qty. Description 30 73-3530 1 Bolt-Idler 31 61-8802 1 Belt-Drive 33 73-5730...256-307 1 Bushing 14 73-0280 1 Tube-Lower Handle 15 73-3630 1 Wire Harness 17 73-1800 1 Filter-Foam 18 32144-88 4 Screw-Pan Head 19 73-0120 1 Strap-Motor 20 73-3520 1 Motor 21 73-8680 1 Motor Plate...47 73-8590 48 73-3690 1 Rotor 1 Scraper 49 73-8580 1 Bushing 50 73-0010 2 Wheel Bracket ASM (Incl. Part Number Qty. Ref. #52) 51 3290-271 2 Rivet-Pop 52 61-8780 2 Bearing-Ball 53 73-0020 1 Shaft-Rotor ...
Ref. #27) 29 73-0041 2 Washer-Thrust Ref. Housing and Rotor Assembly Ref. Part Number Qty. Description 30 73-3530 1 Bolt-Idler 31 61-8802 1 Belt-Drive 33 73-5730...256-307 1 Bushing 14 73-0280 1 Tube-Lower Handle 15 73-3630 1 Wire Harness 17 73-1800 1 Filter-Foam 18 32144-88 4 Screw-Pan Head 19 73-0120 1 Strap-Motor 20 73-3520 1 Motor 21 73-8680 1 Motor Plate...47 73-8590 48 73-3690 1 Rotor 1 Scraper 49 73-8580 1 Bushing 50 73-0010 2 Wheel Bracket ASM (Incl. Part Number Qty. Ref. #52) 51 3290-271 2 Rivet-Pop 52 61-8780 2 Bearing-Ball 53 73-0020 1 Shaft-Rotor ...

Parts Catalog
Page 5
Part Number Qty. Handle Assembly Ref. Description 1 73-3510 1 Bar-Switch 2 64-4930 1 Switch 3 73-5700 1 Handle-Control, Upper 4 73-5190 1 Key 5 73-5710 1 Handle-Control, ... 3296-12 14 98-1822 2 Nut-Lock, NI 1 Decal-Escutcheon 15 73-0240 16 73-0230 1 Rod-Crank, Chute 1 Gear-Crank, Chute 17 73-0310 18 256-306 1 Plate-Escutcheon 1 Bushing-Nyliner 20 73-3450 2 Spring 21 73-3710 1 Brake-Gear 22 114-8986 1 Decal-Operation 3 5 3362-566A
Part Number Qty. Handle Assembly Ref. Description 1 73-3510 1 Bar-Switch 2 64-4930 1 Switch 3 73-5700 1 Handle-Control, Upper 4 73-5190 1 Key 5 73-5710 1 Handle-Control, ... 3296-12 14 98-1822 2 Nut-Lock, NI 1 Decal-Escutcheon 15 73-0240 16 73-0230 1 Rod-Crank, Chute 1 Gear-Crank, Chute 17 73-0310 18 256-306 1 Plate-Escutcheon 1 Bushing-Nyliner 20 73-3450 2 Spring 21 73-3710 1 Brake-Gear 22 114-8986 1 Decal-Operation 3 5 3362-566A
Parts Catalog
Page 6
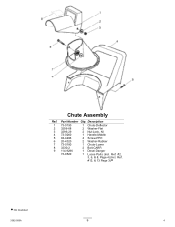
Ref. #12, & 13 Page 3) ● ● Not illustrated 3362-566A 6 4 Part Number Qty. Description 1 73-0190 1 Chute-Deflector 2 3256-68 2 Washer-Flat 3 3296-29 2 Nut-Lock, NI 4 73-0260 1 Handle-Middle 5 94-4496 4 Screw-PPH 6 20-4320 2 Washer-Rubber 7 73-0180 1 Chute-Lower 8 3230-2 2 Bolt-CARR 9 114-9286 1 Decal-Danger 73-0520 1 Loose Parts (Incl. Ref. #2, 3, 6, & 8, Page 4)(Incl. Chute Assembly Ref.
Ref. #12, & 13 Page 3) ● ● Not illustrated 3362-566A 6 4 Part Number Qty. Description 1 73-0190 1 Chute-Deflector 2 3256-68 2 Washer-Flat 3 3296-29 2 Nut-Lock, NI 4 73-0260 1 Handle-Middle 5 94-4496 4 Screw-PPH 6 20-4320 2 Washer-Rubber 7 73-0180 1 Chute-Lower 8 3230-2 2 Bolt-CARR 9 114-9286 1 Decal-Danger 73-0520 1 Loose Parts (Incl. Ref. #2, 3, 6, & 8, Page 4)(Incl. Chute Assembly Ref.


