
Owner's Manual
Page 1
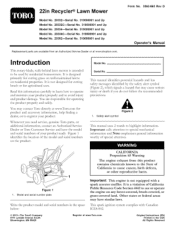
... product model and serial numbers in the USA All Rights Reserved Other states or federal areas may contact Toro directly at www.shoptoro.com. Introduction This rotary-blade, walk-behind lawn mower is a violation of California Public Resource Code Section 4442 to use or operate the engine on any ...Company 8111 Lyndale Avenue South Bloomington, MN 55420 Register at www.Toro.com. 22in Recycler Lawn Mower Form No. 3363-863 Rev D Model No. 20332mSerial No. 310000001 and Up Model No. 20332CmSerial No. 310000001 and Up Model No. 20334--Serial No. 310000001 and Up Model No. 20334C--Serial No....
... product model and serial numbers in the USA All Rights Reserved Other states or federal areas may contact Toro directly at www.shoptoro.com. Introduction This rotary-blade, walk-behind lawn mower is a violation of California Public Resource Code Section 4442 to use or operate the engine on any ...Company 8111 Lyndale Avenue South Bloomington, MN 55420 Register at www.Toro.com. 22in Recycler Lawn Mower Form No. 3363-863 Rev D Model No. 20332mSerial No. 310000001 and Up Model No. 20332CmSerial No. 310000001 and Up Model No. 20334--Serial No. 310000001 and Up Model No. 20334C--Serial No....

Owner's Manual
Page 2
... • See manufacturer's instructions for walk-behind the handle when the engine is running machine unattended. • Stop the engine and wait until the blade comes to operate this manual The safe... the area is used to alert you start to avoid possible injury or death. Keep clear of the discharge opening at the time of bystanders before starting . • Do not put hands... potential personal injury hazards. Safety This lawn mower meets or exceeds the CPSC blade safety requirements for proper operation and installation of accessories. Stay behind rotary lawn mowers and ...
... • See manufacturer's instructions for walk-behind the handle when the engine is running machine unattended. • Stop the engine and wait until the blade comes to operate this manual The safe... the area is used to alert you start to avoid possible injury or death. Keep clear of the discharge opening at the time of bystanders before starting . • Do not put hands... potential personal injury hazards. Safety This lawn mower meets or exceeds the CPSC blade safety requirements for proper operation and installation of accessories. Stay behind rotary lawn mowers and ...
Owner's Manual
Page 3
...responsible adult other than from a gasoline dispenser nozzle. Never allow children to prevent unintended starting . Use extra care when approaching blind corners, shrubs, trees, or other sources of ... Allow engine to the presence of ignition. Remove gas-powered equipment from your view of Gasoline To avoid personal injury or property damage, use extreme care in contact ... is not possible, then refuel such equipment with manufacturer's recommended parts, when necessar): Mower blades are sharp. Maintain or replace safeb; General Service Never operate machine in an enclosed ...
...responsible adult other than from a gasoline dispenser nozzle. Never allow children to prevent unintended starting . Use extra care when approaching blind corners, shrubs, trees, or other sources of ... Allow engine to the presence of ignition. Remove gas-powered equipment from your view of Gasoline To avoid personal injury or property damage, use extreme care in contact ... is not possible, then refuel such equipment with manufacturer's recommended parts, when necessar): Mower blades are sharp. Maintain or replace safeb; General Service Never operate machine in an enclosed ...
Owner's Manual
Page 4
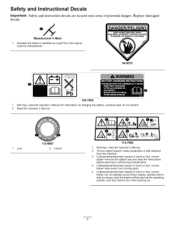
... battery; and look behind you when backing up and down slopes; Safety and instruction decals are located near areas of hand or foot, mower blade--remove the ignition key and read the instructions before leaving the operating position; Cutting/dismemberment hazard of hand or foot..., mower blade--stay away from moving parts. 5. contains lead; Thrown object hazard--keep bystanders a safe distance from the original machine manufacturer. 94-8072 0 81 104-7953...
... battery; and look behind you when backing up and down slopes; Safety and instruction decals are located near areas of hand or foot, mower blade--remove the ignition key and read the instructions before leaving the operating position; Cutting/dismemberment hazard of hand or foot..., mower blade--stay away from moving parts. 5. contains lead; Thrown object hazard--keep bystanders a safe distance from the original machine manufacturer. 94-8072 0 81 104-7953...

Owner's Manual
Page 6
... Side-discharge deflector models only) 4. Fuel tank cap 11. Recoil start 8. Product Overview 1 2 3 4 5 6 7 8 11 10 9 Figure 5 G009503 1. Handle 2. Cutting height lever (4) 9. Handle knob (2) 6. Grass bag 2. Ignition key (electric-start handle 7. Oil fill/dipstick 12. Air filter 10. Side discharge ... oil and run the engine. Spark plug 1 G009526 Figure 6 1. Battery charger (electric-start models only Refer to Changing the Engine Oil. [3 Charging the Battery No Parts Required Procedure Electric-start models only) Blade control bar 3.
... Side-discharge deflector models only) 4. Fuel tank cap 11. Recoil start 8. Product Overview 1 2 3 4 5 6 7 8 11 10 9 Figure 5 G009503 1. Handle 2. Cutting height lever (4) 9. Handle knob (2) 6. Grass bag 2. Ignition key (electric-start handle 7. Oil fill/dipstick 12. Air filter 10. Side discharge ... oil and run the engine. Spark plug 1 G009526 Figure 6 1. Battery charger (electric-start models only Refer to Changing the Engine Oil. [3 Charging the Battery No Parts Required Procedure Electric-start models only) Blade control bar 3.
Owner's Manual
Page 8
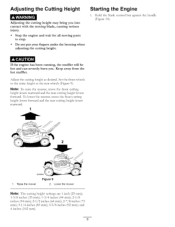
...not put your fingers under the housing when adjusting the cutting height. Hold the blade control bar against the handle (Figure 10). and 4 inches (102 ram). If...for all moving blade, causing injury. To lower the mower, move the front cutting height levers rearward and the rear cutting height levers forward. Raise the mower Figure 9 2. Lower the mower Note: The...2-7/8inches (73 ram); 3-1/4 inches (83 ram); 3-5/8 inches (92 ram); you . Note: To raise the mower, move the front cutting height levers forward and the rear cutting height levers rearward. 1 2 _r--- _ 1. ...
...not put your fingers under the housing when adjusting the cutting height. Hold the blade control bar against the handle (Figure 10). and 4 inches (102 ram). If...for all moving blade, causing injury. To lower the mower, move the front cutting height levers rearward and the rear cutting height levers forward. Raise the mower Figure 9 2. Lower the mower Note: The...2-7/8inches (73 ram); 3-1/4 inches (83 ram); 3-5/8 inches (92 ram); you . Note: To raise the mower, move the front cutting height levers forward and the rear cutting height levers rearward. 1 2 _r--- _ 1. ...

Owner's Manual
Page 9
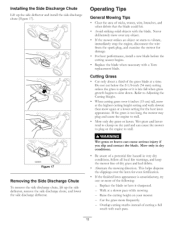
...mower does not start after self-propelling, stop walking, hold your sides, and the mower will automatically keep pace with you feel resistance, then pull it lightly until you (Figure 13). 1. Note: When you pull the recoil start handle (Figure 12). Blade control bar 7 _/_'G009546 Figure 10 , Turn the ignition key (Figure 11) (electric-start...under the personal pace handle to disengage the wheel drive. Using the Self-propel Drive To operate the self-propel drive, simply walk with your hands on the upper handle and your elbows at your hands in place, and allow the mower to ...
...mower does not start after self-propelling, stop walking, hold your sides, and the mower will automatically keep pace with you feel resistance, then pull it lightly until you (Figure 13). 1. Note: When you pull the recoil start handle (Figure 12). Blade control bar 7 _/_'G009546 Figure 10 , Turn the ignition key (Figure 11) (electric-start...under the personal pace handle to disengage the wheel drive. Using the Self-propel Drive To operate the self-propel drive, simply walk with your hands on the upper handle and your elbows at your hands in place, and allow the mower to ...

Owner's Manual
Page 10
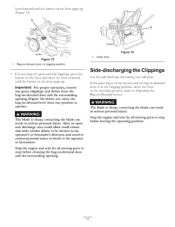
...is sharp; The blade is damaged, install a new Toro replacement bag. Raise and hold up the rear deflector (Figure 14). 1. Operating the Bag-on-Demand Lever The bag-on -demand lever and move the 10 and contact an Authorized Recycling the Clippings Your mower comes from the lawn...3 seconds. Important: When you leave the mower (electric-start models only). If the bag-on -demand lever is in serious personal injury. Rear deflector 2. Note: Remove the ignition key when you release the blade control bar, both the engine and blade should stop before recycling the clippings. If the...
...is sharp; The blade is damaged, install a new Toro replacement bag. Raise and hold up the rear deflector (Figure 14). 1. Operating the Bag-on-Demand Lever The bag-on -demand lever and move the 10 and contact an Authorized Recycling the Clippings Your mower comes from the lawn...3 seconds. Important: When you leave the mower (electric-start models only). If the bag-on -demand lever is in serious personal injury. Rear deflector 2. Note: Remove the ignition key when you release the blade control bar, both the engine and blade should stop before recycling the clippings. If the...
Owner's Manual
Page 11
... (refer to stop before leaving the operating position. 11 lever from the bag-on-demand door and the surrounding opening . The blade is in serious personal injury. Stop the engine and wait for all moving parts to Operating the Bag-on-Demand Lever). Stop the engine and wait ... result in serious personal injury. Important: For proper operation, remove any grass clippings and debris from one position to door G009582 1. If the grass bag is on the mower and the bag-on-demand lever is sharp; contacting the blade can result in the bagging position, move the bag-on-...
... (refer to stop before leaving the operating position. 11 lever from the bag-on-demand door and the surrounding opening . The blade is in serious personal injury. Stop the engine and wait for all moving parts to Operating the Bag-on-Demand Lever). Stop the engine and wait ... result in serious personal injury. Important: For proper operation, remove any grass clippings and debris from one position to door G009582 1. If the grass bag is on the mower and the bag-on-demand lever is sharp; contacting the blade can result in the bagging position, move the bag-on-...
Owner's Manual
Page 12
... the mower strikes an object or starts to vibrate, immediately stop the engine, disconnect the wire from the spark plug, and examine the mower for..., and keep the mower free of the grass blade at the highest cutting height setting and walk slower; then mow again at a slower pace while mowing. -...blade before the cutting season begins. • Replace the blade when necessary with the blade. Be aware of sticks, stones, wire, branches, and other debris that the blade could hit. • Avoid striking solid objects with a Toro replacement blade. Wet grass or leaves can cause the mower...
... the mower strikes an object or starts to vibrate, immediately stop the engine, disconnect the wire from the spark plug, and examine the mower for..., and keep the mower free of the grass blade at the highest cutting height setting and walk slower; then mow again at a slower pace while mowing. -...blade before the cutting season begins. • Replace the blade when necessary with the blade. Be aware of sticks, stones, wire, branches, and other debris that the blade could hit. • Avoid striking solid objects with a Toro replacement blade. Wet grass or leaves can cause the mower...

Owner's Manual
Page 14
...in dusty operating conditions. • Charge the battery for 24 hours (electric-start models only). • Empty the fuel tank before repairs as directed and before performing any additional yearly maintenance procedures. Always tip the mower onto its side, with a hand pump; is flammable, explosive and ...conditions. Disconnect the spark plug wire from under the mower. • Replace the air filter; Important: Before tipping the mower to change the oil or replace the blade, allow the fuel tank to leak. Tipping Gasoline personal the mower may cause the fuel to run dry through normal...
...in dusty operating conditions. • Charge the battery for 24 hours (electric-start models only). • Empty the fuel tank before repairs as directed and before performing any additional yearly maintenance procedures. Always tip the mower onto its side, with a hand pump; is flammable, explosive and ...conditions. Disconnect the spark plug wire from under the mower. • Replace the air filter; Important: Before tipping the mower to change the oil or replace the blade, allow the fuel tank to leak. Tipping Gasoline personal the mower may cause the fuel to run dry through normal...
Owner's Manual
Page 17
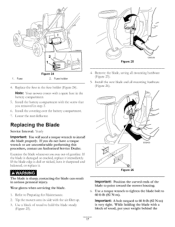
...serious personal injury. If the blade is du_ or nicked, have a torque wrench or are uncomfortable performing this procedure, contact an Authorized Service Dealer. Refer to install the blade properly. Use a block of wood, put your weight behind the 17 While holding the blade with...run out of the blade to point toward the mower housing. , Use a torque wrench to tighten the blade bolt to hold the blade steady (Figure 25). , Remove the blade, saving all mounting hardware (Figure 26). contacting the blade can result in step 3. Install the new blade and all mounting hardware ...
...serious personal injury. If the blade is du_ or nicked, have a torque wrench or are uncomfortable performing this procedure, contact an Authorized Service Dealer. Refer to install the blade properly. Use a block of wood, put your weight behind the 17 While holding the blade with...run out of the blade to point toward the mower housing. , Use a torque wrench to tighten the blade bolt to hold the blade steady (Figure 25). , Remove the blade, saving all mounting hardware (Figure 26). contacting the blade can result in step 3. Install the new blade and all mounting hardware ...

Owner's Manual
Page 20
...performed by a dealer or by anyone other remedies fail, you . cool temperature starts such as filters, fuel, lubricants, oil changes, spark plugs, air filters blade sharpening or worn blades, cable!linkage adjustments, or brake and clutch adjustments • Any product or part.... The Toro GTS (Guaranteed to Start) Starting Guarantee does not apply when the product is liable for indirect, incidental, or consequential damages in Mulcher/Bagger Walk Power Mowers Conditions and Products Covered Items and Conditions Not Covered The Toro Company and its affiliate, Toro Warranty Company...
...performed by a dealer or by anyone other remedies fail, you . cool temperature starts such as filters, fuel, lubricants, oil changes, spark plugs, air filters blade sharpening or worn blades, cable!linkage adjustments, or brake and clutch adjustments • Any product or part.... The Toro GTS (Guaranteed to Start) Starting Guarantee does not apply when the product is liable for indirect, incidental, or consequential damages in Mulcher/Bagger Walk Power Mowers Conditions and Products Covered Items and Conditions Not Covered The Toro Company and its affiliate, Toro Warranty Company...

Parts Catalog
Page 2
...: phillips flat head PPH: phillips pan head PPHTF: phillips pan head thread forming PRH: phillips round head PTH: phillips truss head PTO: power-take-off RH: right hand ROPS: roll-over protection system RRB: rear roller brush SFH: slotted fillister head SHH: slotted hex head SHWH... SRH: slotted round head STD: standard TAP: self tapping TTH: torx truss head 2 List of Abbreviations AR: as required ASM: assembly BBC: blade brake control BHTF: button head thread forming CARR: carriage CCW: counter clockwise CW: clockwise DEG: degrees DPA: Dual Point Adjustment ECM: electronic control ...
...: phillips flat head PPH: phillips pan head PPHTF: phillips pan head thread forming PRH: phillips round head PTH: phillips truss head PTO: power-take-off RH: right hand ROPS: roll-over protection system RRB: rear roller brush SFH: slotted fillister head SHH: slotted hex head SHWH... SRH: slotted round head STD: standard TAP: self tapping TTH: torx truss head 2 List of Abbreviations AR: as required ASM: assembly BBC: blade brake control BHTF: button head thread forming CARR: carriage CCW: counter clockwise CW: clockwise DEG: degrees DPA: Dual Point Adjustment ECM: electronic control ...

Parts Catalog
Page 3
Contents Deck, Side Chute and Rear Door Assembly 4 Rear Bag Assembly 5 Engine and Blade Assembly 6 Front Wheel and Height-of-Cut Assembly 7 Transmission and Rear Wheel Drive Assembly 8 Handle Assembly 9 Electrical Assembly 10 Attachments and Accessories 11 © 2012-The Toro® Company Contact us at www.Toro.com. 8111 Lyndale Avenue South Bloomington, MN 55420 3 Printed in the USA. All Rights Reserved
Contents Deck, Side Chute and Rear Door Assembly 4 Rear Bag Assembly 5 Engine and Blade Assembly 6 Front Wheel and Height-of-Cut Assembly 7 Transmission and Rear Wheel Drive Assembly 8 Handle Assembly 9 Electrical Assembly 10 Attachments and Accessories 11 © 2012-The Toro® Company Contact us at www.Toro.com. 8111 Lyndale Avenue South Bloomington, MN 55420 3 Printed in the USA. All Rights Reserved

Parts Catalog
Page 6
Engine and Blade Assembly Ref. Description 1 1 Engine-Briggs, 128M05-3423-B1 ● ■ 2 104-7577-03 1 Shield-Muffler 3 32144-1 3 Screw-Taptite 5 106-3999 1 Spacer-Driver 6 106-3987 1 Blade Driver ASM 7 108-9764-03 1 Blade-22 Inch 8 108-3766-03 1 Support-Blade 9 105-8579 1 Bolt-Blade 10 105-3030-03 1 Guide-Belt 11 95-1726 3 Screw-Taptite 12 114-7937 1 Cover-Belt 13 46-8091 2 Screw-HWH 14 2210-316 1 Stop-Rope 16 121-2371 1 Decal-Shroud ● Not serviced separately 3371-850B ■ Obtain parts from www.briggsandstratton.com 6 B2 Part Number Qty.
Engine and Blade Assembly Ref. Description 1 1 Engine-Briggs, 128M05-3423-B1 ● ■ 2 104-7577-03 1 Shield-Muffler 3 32144-1 3 Screw-Taptite 5 106-3999 1 Spacer-Driver 6 106-3987 1 Blade Driver ASM 7 108-9764-03 1 Blade-22 Inch 8 108-3766-03 1 Support-Blade 9 105-8579 1 Bolt-Blade 10 105-3030-03 1 Guide-Belt 11 95-1726 3 Screw-Taptite 12 114-7937 1 Cover-Belt 13 46-8091 2 Screw-HWH 14 2210-316 1 Stop-Rope 16 121-2371 1 Decal-Shroud ● Not serviced separately 3371-850B ■ Obtain parts from www.briggsandstratton.com 6 B2 Part Number Qty.

Parts Catalog
Page 10
Description 6 114-7936 1 Tray-Battery 7 106-8397 1 Battery-12 Volt 9 120-3329 1 Cover-Battery 10 32144-97 1 Screw-PPH, Plastite 11 114-2619 1 Decal-Electric Start 12 104-7953 1 Decal 13 114-1588 1 Charger-Battery 15 614249 3 Tie-Cable 3371-850B 10 D5 Electrical Assembly Ref. Description 1 120-5242 1 Mount-Switch 2 92-2270 1 Screw-Handle 3 46-5780 1 Starter Switch ASM 3:1 3254-5 1 Washer-Tooth, Internal 3:2 218-461 1 Nut-HH 4 700918 1 Key 5 120-7035 1 Harness-Wire 5:1 99-6124 1 Fuse-Blade, 40 Amp Ref. Part Number Qty. Part Number Qty.
Description 6 114-7936 1 Tray-Battery 7 106-8397 1 Battery-12 Volt 9 120-3329 1 Cover-Battery 10 32144-97 1 Screw-PPH, Plastite 11 114-2619 1 Decal-Electric Start 12 104-7953 1 Decal 13 114-1588 1 Charger-Battery 15 614249 3 Tie-Cable 3371-850B 10 D5 Electrical Assembly Ref. Description 1 120-5242 1 Mount-Switch 2 92-2270 1 Screw-Handle 3 46-5780 1 Starter Switch ASM 3:1 3254-5 1 Washer-Tooth, Internal 3:2 218-461 1 Nut-HH 4 700918 1 Key 5 120-7035 1 Harness-Wire 5:1 99-6124 1 Fuse-Blade, 40 Amp Ref. Part Number Qty. Part Number Qty.


