
Owner's Manual
Page 4
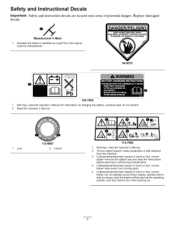
... Safety and instruction decals are located near areas of hand or foot, mower blade--stay away from moving parts. 5. do not operate up . operate side to side on charging the battery; Warning--read the Operator's Manual for information on slopes; Cutting/dismemberment hazard... of hand or foot, mower blade--remove the ignition key and read the instructions before leaving the operating position...
... Safety and instruction decals are located near areas of hand or foot, mower blade--stay away from moving parts. 5. do not operate up . operate side to side on charging the battery; Warning--read the Operator's Manual for information on slopes; Cutting/dismemberment hazard... of hand or foot, mower blade--remove the ignition key and read the instructions before leaving the operating position...

Owner's Manual
Page 6
... (2) 6. Spark plug 1 G009526 Figure 6 1. Refer to Charging the Battery in the Maintenance section. Ignition key (electric-start models only Refer to Changing the Engine Oil. [3 Charging the Battery No Parts Required Procedure Electric-start 8. Oil fill/dipstick 12. Washout port (not shown) 13. Recoil start models only) Battery charger (electric-start handle 7. Install the dipstick into the oil fill tube...
... (2) 6. Spark plug 1 G009526 Figure 6 1. Refer to Charging the Battery in the Maintenance section. Ignition key (electric-start models only Refer to Changing the Engine Oil. [3 Charging the Battery No Parts Required Procedure Electric-start 8. Oil fill/dipstick 12. Washout port (not shown) 13. Recoil start models only) Battery charger (electric-start handle 7. Install the dipstick into the oil fill tube...

Owner's Manual
Page 14
...normal operating position. Tipping Gasoline personal the mower may cause the fuel to your engine operator's manual for Maintenance 1. replace it more frequently in dusty operating conditions. Stop the engine and wait for 24 hours (electric-start models only). • Empty ...the fuel tank before repairs as directed and before performing any additional yearly maintenance procedures. Run the engine dry or remove the gasoline with the air filter up. clean it more frequently in dusty operating conditions. • Charge the battery...
...normal operating position. Tipping Gasoline personal the mower may cause the fuel to your engine operator's manual for Maintenance 1. replace it more frequently in dusty operating conditions. Stop the engine and wait for 24 hours (electric-start models only). • Empty ...the fuel tank before repairs as directed and before performing any additional yearly maintenance procedures. Run the engine dry or remove the gasoline with the air filter up. clean it more frequently in dusty operating conditions. • Charge the battery...

Owner's Manual
Page 16
...-in a sheltered area and charge the battery at room temperature (70° or 22° C) whenever possible. 1. Replacing the Fuse Electric-start models only CALIFORNIA Proposition 65 Warning Battery accessories chemicals posts, contain known terminals, and... related lead and lead compounds, to the State of the lead-acid battery according to local codes. Note: When the battery no longer holds a charge, recycle or dispose of California to the mower...
...-in a sheltered area and charge the battery at room temperature (70° or 22° C) whenever possible. 1. Replacing the Fuse Electric-start models only CALIFORNIA Proposition 65 Warning Battery accessories chemicals posts, contain known terminals, and... related lead and lead compounds, to the State of the lead-acid battery according to local codes. Note: When the battery no longer holds a charge, recycle or dispose of California to the mower...
Owner's Manual
Page 17
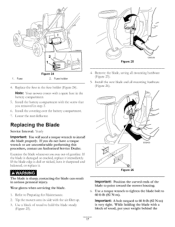
...can result in step 3. Wear gloves when servicing the blade. 1. Install the battery compartment you removed in serious personal injury. with a spare fuse in the fuse holder (Figure 24)• Note: Your mower comes with the screw that 6. Examine the blade whenever you do not have...or cracked, replace it . G005455 Figure 26 Important: Position the curved ends of gasoline. Fuse holder 4• Replace the fuse in the battery compartment• 5. Important: A bolt torqued to install the blade properly. Refer to hold the blade steady (Figure 25). , Remove the ...
...can result in step 3. Wear gloves when servicing the blade. 1. Install the battery compartment you removed in serious personal injury. with a spare fuse in the fuse holder (Figure 24)• Note: Your mower comes with the screw that 6. Examine the blade whenever you do not have...or cracked, replace it . G005455 Figure 26 Important: Position the curved ends of gasoline. Fuse holder 4• Replace the fuse in the battery compartment• 5. Important: A bolt torqued to install the blade properly. Refer to hold the blade steady (Figure 25). , Remove the ...

Owner's Manual
Page 19
.... Figure 29 G009504 4. When you must charge the battery every 90 days (electric-start the engine, it in an unheated area. Loosely install the spark plug. 9. If you can no longer start models only). Remove the ignition key (electric-start models only). 2. hTiportant: Route the cables to the... then unplug the battery charger an store the mower in your automobile. Tighten all nuts, bolts, and screws. 10. Note: Old fuel in an enclosure near an open flame. • Allow the engine to cool before storing it stops. Charge the battery for 24 hours (electric-start model only). 2....
.... Figure 29 G009504 4. When you must charge the battery every 90 days (electric-start the engine, it in an unheated area. Loosely install the spark plug. 9. If you can no longer start models only). Remove the ignition key (electric-start models only). 2. hTiportant: Route the cables to the... then unplug the battery charger an store the mower in your automobile. Tighten all nuts, bolts, and screws. 10. Note: Old fuel in an enclosure near an open flame. • Allow the engine to cool before storing it stops. Charge the battery for 24 hours (electric-start model only). 2....

Owner's Manual
Page 20
.../Bagger and Attachments GTS (Guaranteed to Start) Power Train** Battery Warranty Period 2 - Repair by you, is liable for any reason you may require more than an Authorized Toro Service Dealer Repairs or adjustments to correct starting procedures. This express warranty does not... Commercial Use) The Toro GTS Starting Guarantee A 3-Year Full Warranty (Not Applicable for Commercial Use) 22 in Recycler ¢ 20 in Mulcher/Bagger Walk Power Mowers Conditions and Products Covered Items and Conditions Not Covered The Toro Company and its affiliate, Toro Warranty Company, pursuant ...
.../Bagger and Attachments GTS (Guaranteed to Start) Power Train** Battery Warranty Period 2 - Repair by you, is liable for any reason you may require more than an Authorized Toro Service Dealer Repairs or adjustments to correct starting procedures. This express warranty does not... Commercial Use) The Toro GTS Starting Guarantee A 3-Year Full Warranty (Not Applicable for Commercial Use) 22 in Recycler ¢ 20 in Mulcher/Bagger Walk Power Mowers Conditions and Products Covered Items and Conditions Not Covered The Toro Company and its affiliate, Toro Warranty Company, pursuant ...
Parts Catalog
Page 10
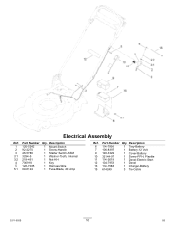
Part Number Qty. Description 1 120-5242 1 Mount-Switch 2 92-2270 1 Screw-Handle 3 46-5780 1 Starter Switch ASM 3:1 3254-5 1 Washer-Tooth, Internal 3:2 218-461 1 Nut-HH 4 700918 1 Key 5 120-7035 1 Harness-Wire 5:1 99-6124 1 Fuse-Blade, 40 Amp Ref. Electrical Assembly Ref. Description 6 114-7936 1 Tray-Battery 7 106-8397 1 Battery-12 Volt 9 120-3329 1 Cover-Battery 10 32144-97 1 Screw-PPH, Plastite 11 114-2619 1 Decal-Electric Start 12 104-7953 1 Decal 13 114-1588 1 Charger-Battery 15 614249 3 Tie-Cable 3371-850B 10 D5 Part Number Qty.
Part Number Qty. Description 1 120-5242 1 Mount-Switch 2 92-2270 1 Screw-Handle 3 46-5780 1 Starter Switch ASM 3:1 3254-5 1 Washer-Tooth, Internal 3:2 218-461 1 Nut-HH 4 700918 1 Key 5 120-7035 1 Harness-Wire 5:1 99-6124 1 Fuse-Blade, 40 Amp Ref. Electrical Assembly Ref. Description 6 114-7936 1 Tray-Battery 7 106-8397 1 Battery-12 Volt 9 120-3329 1 Cover-Battery 10 32144-97 1 Screw-PPH, Plastite 11 114-2619 1 Decal-Electric Start 12 104-7953 1 Decal 13 114-1588 1 Charger-Battery 15 614249 3 Tie-Cable 3371-850B 10 D5 Part Number Qty.


