
Owner's Manual
Page 1
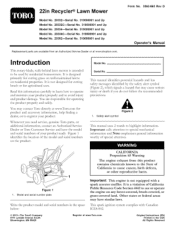
... properties. Introduction This rotary-blade, walk-behind lawn mower is designed primarily for cutting grass ...Toro parts, or additional information, contact an Authorized Service Dealer or Toro Customer Service and have similar laws. This spark ignition system complies with a spark arrester muffler. 22in Recycler Lawn Mower...20334--Serial No. 310000001 and Up Model No. 20334C--Serial No. 310000001 and Up Model No. 20352--Serial No. 310000001 and Up Operator's Manual Replacement parts are responsible for operating the product properly and safel> You may contact Toro directly at v_,wv,Toro...
... properties. Introduction This rotary-blade, walk-behind lawn mower is designed primarily for cutting grass ...Toro parts, or additional information, contact an Authorized Service Dealer or Toro Customer Service and have similar laws. This spark ignition system complies with a spark arrester muffler. 22in Recycler Lawn Mower...20334--Serial No. 310000001 and Up Model No. 20334C--Serial No. 310000001 and Up Model No. 20352--Serial No. 310000001 and Up Operator's Manual Replacement parts are responsible for operating the product properly and safel> You may contact Toro directly at v_,wv,Toro...
Owner's Manual
Page 3
...or trailer and refuel it on a truck or trailer bed with manufacturer's recommended parts, when necessar): Mower blades are explosive. General Service Never operate machine in an enclosed area. Check... or replace safeb; Gasoline is not alert to the presence of Gasoline To avoid personal injury or property damage, use extreme care in handling gasoline. Never store the machine...trees, or other appliances. Allow engine to prevent unintended starting . Never fill containers inside a vehicle or on the ground. Remove gas-powered equipment from your view of a child. Replace gas ...
...or trailer and refuel it on a truck or trailer bed with manufacturer's recommended parts, when necessar): Mower blades are explosive. General Service Never operate machine in an enclosed area. Check... or replace safeb; Gasoline is not alert to the presence of Gasoline To avoid personal injury or property damage, use extreme care in handling gasoline. Never store the machine...trees, or other appliances. Allow engine to prevent unintended starting . Never fill containers inside a vehicle or on the ground. Remove gas-powered equipment from your view of a child. Replace gas ...
Owner's Manual
Page 4
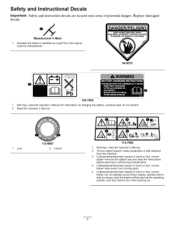
.../dismemberment hazard of hand or foot, mower blade--remove the ignition key and read the instructions before leaving the operating position; Safety and instruction decals are located near areas of hand or foot, mower blade--stay away from moving parts. 5. Unlock 114-7982 1. operate ...side to side on charging the battery; Indicates the blade is identified as a part from the machine. 3. contains lead; Read the Operator's Manual. ...
.../dismemberment hazard of hand or foot, mower blade--remove the ignition key and read the instructions before leaving the operating position; Safety and instruction decals are located near areas of hand or foot, mower blade--stay away from moving parts. 5. Unlock 114-7982 1. operate ...side to side on charging the battery; Indicates the blade is identified as a part from the machine. 3. contains lead; Read the Operator's Manual. ...
Owner's Manual
Page 5
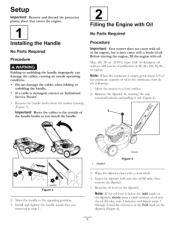
Move the mower to the operating position. 3. Install and tighten the handle _obs that covers the engine. 1 nstalling the Handle No Parts Required Procedure Folding or unfolding the handle improperly can damage the cables, causing an unsafe operating condition. • ... Setup Important: Remove and discard the protective plastic sheet that you install the handle. [2 Filling the Engine with Oil No Parts Required Procedure Important: Your mower does not come with oil. Before starting the engine, fill the engine with a bottle of SF, SG, SH, SJ, SL, or higher. i G009550 Figure ...
Move the mower to the operating position. 3. Install and tighten the handle _obs that covers the engine. 1 nstalling the Handle No Parts Required Procedure Folding or unfolding the handle improperly can damage the cables, causing an unsafe operating condition. • ... Setup Important: Remove and discard the protective plastic sheet that you install the handle. [2 Filling the Engine with Oil No Parts Required Procedure Important: Your mower does not come with oil. Before starting the engine, fill the engine with a bottle of SF, SG, SH, SJ, SL, or higher. i G009550 Figure ...

Owner's Manual
Page 6
... the Battery No Parts Required Procedure Electric-start handle 7. Washout port (not shown) 13. Grass bag 2. with oil until 6. Cutting height lever (4) 9. Side-discharge deflector models only) 4. change it yearly thereafter. Handle knob (2) 6. Recoil start models only Refer ...the oil level on -demand lever 5. Ignition key (electric-start models only) Oil fill/dipstick 12. Product Overview 1 2 3 4 5 6 7 8 11 10 9 Figure 5 G009503 1. Blade control bar 3. Battery charger (electric-start 8. Side discharge chute 3. Install the dipstick into the ...
... the Battery No Parts Required Procedure Electric-start handle 7. Washout port (not shown) 13. Grass bag 2. with oil until 6. Cutting height lever (4) 9. Side-discharge deflector models only) 4. change it yearly thereafter. Handle knob (2) 6. Recoil start models only Refer ...the oil level on -demand lever 5. Ignition key (electric-start models only) Oil fill/dipstick 12. Product Overview 1 2 3 4 5 6 7 8 11 10 9 Figure 5 G009503 1. Blade control bar 3. Battery charger (electric-start 8. Side discharge chute 3. Install the dipstick into the ...
Owner's Manual
Page 8
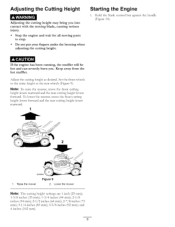
Starting the Engine 1. Adjust the cutting height as the rear wheels (Figure 9). Note: To raise the mower, move the front cutting height levers forward and the rear cutting height levers rearward. 1 2 _r--- _ 1. To lower the mower, move the... levers forward. and 4 inches (102 ram). Hold the blade control bar against the handle (Figure 10). Raise the mower Figure 9 2. Lower the mower Note: The cutting height settings are 1 inch (25 ram); 1-3/8 inches (35 ram); 1-3/4 inches (44 ram); ...cutting height may bring contact with the moving parts to the same height as desired.
Starting the Engine 1. Adjust the cutting height as the rear wheels (Figure 9). Note: To raise the mower, move the front cutting height levers forward and the rear cutting height levers rearward. 1 2 _r--- _ 1. To lower the mower, move the... levers forward. and 4 inches (102 ram). Hold the blade control bar against the handle (Figure 10). Raise the mower Figure 9 2. Lower the mower Note: The cutting height settings are 1 inch (25 ram); 1-3/8 inches (35 ram); 1-3/4 inches (44 ram); ...cutting height may bring contact with the moving parts to the same height as desired.

Owner's Manual
Page 10
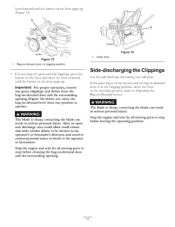
...is attached to Operating the Bag-on the bag rest in serious personal injury. If they do not stop properly, stop the engine, release the blade control bar. Stop the engine and wait for all moving parts to Removing the Side Discharge Chute) before leaving the operating position... bag when you to either collect or recycle grass and leaf clippings while the grass bag is damaged, install a new Toro replacement bag. Important: When you leave the mower (electric-start models only). Raise and hold up the rear deflector (Figure 14). 1. If it (refer to the operator or bystanders...
...is attached to Operating the Bag-on the bag rest in serious personal injury. If they do not stop properly, stop the engine, release the blade control bar. Stop the engine and wait for all moving parts to Removing the Side Discharge Chute) before leaving the operating position... bag when you to either collect or recycle grass and leaf clippings while the grass bag is damaged, install a new Toro replacement bag. Important: When you leave the mower (electric-start models only). Raise and hold up the rear deflector (Figure 14). 1. If it (refer to the operator or bystanders...
Owner's Manual
Page 11
...lever to the recycling position (refer to The blade is sharp; parts to the operator or bystanders. The blade is sharp; contacting the blade can result in serious personal injury. If the grass bag is on the mower and the bag-on-demand lever is in bagging position) For recycling...rear discharge area could allow small stones and other similar debris to be thrown in the operator's or bystander's direction and result in serious personal injury. Important: For proper operation, remove any grass clippings and debris from one position to Operating the Bag-on-Demand Lever). Clean ...
...lever to the recycling position (refer to The blade is sharp; parts to the operator or bystanders. The blade is sharp; contacting the blade can result in serious personal injury. If the grass bag is on the mower and the bag-on-demand lever is in bagging position) For recycling...rear discharge area could allow small stones and other similar debris to be thrown in the operator's or bystander's direction and result in serious personal injury. Important: For proper operation, remove any grass clippings and debris from one position to Operating the Bag-on-Demand Lever). Clean ...

Owner's Manual
Page 14
...in dusty operating conditions. clean it sharpened (more frequently in dusty operating conditions. • Charge the battery for 24 hours (electric-start models only). • Empty the fuel tank before repairs as directed and before performing any additional yearly maintenance procedures. Refer to...engine dry or remove the gasoline with the air filter up. Figure 18 G009500 . Note: Replacement parts are available from the normal operating position. Tipping Gasoline personal the mower may cause the fuel to find the nearest dealer) or at v_-,,_-,,_shoptoro.com. Important: Before ...
...in dusty operating conditions. clean it sharpened (more frequently in dusty operating conditions. • Charge the battery for 24 hours (electric-start models only). • Empty the fuel tank before repairs as directed and before performing any additional yearly maintenance procedures. Refer to...engine dry or remove the gasoline with the air filter up. Figure 18 G009500 . Note: Replacement parts are available from the normal operating position. Tipping Gasoline personal the mower may cause the fuel to find the nearest dealer) or at v_-,,_-,,_shoptoro.com. Important: Before ...

Owner's Manual
Page 20
...The Toro GTS Starting Guarantee A 3-Year Full Warranty (Not Applicable for Commercial Use) 22 in Recycler ¢ 20 in Mulcher/Bagger Walk Power Mowers Conditions and Products Covered Items and Conditions Not Covered The Toro Company and its affiliate, Toro ...Warranty Company, pursuant to an agreement between them, jointly promise to repair the Toro Product listed below if used commercially*. if it is considered commercial use, and the commercial use of parts...
...The Toro GTS Starting Guarantee A 3-Year Full Warranty (Not Applicable for Commercial Use) 22 in Recycler ¢ 20 in Mulcher/Bagger Walk Power Mowers Conditions and Products Covered Items and Conditions Not Covered The Toro Company and its affiliate, Toro ...Warranty Company, pursuant to an agreement between them, jointly promise to repair the Toro Product listed below if used commercially*. if it is considered commercial use, and the commercial use of parts...

Parts Catalog
Page 1
Form No. 3371-850 Rev B 22in Recycler® Lawn Mower Model No. 20334-Serial No. 312000001 and Up Parts Catalog Register at www.Toro.com. Original Instructions (EN) *3371-850* B
Form No. 3371-850 Rev B 22in Recycler® Lawn Mower Model No. 20334-Serial No. 312000001 and Up Parts Catalog Register at www.Toro.com. Original Instructions (EN) *3371-850* B
Parts Catalog
Page 2
...two of this type appear in illustration and in an illustration. Understanding Reference Numbers Each identified part in the parts list, along with other information about the part. Reference numbers of the parts identified by reference numbers 6:1,6:2, and 6:3. The a represents the reference number of the entire service... flat head PPH: phillips pan head PPHTF: phillips pan head thread forming PRH: phillips round head PTH: phillips truss head PTO: power-take-off RH: right hand ROPS: roll-over protection system RRB: rear roller brush SFH: slotted fillister head SHH: slotted hex ...
...two of this type appear in illustration and in an illustration. Understanding Reference Numbers Each identified part in the parts list, along with other information about the part. Reference numbers of the parts identified by reference numbers 6:1,6:2, and 6:3. The a represents the reference number of the entire service... flat head PPH: phillips pan head PPHTF: phillips pan head thread forming PRH: phillips round head PTH: phillips truss head PTO: power-take-off RH: right hand ROPS: roll-over protection system RRB: rear roller brush SFH: slotted fillister head SHH: slotted hex ...

Parts Catalog
Page 4
Part Number Qty. Description 16 114-7959 1 Latch-Recycle 17 117-1031 1 Spring-Compression 18 32104-120 2 Screw-PPH 19 121-5776 1 Rear Door ASM 19:2 ... 1 Bumper 30 105-6849 2 Screw-Thread Forming 34 117-5928 1 Decal-Bag On Demand 3371-850B 4 A2 Deck, Side Chute and Rear Door Assembly Ref. Part Number Qty. Description 1 117-1084 1 Housing ASM 1:2 94-8072 1 Decal-Danger 1:3 115-4676 1 Decal-Recycler 1:4 112-8867 1 Decal-Port, Washout 2 114-7963-01 1 Baffle-Front...
Part Number Qty. Description 16 114-7959 1 Latch-Recycle 17 117-1031 1 Spring-Compression 18 32104-120 2 Screw-PPH 19 121-5776 1 Rear Door ASM 19:2 ... 1 Bumper 30 105-6849 2 Screw-Thread Forming 34 117-5928 1 Decal-Bag On Demand 3371-850B 4 A2 Deck, Side Chute and Rear Door Assembly Ref. Part Number Qty. Description 1 117-1084 1 Housing ASM 1:2 94-8072 1 Decal-Danger 1:3 115-4676 1 Decal-Recycler 1:4 112-8867 1 Decal-Port, Washout 2 114-7963-01 1 Baffle-Front...
Parts Catalog
Page 6
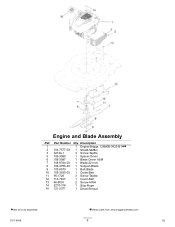
Part Number Qty. Description 1 1 Engine-Briggs, 128M05-3423-B1 ● ■ 2 104-7577-03 1 Shield-Muffler 3 32144-1 3 Screw-Taptite 5 106-3999 1 Spacer-Driver 6 106-3987 1 Blade Driver ASM 7 108-9764-03 1 Blade-22 Inch 8 108-3766-03 1 Support-Blade 9 105-8579 1 Bolt-Blade 10 105-3030-03 1 Guide-Belt 11 95-1726 3 Screw-Taptite 12 114-7937 1 Cover-Belt 13 46-8091 2 Screw-HWH 14 2210-316 1 Stop-Rope 16 121-2371 1 Decal-Shroud ● Not serviced separately 3371-850B ■ Obtain parts from www.briggsandstratton.com 6 B2 Engine and Blade Assembly Ref.
Part Number Qty. Description 1 1 Engine-Briggs, 128M05-3423-B1 ● ■ 2 104-7577-03 1 Shield-Muffler 3 32144-1 3 Screw-Taptite 5 106-3999 1 Spacer-Driver 6 106-3987 1 Blade Driver ASM 7 108-9764-03 1 Blade-22 Inch 8 108-3766-03 1 Support-Blade 9 105-8579 1 Bolt-Blade 10 105-3030-03 1 Guide-Belt 11 95-1726 3 Screw-Taptite 12 114-7937 1 Cover-Belt 13 46-8091 2 Screw-HWH 14 2210-316 1 Stop-Rope 16 121-2371 1 Decal-Shroud ● Not serviced separately 3371-850B ■ Obtain parts from www.briggsandstratton.com 6 B2 Engine and Blade Assembly Ref.
Parts Catalog
Page 7
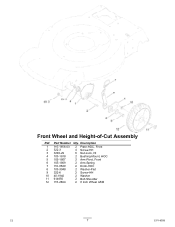
Part Number Qty. Description 1 115-1956-03 2 Plate-HOC, Front 2 322-3 4 Screw-HH 3 3296-29 6 Nut-Lock, NI 4 105-1818 2 Bushing-Mount, HOC 5 105-1807 2 Arm-Pivot, Front 6 105-1809 2 Arm-Spring 7 110-0549 2 Knob-HOC 8 105-3048 2 Washer-Flat 9 322-6 2 Screw-HH 10 40-1940 2 Washer 11 614650 2 Bolt-Shoulder 12 115-2894 2 8 Inch Wheel ASM C2 7 3371-850B Front Wheel and Height-of-Cut Assembly Ref.
Part Number Qty. Description 1 115-1956-03 2 Plate-HOC, Front 2 322-3 4 Screw-HH 3 3296-29 6 Nut-Lock, NI 4 105-1818 2 Bushing-Mount, HOC 5 105-1807 2 Arm-Pivot, Front 6 105-1809 2 Arm-Spring 7 110-0549 2 Knob-HOC 8 105-3048 2 Washer-Flat 9 322-6 2 Screw-HH 10 40-1940 2 Washer 11 614650 2 Bolt-Shoulder 12 115-2894 2 8 Inch Wheel ASM C2 7 3371-850B Front Wheel and Height-of-Cut Assembly Ref.
Parts Catalog
Page 8
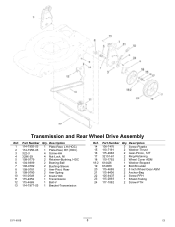
... ASM 21 115-8406 2 Anchor-Bag 22 105-9437 2 Screw-PPH 23 115-2893 1 Shield-Trailing 24 117-1092 2 Screw-PTH 3371-850B 8 C3 Part Number Qty. Part Number Qty. Description 1 114-7955-03 1 Plate-Rear, LH (HOC) 2 114-7956-03 1 Plate-Rear, RH (HOC) 3 322-3 4 Screw-HH 4 3296-29 4 Nut-Lock...
... ASM 21 115-8406 2 Anchor-Bag 22 105-9437 2 Screw-PPH 23 115-2893 1 Shield-Trailing 24 117-1092 2 Screw-PTH 3371-850B 8 C3 Part Number Qty. Part Number Qty. Description 1 114-7955-03 1 Plate-Rear, LH (HOC) 2 114-7956-03 1 Plate-Rear, RH (HOC) 3 322-3 4 Screw-HH 4 3296-29 4 Nut-Lock...

Parts Catalog
Page 9
...-Cable 1 Guide-Rope 6 3296-73 2 Nut-Lock, NI 7 3256-1 1 Washer-Flat 8 105-6842 1 Guide-LH 9 105-6841 1 Guide-RH 12 104-8678 1 Handle-Control Ref. Part Number Qty. Part Number Qty. Handle Assembly Ref.
...-Cable 1 Guide-Rope 6 3296-73 2 Nut-Lock, NI 7 3256-1 1 Washer-Flat 8 105-6842 1 Guide-LH 9 105-6841 1 Guide-RH 12 104-8678 1 Handle-Control Ref. Part Number Qty. Part Number Qty. Handle Assembly Ref.
Parts Catalog
Page 10
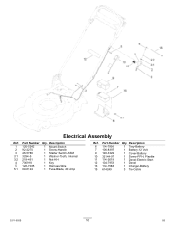
Part Number Qty. Description 6 114-7936 1 Tray-Battery 7 106-8397 1 Battery-12 Volt 9 120-3329 1 Cover-Battery 10 32144-97 1 Screw-PPH, Plastite 11 114-2619 1 Decal-Electric Start 12 104-7953 1 Decal 13 114-1588 1 Charger-Battery 15 614249 3 Tie-Cable 3371-850B 10 D5 Part Number Qty. Electrical Assembly Ref. Description 1 120-5242 1 Mount-Switch 2 92-2270 1 Screw-Handle 3 46-5780 1 Starter Switch ASM 3:1 3254-5 1 Washer-Tooth, Internal 3:2 218-461 1 Nut-HH 4 700918 1 Key 5 120-7035 1 Harness-Wire 5:1 99-6124 1 Fuse-Blade, 40 Amp Ref.
Part Number Qty. Description 6 114-7936 1 Tray-Battery 7 106-8397 1 Battery-12 Volt 9 120-3329 1 Cover-Battery 10 32144-97 1 Screw-PPH, Plastite 11 114-2619 1 Decal-Electric Start 12 104-7953 1 Decal 13 114-1588 1 Charger-Battery 15 614249 3 Tie-Cable 3371-850B 10 D5 Part Number Qty. Electrical Assembly Ref. Description 1 120-5242 1 Mount-Switch 2 92-2270 1 Screw-Handle 3 46-5780 1 Starter Switch ASM 3:1 3254-5 1 Washer-Tooth, Internal 3:2 218-461 1 Nut-HH 4 700918 1 Key 5 120-7035 1 Harness-Wire 5:1 99-6124 1 Fuse-Blade, 40 Amp Ref.


