
Owner's Manual
Page 1
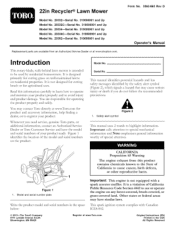
...walk-behind lawn mower is intended to highlight information. Safety alert symbol Figure 2 This manual uses 2 words to be used by the safe_ _alert symbol (Figure 2), which signals a hazard that may cause serious injury or death if you need service, genuine Toro...22in Recycler Lawn Mower Form No. 3363-863 Rev D Model No. 20332mSerial No. 310000001 and Up Model No. 20332CmSerial No. 310000001 and Up Model No. 20334--Serial No. ... have the model and serial numbers of California to use or operate the engine on the product. Whenever you do not follow the recommended precautions. 1....
...walk-behind lawn mower is intended to highlight information. Safety alert symbol Figure 2 This manual uses 2 words to be used by the safe_ _alert symbol (Figure 2), which signals a hazard that may cause serious injury or death if you need service, genuine Toro...22in Recycler Lawn Mower Form No. 3363-863 Rev D Model No. 20332mSerial No. 310000001 and Up Model No. 20332CmSerial No. 310000001 and Up Model No. 20334--Serial No. ... have the model and serial numbers of California to use or operate the engine on the product. Whenever you do not follow the recommended precautions. 1....

Owner's Manual
Page 2
Read and understand the contents before starting the engine. • If the machine should start the engine. Obey all safe g messages that follow all instructions on slopes. • Watch for walk-behind rotary lawn mowers and the B71.1 specifications of the American National Standards Institute in the ... Slope Operation Slopes are familiar with the instructions, to potential personal injury hazards. never up and down and behind the handle when the engine is running machine unattended. • Stop the engine and wait until the blade comes to avoid possible injury or ...
Read and understand the contents before starting the engine. • If the machine should start the engine. Obey all safe g messages that follow all instructions on slopes. • Watch for walk-behind rotary lawn mowers and the B71.1 specifications of the American National Standards Institute in the ... Slope Operation Slopes are familiar with the instructions, to potential personal injury hazards. never up and down and behind the handle when the engine is running machine unattended. • Stop the engine and wait until the blade comes to avoid possible injury or ...
Owner's Manual
Page 3
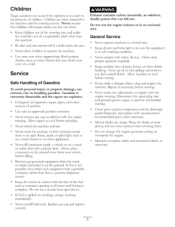
...cool before refueling. Service Safe Handling of Gasoline To avoid personal injury or property damage, use extra caution when servicing ...starting . Keep children out of the mowing area and under the watchful care of a child. If this is spilled on the ground. an odorless, Do not run the engine indoors or in contact with manufacturer's recommended parts, when necessar): Mower... open device. Never fill containers inside a vehicle or on other appliances. Remove gas-powered equipment from your view of a responsible adult other objects that children will remain where you strike ...
...cool before refueling. Service Safe Handling of Gasoline To avoid personal injury or property damage, use extra caution when servicing ...starting . Keep children out of the mowing area and under the watchful care of a child. If this is spilled on the ground. an odorless, Do not run the engine indoors or in contact with manufacturer's recommended parts, when necessar): Mower... open device. Never fill containers inside a vehicle or on other appliances. Remove gas-powered equipment from your view of a responsible adult other objects that children will remain where you strike ...
Owner's Manual
Page 4
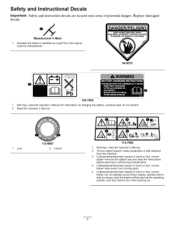
...up and down slopes; Safety and instruction decals are located near areas of hand or foot, mower blade--stay away from moving parts. 5. Indicates the blade is identified as a part from the machine. ...3. Cutting/dismemberment hazard of hand or foot, mower blade--remove the ignition key and read the Operator's Manual for information on slopes; Safety and ... operate up . Cutting/dismemberment hazard of hand or foot, mower blade--do not discard. 2. Replace damaged Manufacturer's Mark 1. Warning--read the Operator's Manual. 2. stop the...
...up and down slopes; Safety and instruction decals are located near areas of hand or foot, mower blade--stay away from moving parts. 5. Indicates the blade is identified as a part from the machine. ...3. Cutting/dismemberment hazard of hand or foot, mower blade--remove the ignition key and read the Operator's Manual for information on slopes; Safety and ... operate up . Cutting/dismemberment hazard of hand or foot, mower blade--do not discard. 2. Replace damaged Manufacturer's Mark 1. Warning--read the Operator's Manual. 2. stop the...
Owner's Manual
Page 5
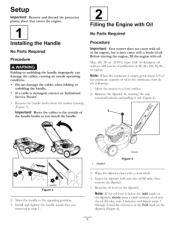
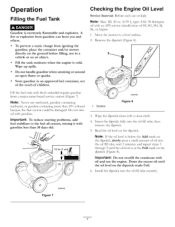
... level is below the Add mark on the dipstick, slowly pour a small amount of oil. Move the mower to the operating position. 3. Read the oil level on the dipstick (Figure 4). Before starting the engine, fill the engine with a bottle of oil into the oil fill tube, then remove the dipstick. 5. Setup Important: Remove and...
... level is below the Add mark on the dipstick, slowly pour a small amount of oil. Move the mower to the operating position. 3. Read the oil level on the dipstick (Figure 4). Before starting the engine, fill the engine with a bottle of oil into the oil fill tube, then remove the dipstick. 5. Setup Important: Remove and...

Owner's Manual
Page 6
change it yearly thereafter. Ignition key (electric-start models only Refer to Changing the Engine Oil. [3 Charging the Battery No Parts Required Procedure Electric-start 8. Fuel tank cap 11. Bag-on the dipstick reads Full. Washout port (not shown) 13. Side ...Handle knob (2) 6. Grass bag 2. Important: Do not overfill the crankcase oil and run the engine. Drain the excess the oil level on -demand lever 5. Recoil start models only) Battery charger (electric-start handle 7. with oil until 6. Install the dipstick into the oil fill tube secure1> Important: ...
change it yearly thereafter. Ignition key (electric-start models only Refer to Changing the Engine Oil. [3 Charging the Battery No Parts Required Procedure Electric-start 8. Fuel tank cap 11. Bag-on the dipstick reads Full. Washout port (not shown) 13. Side ...Handle knob (2) 6. Grass bag 2. Important: Do not overfill the crankcase oil and run the engine. Drain the excess the oil level on -demand lever 5. Recoil start models only) Battery charger (electric-start handle 7. with oil until 6. Install the dipstick into the oil fill tube secure1> Important: ...
Owner's Manual
Page 7
fi11:20 oz. (0.59 1), type: SAE 30 detergent oil with 1. Remove the dipstick (Figure 8). Important: To reduce starting problems, fuel stabilizer to a level surface. 2. Install the dipstick into the oil fill tube, wait 3 minutes, and repeat steps 3 through 5 until 6. Wipe...name-brand service station (Figure 7). Drain the excess the oil level on the dipstick. Fill the tank outdoors when the engine is extremely flammable and explosive. Move the mower to the fuel all season, mixing gasoline less than 10% ethanol because the fuel system could be damaged. Do not handle...
fi11:20 oz. (0.59 1), type: SAE 30 detergent oil with 1. Remove the dipstick (Figure 8). Important: To reduce starting problems, fuel stabilizer to a level surface. 2. Install the dipstick into the oil fill tube, wait 3 minutes, and repeat steps 3 through 5 until 6. Wipe...name-brand service station (Figure 7). Drain the excess the oil level on the dipstick. Fill the tank outdoors when the engine is extremely flammable and explosive. Move the mower to the fuel all season, mixing gasoline less than 10% ethanol because the fuel system could be damaged. Do not handle...
Owner's Manual
Page 8
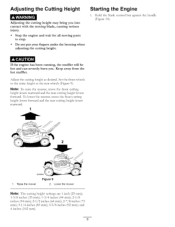
... the front cutting height levers rearward and the rear cutting height levers forward. Raise the mower Figure 9 2. and 4 inches (102 ram). Starting the Engine 1. Keep away from the hot muffler. Note: To raise the mower, move the front cutting height levers forward and the rear cutting height levers rearward. 1 2 ... you into serious • Stop the engine and wait for all moving blade, causing injury. you . Set the front wheels to stop. • Do not put your fingers under the housing when adjusting the cutting height. Lower the mower Note: The cutting height settings are 1...
... the front cutting height levers rearward and the rear cutting height levers forward. Raise the mower Figure 9 2. and 4 inches (102 ram). Starting the Engine 1. Keep away from the hot muffler. Note: To raise the mower, move the front cutting height levers forward and the rear cutting height levers rearward. 1 2 ... you into serious • Stop the engine and wait for all moving blade, causing injury. you . Set the front wheels to stop. • Do not put your fingers under the housing when adjusting the cutting height. Lower the mower Note: The cutting height settings are 1...

Owner's Manual
Page 10
..., both the engine and blade should stop the engine, release the blade control bar. Removing the Grass Bag To remove the bag, reverse the steps above. If the bag-on-demand lever is on -demand feature allows you leave the mower (electric-start models only). ...mower and the bag-on the bag rest in serious personal injury. Rear deflector 2. Installing the Grass Bag 1. Raise and hold up the rear deflector (Figure 14). 1. Install the grass bag, ensuring that the pins on -demand lever is damaged, install a new Toro replacement bag. Check the grass bag frequently. Stop the engine...
..., both the engine and blade should stop the engine, release the blade control bar. Removing the Grass Bag To remove the bag, reverse the steps above. If the bag-on-demand lever is on -demand feature allows you leave the mower (electric-start models only). ...mower and the bag-on the bag rest in serious personal injury. Rear deflector 2. Installing the Grass Bag 1. Raise and hold up the rear deflector (Figure 14). 1. Install the grass bag, ensuring that the pins on -demand lever is damaged, install a new Toro replacement bag. Check the grass bag frequently. Stop the engine...
Owner's Manual
Page 11
...moving parts to stop before cleaning the bag-on-demand and the surrounding opening (Figure 16) before leaving the operating position. 11 Stop the engine and wait for cutting very tall grass. lever from the bag-on -demand another. The blade is in the bagging position, move the ...rearward until the button on the lever pops up (Figure 15) Figure 15 1. contacting the blade can result in serious personal injury. parts to The blade is on the mower and the bag-on -Demand Lever). Important: For proper operation, remove any grass clippings and debris from one position to...
...moving parts to stop before cleaning the bag-on-demand and the surrounding opening (Figure 16) before leaving the operating position. 11 Stop the engine and wait for cutting very tall grass. lever from the bag-on -demand another. The blade is in the bagging position, move the ...rearward until the button on the lever pops up (Figure 15) Figure 15 1. contacting the blade can result in serious personal injury. parts to The blade is on the mower and the bag-on -Demand Lever). Important: For proper operation, remove any grass clippings and debris from one position to...
Owner's Manual
Page 12
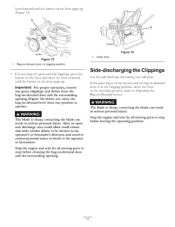
...pace while mowing. - Be aware of a potential fire hazard in dry conditions. This helps disperse the clippings over aW object. • If the mower strikes an object or starts to stall. If the finished lawn appearance is too long, the mower may plug and cause the engine...Toro replacement blade. If the grass is unsatisfactor B try one or more frequent13: - Mow only in very dry conditions, follow all local fire warnings, and keep the mower... at a lower setting for even fertilization. Walk at the highest cutting height setting and walk slower; G009537 Figure 17 Removing the Side ...
...pace while mowing. - Be aware of a potential fire hazard in dry conditions. This helps disperse the clippings over aW object. • If the mower strikes an object or starts to stall. If the finished lawn appearance is too long, the mower may plug and cause the engine...Toro replacement blade. If the grass is unsatisfactor B try one or more frequent13: - Mow only in very dry conditions, follow all local fire warnings, and keep the mower... at a lower setting for even fertilization. Walk at the highest cutting height setting and walk slower; G009537 Figure 17 Removing the Side ...

Owner's Manual
Page 14
Tipping Gasoline personal the mower may cause the fuel to the spark plug. After performing the maintenance procedure(s), connect the spark plug wire to leak. Disconnect the spark plug wire from the normal operating position. tip the mower prior to running out of the machine from the spark ... the nearest dealer) or at v_-,,_-,,_shoptoro.com. Important: Before tipping the mower to change the oil or replace the blade, allow the fuel tank to your engine operator's manual for 24 hours (electric-start models only). • Empty the fuel tank before repairs as directed and ...
Tipping Gasoline personal the mower may cause the fuel to the spark plug. After performing the maintenance procedure(s), connect the spark plug wire to leak. Disconnect the spark plug wire from the normal operating position. tip the mower prior to running out of the machine from the spark ... the nearest dealer) or at v_-,,_-,,_shoptoro.com. Important: Before tipping the mower to change the oil or replace the blade, allow the fuel tank to your engine operator's manual for 24 hours (electric-start models only). • Empty the fuel tank before repairs as directed and ...
Owner's Manual
Page 15
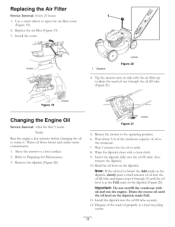
... filter up to the operating position. 6. Figure 21 ooo 5. Wipe the dipstick clean with oil and run the engine. Important: Do not overfill the crankcase with a clean cloth. 9. Return the mower to drain the used oil properly at the Full mark on the dipstick, slowly pour a small amount of the ... Service Interval: After the first 5 hours Yearly Run the engine a few minutes before changing the oil to a level surface. 2. Remove the dipstick (Figure 20). Insert the dipstick fury into the oil fill tube secure1> 12. Move the mower to warm it. Refer to Preparing for the oil to open the...
... filter up to the operating position. 6. Figure 21 ooo 5. Wipe the dipstick clean with oil and run the engine. Important: Do not overfill the crankcase with a clean cloth. 9. Return the mower to drain the used oil properly at the Full mark on the dipstick, slowly pour a small amount of the ... Service Interval: After the first 5 hours Yearly Run the engine a few minutes before changing the oil to a level surface. 2. Remove the dipstick (Figure 20). Insert the dipstick fury into the oil fill tube secure1> 12. Move the mower to warm it. Refer to Preparing for the oil to open the...

Owner's Manual
Page 16
... in type fuse. 1. and locate the fuse (Figure 24. 16 Charging the Battery Service Interval: Every 25 hours Electric-start models only If the battery does not charge or the engine does not run with a 40-amp plug-in a sheltered area and charge the battery at room temperature (70°... as needed. Replace it with the electric starter, the fuse may have a two-color LED display that indicates the following states of the lead-acid battery according to the mower wire harness located below the ignition key (Figure 22). Plug the charger into a wall outlet. Battery compartment , Wipe...
... in type fuse. 1. and locate the fuse (Figure 24. 16 Charging the Battery Service Interval: Every 25 hours Electric-start models only If the battery does not charge or the engine does not run with a 40-amp plug-in a sheltered area and charge the battery at room temperature (70°... as needed. Replace it with the electric starter, the fuse may have a two-color LED display that indicates the following states of the lead-acid battery according to the mower wire harness located below the ignition key (Figure 22). Plug the charger into a wall outlet. Battery compartment , Wipe...
Owner's Manual
Page 18
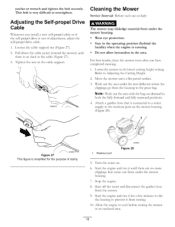
... 3. Attach a garden hose that is no more clippings that come out from the housing to the grass bag. the garden hose , Start the engine and run it from rusting. 10. Lower the mower to Adjusting the Cutting Height. 2. Washout port G009501 Figure 28 , Turn the water on the cable support.... Start the engine and run it for the purpose of adjustment , adjust the self-propel drive cable. , Loosen the cable support nut (Figure 27). 2....
... 3. Attach a garden hose that is no more clippings that come out from the housing to the grass bag. the garden hose , Start the engine and run it from rusting. 10. Lower the mower to Adjusting the Cutting Height. 2. Washout port G009501 Figure 28 , Turn the water on the cable support.... Start the engine and run it for the purpose of adjustment , adjust the self-propel drive cable. , Loosen the cable support nut (Figure 27). 2....

Owner's Manual
Page 19
... 1. Charge the battery for 24 hours (electric-start models only). Do not store fuel without stabilizer more than 30 days, and do not store stabilized fuel more than 90 days. , Run the mower until the engine stops from running out of fuel. , Start the engine again. Tighten all nuts, bolts, and ... you fold the handle. Figure 29 G009504 4. Note: Old fuel in the fuel tank is damaged, Service Dealer. Remove the ignition key (electric-start the engine, it is sufficiently dr> , Disconnect the wire from the spark plug. 7. Fold the upper handle forward as you can move the upper ...
... 1. Charge the battery for 24 hours (electric-start models only). Do not store fuel without stabilizer more than 30 days, and do not store stabilized fuel more than 90 days. , Run the mower until the engine stops from running out of fuel. , Start the engine again. Tighten all nuts, bolts, and ... you fold the handle. Figure 29 G009504 4. Note: Old fuel in the fuel tank is damaged, Service Dealer. Remove the ignition key (electric-start the engine, it is sufficiently dr> , Disconnect the wire from the spark plug. 7. Fold the upper handle forward as you can move the upper ...

Owner's Manual
Page 20
..., MN 55420-1196 Toll free at www.Toro.com. first time starts after extended period of non-use over one location, or institutional or rental use, is liable for indirect, incidental, or consequential damages in Mulcher/Bagger Walk Power Mowers Conditions and Products Covered Items and Conditions Not... periods of malfunction or non-use pending completion of repairs under these warranties must pay transportation costs. or if the Toro GTS (Guaranteed to Start) engine will diagnose the problem and determine if it stops functioning due to any period of non-use over three months or...
..., MN 55420-1196 Toll free at www.Toro.com. first time starts after extended period of non-use over one location, or institutional or rental use, is liable for indirect, incidental, or consequential damages in Mulcher/Bagger Walk Power Mowers Conditions and Products Covered Items and Conditions Not... periods of malfunction or non-use pending completion of repairs under these warranties must pay transportation costs. or if the Toro GTS (Guaranteed to Start) engine will diagnose the problem and determine if it stops functioning due to any period of non-use over three months or...

Parts Catalog
Page 3
All Rights Reserved Contents Deck, Side Chute and Rear Door Assembly 4 Rear Bag Assembly 5 Engine and Blade Assembly 6 Front Wheel and Height-of-Cut Assembly 7 Transmission and Rear Wheel Drive Assembly 8 Handle Assembly 9 Electrical Assembly 10 Attachments and Accessories 11 © 2012-The Toro® Company Contact us at www.Toro.com. 8111 Lyndale Avenue South Bloomington, MN 55420 3 Printed in the USA.
All Rights Reserved Contents Deck, Side Chute and Rear Door Assembly 4 Rear Bag Assembly 5 Engine and Blade Assembly 6 Front Wheel and Height-of-Cut Assembly 7 Transmission and Rear Wheel Drive Assembly 8 Handle Assembly 9 Electrical Assembly 10 Attachments and Accessories 11 © 2012-The Toro® Company Contact us at www.Toro.com. 8111 Lyndale Avenue South Bloomington, MN 55420 3 Printed in the USA.

Parts Catalog
Page 6
Engine and Blade Assembly Ref. Part Number Qty. Description 1 1 Engine-Briggs, 128M05-3423-B1 ● ■ 2 104-7577-03 1 Shield-Muffler 3 32144-1 3 Screw-Taptite 5 106-3999 1 Spacer-Driver 6 106-3987 1 Blade Driver ASM 7 108-9764-03 1 Blade-22 Inch 8 108-3766-03 1 Support-Blade 9 105-8579 1 Bolt-Blade 10 105-3030-03 1 Guide-Belt 11 95-1726 3 Screw-Taptite 12 114-7937 1 Cover-Belt 13 46-8091 2 Screw-HWH 14 2210-316 1 Stop-Rope 16 121-2371 1 Decal-Shroud ● Not serviced separately 3371-850B ■ Obtain parts from www.briggsandstratton.com 6 B2
Engine and Blade Assembly Ref. Part Number Qty. Description 1 1 Engine-Briggs, 128M05-3423-B1 ● ■ 2 104-7577-03 1 Shield-Muffler 3 32144-1 3 Screw-Taptite 5 106-3999 1 Spacer-Driver 6 106-3987 1 Blade Driver ASM 7 108-9764-03 1 Blade-22 Inch 8 108-3766-03 1 Support-Blade 9 105-8579 1 Bolt-Blade 10 105-3030-03 1 Guide-Belt 11 95-1726 3 Screw-Taptite 12 114-7937 1 Cover-Belt 13 46-8091 2 Screw-HWH 14 2210-316 1 Stop-Rope 16 121-2371 1 Decal-Shroud ● Not serviced separately 3371-850B ■ Obtain parts from www.briggsandstratton.com 6 B2


