

Owner's Manual
Page 6
... only) Washout port (not shown) 13. Handle 2. Grass bag 2. Important: Do not overfill the crankcase oil and run the engine. Air filter 10. Battery charger (electric-start 8. Install the dipstick into the oil fill tube secure1> Important: Change the engine oil after the first 5 operating hours; Oil fill/dipstick 12. Handle knob (2) 6. ...
... only) Washout port (not shown) 13. Handle 2. Grass bag 2. Important: Do not overfill the crankcase oil and run the engine. Air filter 10. Battery charger (electric-start 8. Install the dipstick into the oil fill tube secure1> Important: Change the engine oil after the first 5 operating hours; Oil fill/dipstick 12. Handle knob (2) 6. ...

Owner's Manual
Page 16
... out the batter); Connect the charger to the mower wire harness located below the ignition key (Figure 22). Note: Your battery charger may be blown. Battery compartment , Wipe away aW debris in a sheltered area and charge the battery at room temperature (70° or 22° C) whenever possible. 1. Replacing the Fuse Electric-start models only CALIFORNIA Proposition 65...
... out the batter); Connect the charger to the mower wire harness located below the ignition key (Figure 22). Note: Your battery charger may be blown. Battery compartment , Wipe away aW debris in a sheltered area and charge the battery at room temperature (70° or 22° C) whenever possible. 1. Replacing the Fuse Electric-start models only CALIFORNIA Proposition 65...

Owner's Manual
Page 19
...not store stabilized fuel more than 90 days. , Run the mower until you can no longer start models only). Loosely install the spark plug. 9. Charge the battery for 24 hours, then unplug the battery charger an store the mower in Figure 29. Do not damage the cables when folding or ...unfolding the handle. contact an Authorized 1. Fold the upper handle forward as shown in an unheated area. Charge the battery for 24 hours (electric-start model only)....
...not store stabilized fuel more than 90 days. , Run the mower until you can no longer start models only). Loosely install the spark plug. 9. Charge the battery for 24 hours, then unplug the battery charger an store the mower in Figure 29. Do not damage the cables when folding or ...unfolding the handle. contact an Authorized 1. Fold the upper handle forward as shown in an unheated area. Charge the battery for 24 hours (electric-start model only)....
Parts Catalog
Page 10
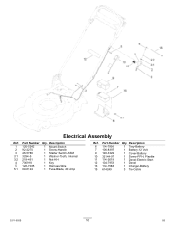
Part Number Qty. Electrical Assembly Ref. Description 1 120-5242 1 Mount-Switch 2 92-2270 1 Screw-Handle 3 46-5780 1 Starter Switch ASM 3:1 3254-5 1 Washer-Tooth, Internal 3:2 218-461 1 Nut-HH 4 700918 1 Key 5 120-7035 1 Harness-Wire 5:1 99-6124 1 Fuse-Blade, 40 Amp Ref. Description 6 114-7936 1 Tray-Battery 7 106-8397 1 Battery-12 Volt 9 120-3329 1 Cover-Battery 10 32144-97 1 Screw-PPH, Plastite 11 114-2619 1 Decal-Electric Start 12 104-7953 1 Decal 13 114-1588 1 Charger-Battery 15 614249 3 Tie-Cable 3371-850B 10 D5 Part Number Qty.
Part Number Qty. Electrical Assembly Ref. Description 1 120-5242 1 Mount-Switch 2 92-2270 1 Screw-Handle 3 46-5780 1 Starter Switch ASM 3:1 3254-5 1 Washer-Tooth, Internal 3:2 218-461 1 Nut-HH 4 700918 1 Key 5 120-7035 1 Harness-Wire 5:1 99-6124 1 Fuse-Blade, 40 Amp Ref. Description 6 114-7936 1 Tray-Battery 7 106-8397 1 Battery-12 Volt 9 120-3329 1 Cover-Battery 10 32144-97 1 Screw-PPH, Plastite 11 114-2619 1 Decal-Electric Start 12 104-7953 1 Decal 13 114-1588 1 Charger-Battery 15 614249 3 Tie-Cable 3371-850B 10 D5 Part Number Qty.


