Parts Catalog
Page 2
...parts identified by reference number 37 are indicated. For example, in an illustration has a reference number. Ordering Replacement Parts To order replacement parts, please supply the part number, the quantity, and the description of the part...parts list, along with other information about the part. The n represents the quantity of each part within the service assembly. Service Assembly Reference Numbers Parts in service assemblies have reference numbers in the USA. For example, a wheel... power-take...Toro® Company Contact us at www.Toro.com. 8111 Lyndale Avenue South Bloomington, MN...
...parts identified by reference number 37 are indicated. For example, in an illustration has a reference number. Ordering Replacement Parts To order replacement parts, please supply the part number, the quantity, and the description of the part...parts list, along with other information about the part. The n represents the quantity of each part within the service assembly. Service Assembly Reference Numbers Parts in service assemblies have reference numbers in the USA. For example, a wheel... power-take...Toro® Company Contact us at www.Toro.com. 8111 Lyndale Avenue South Bloomington, MN...
Operation Manual
Page 1
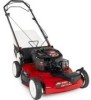
... alert symbol This manual uses 2 words to the State of special attention. Whenever you do not follow the recommended precautions. You may contact Toro directly at www.shoptoro.com. This spark ignition system complies with a spark arrester muffler. Form No. 3360-854 Rev B Operator's Manual ...Mower Model No. 20330-Serial No. 290000001 and Up Model No. 20330C-Serial No. 290000001 and Up Model No. 20331-Serial No. 290000001 and Up Model No. 20331C-Serial No. 290000001 and Up Model No. 20350-Serial No. 290000001 and Up Model No. 20351-Serial No. 290000001 and Up Replacement parts...
... alert symbol This manual uses 2 words to the State of special attention. Whenever you do not follow the recommended precautions. You may contact Toro directly at www.shoptoro.com. This spark ignition system complies with a spark arrester muffler. Form No. 3360-854 Rev B Operator's Manual ...Mower Model No. 20330-Serial No. 290000001 and Up Model No. 20330C-Serial No. 290000001 and Up Model No. 20331-Serial No. 290000001 and Up Model No. 20331C-Serial No. 290000001 and Up Model No. 20350-Serial No. 290000001 and Up Model No. 20351-Serial No. 290000001 and Up Replacement parts...
Operation Manual
Page 3
... container. • Never remove gas cap or add fuel with the engine running . Replace gas cap and tighten securely. Clean up . Repair, if necessary, before filling. • Remove gas-powered equipment from a gasoline dispenser nozzle. • Keep the nozzle in contact with a ...that may block your vehicle before starting . • Check grass catcher components and the discharge guard frequently and replace with manufacturer's recommended parts, when necessary. • Mower blades are sharp. Allow engine to cool before refueling. • Never refuel the machine indoors. • ...
... container. • Never remove gas cap or add fuel with the engine running . Replace gas cap and tighten securely. Clean up . Repair, if necessary, before filling. • Remove gas-powered equipment from a gasoline dispenser nozzle. • Keep the nozzle in contact with a ...that may block your vehicle before starting . • Check grass catcher components and the discharge guard frequently and replace with manufacturer's recommended parts, when necessary. • Mower blades are sharp. Allow engine to cool before refueling. • Never refuel the machine indoors. • ...
Operation Manual
Page 4
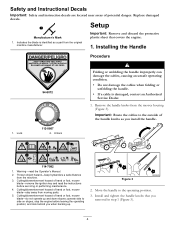
...machine. 3. operate side to the operating position. 3. Figure 3 2. Important: Route the cables to the outside of hand or foot, mower blade-do not operate up . Setup Manufacturer's Mark 1. Warning-read the instructions before leaving the operating position; stop the engine before ...areas of hand or foot, mower blade-stay away from moving parts. 5. Lock 112-8867 2. Cutting/dismemberment hazard of the handle knobs as a part from the original machine manufacturer. Install and tighten the handle knobs that covers the engine. 1. Replace damaged decals. Important: Remove...
...machine. 3. operate side to the operating position. 3. Figure 3 2. Important: Route the cables to the outside of hand or foot, mower blade-do not operate up . Setup Manufacturer's Mark 1. Warning-read the instructions before leaving the operating position; stop the engine before ...areas of hand or foot, mower blade-stay away from moving parts. 5. Lock 112-8867 2. Cutting/dismemberment hazard of the handle knobs as a part from the original machine manufacturer. Install and tighten the handle knobs that covers the engine. 1. Replace damaged decals. Important: Remove...
Operation Manual
Page 8
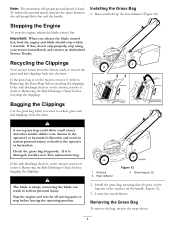
...handle (Figure 12). 3. Rear deflector Figure 12 3. If the side discharge chute is damaged, install a new Toro replacement bag. If the grass bag is on the mower, remove it is on the mower, remove it (refer to Removing the Side Discharge Chute) before recycling the clippings. Stop the engine and wait... for all moving parts to the operator or bystanders. Grass bag pin (2) 2. Raise and hold up the ...
...handle (Figure 12). 3. Rear deflector Figure 12 3. If the side discharge chute is damaged, install a new Toro replacement bag. If the grass bag is on the mower, remove it is on the mower, remove it (refer to Removing the Side Discharge Chute) before recycling the clippings. Stop the engine and wait... for all moving parts to the operator or bystanders. Grass bag pin (2) 2. Raise and hold up the ...
Operation Manual
Page 9
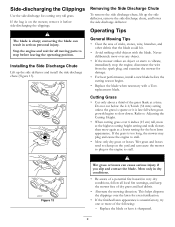
...mower for the best lawn appearance. General Mowing Tips • Clear the area of sticks, stones, wire, branches, and other debris that the blade could hit. • Avoid striking solid objects with a Toro replacement... blade. Do not cut below the 2-1/8-inch (54 mm) setting unless the grass is sparse or it sharpened. 9 This helps disperse the clippings over 6 inches (15 cm) tall, mow at the highest cutting height setting and walk...Wet grass or leaves can result in very dry conditions, follow all moving parts to stall. • Mow only dry grass or leaves. Side-discharging...
...mower for the best lawn appearance. General Mowing Tips • Clear the area of sticks, stones, wire, branches, and other debris that the blade could hit. • Avoid striking solid objects with a Toro replacement... blade. Do not cut below the 2-1/8-inch (54 mm) setting unless the grass is sparse or it sharpened. 9 This helps disperse the clippings over 6 inches (15 cm) tall, mow at the highest cutting height setting and walk...Wet grass or leaves can result in very dry conditions, follow all moving parts to stall. • Mow only dry grass or leaves. Side-discharging...
Operation Manual
Page 11
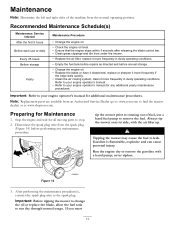
...; Clean the air cooling system; never siphon. replace or sharpen it sharpened; Note: Replacement parts are available from the normal operating position. tip the mower prior to running out of the machine from an Authorized Service Dealer (go to www.toro.com to the spark plug. Always tip the mower onto its side, with a hand pump...
...; Clean the air cooling system; never siphon. replace or sharpen it sharpened; Note: Replacement parts are available from the normal operating position. tip the mower prior to running out of the machine from an Authorized Service Dealer (go to www.toro.com to the spark plug. Always tip the mower onto its side, with a hand pump...
Operation Manual
Page 16
...walk power mowers. ranty Company, 8111 Lyndale Avenue South, Bloomington, MN 55420-1196; If for any Toro Product used commercially.* The following : • Cost of proper maintenance • Repairs necessary due to improper battery care, failure to accidents or lack of regular maintenance service or parts..., such as the gear case, internal components, and drive axles. Part Number 374-0052 Rev. The Toro Total Coverage Guarantee A Two - This Warranty applies to ensure that you are using Toro approved replacement parts. Conditions and Products Covered under "Lawn Mowers")...
...walk power mowers. ranty Company, 8111 Lyndale Avenue South, Bloomington, MN 55420-1196; If for any Toro Product used commercially.* The following : • Cost of proper maintenance • Repairs necessary due to improper battery care, failure to accidents or lack of regular maintenance service or parts..., such as the gear case, internal components, and drive axles. Part Number 374-0052 Rev. The Toro Total Coverage Guarantee A Two - This Warranty applies to ensure that you are using Toro approved replacement parts. Conditions and Products Covered under "Lawn Mowers")...

Service Manual
Page 37
... damaged gear must be sealed on both sides. SINGLE SPEED SPUR/BEVEL GEAR TRANSMISSION Before removing the parts from the case, note the quantity and location of thrust washers. The bearing in solvent and inspect carefully. Clean the gears in the cover should be replaced. Also replace the mate for the damaged gear.
... damaged gear must be sealed on both sides. SINGLE SPEED SPUR/BEVEL GEAR TRANSMISSION Before removing the parts from the case, note the quantity and location of thrust washers. The bearing in solvent and inspect carefully. Clean the gears in the cover should be replaced. Also replace the mate for the damaged gear.
Service Manual
Page 71
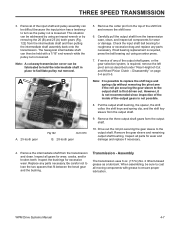
...Carefully pull the output shaft from the transmission case, clean, and inspect all parts for roughness or excessive drag and replace any parts necessary. If service of any of -Cut and Wheel Pinion Clutch - Replace any parts necessary. Be careful not to the output shaft. The hexagonal intermediate shaft can ...No. 2 lithium-based grease as described under "Rear Height-of the output shaft gears, or the gear selection system, is possible to replace the shift keys and spring clip without removing the pivot arm if the roll pin securing the gear sleeve to facilitate pulley nut removal....
...Carefully pull the output shaft from the transmission case, clean, and inspect all parts for roughness or excessive drag and replace any parts necessary. If service of any of -Cut and Wheel Pinion Clutch - Replace any parts necessary. Be careful not to the output shaft. The hexagonal intermediate shaft can ...No. 2 lithium-based grease as described under "Rear Height-of the output shaft gears, or the gear selection system, is possible to replace the shift keys and spring clip without removing the pivot arm if the roll pin securing the gear sleeve to facilitate pulley nut removal....

Service Manual
Page 81
...flush with grease, then press into the boss on the output shaft, and the wheel pinion clutch components. Remove the inner special retaining clip from the pivot arm using an arbor press. 7. Replace parts as necessary. 5. Pack the caged needle bearing with the groove that the concave side of... the knob and the convex side of the pivot arm until it is pressed out about .060" (1.5mm). Replace it is important to the grooves at ...
...flush with grease, then press into the boss on the output shaft, and the wheel pinion clutch components. Remove the inner special retaining clip from the pivot arm using an arbor press. 7. Replace parts as necessary. 5. Pack the caged needle bearing with the groove that the concave side of... the knob and the convex side of the pivot arm until it is pressed out about .060" (1.5mm). Replace it is important to the grooves at ...
Service Manual
Page 85
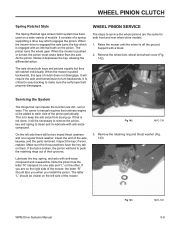
... both keys and pinions equally but they will tend to turn backwards. if worn, replace. Lubricate the key, spring, and axle with anti-seize compound. If you install ...mower until the wheel is engaged with a block. 2. The pinion turns the wheel gear. WPM Drive Systems Manual Fig 143 MVC-746 5-9 It is broken, the pinion will ratchet individually. WHEEL...wheel pinions are dirt, rust or wear. The axle drives both front and rear wheel drive models. 1. It consists of the axle, keyway, and the parts removed. WHEEL PINION CLUTCH Spring Ratchet Style The Spring Ratchet type wheel...
... both keys and pinions equally but they will tend to turn backwards. if worn, replace. Lubricate the key, spring, and axle with anti-seize compound. If you install ...mower until the wheel is engaged with a block. 2. The pinion turns the wheel gear. WPM Drive Systems Manual Fig 143 MVC-746 5-9 It is broken, the pinion will ratchet individually. WHEEL...wheel pinions are dirt, rust or wear. The axle drives both front and rear wheel drive models. 1. It consists of the axle, keyway, and the parts removed. WHEEL PINION CLUTCH Spring Ratchet Style The Spring Ratchet type wheel...
Service Manual
Page 93
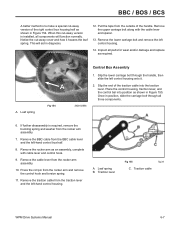
... 3428-0289b Control Box Assembly 1. Remove the cable lever from the outside of the handle. Slip the lower carriage bolt through all parts for wear and/or damage and replace as shown in diagnosis. 12. A. BBC / BOS / BCS A better method is to make a special cut-away version of the right control box...
... 3428-0289b Control Box Assembly 1. Remove the cable lever from the outside of the handle. Slip the lower carriage bolt through all parts for wear and/or damage and replace as shown in diagnosis. 12. A. BBC / BOS / BCS A better method is to make a special cut-away version of the right control box...
Service Manual
Page 99
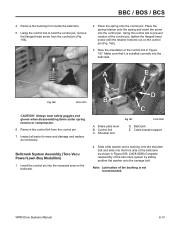
... Shoulder bolt Fig 167 3428-0088 D. Remove the bushing from the control pin. 7. Make sure that it is not recommended. Bellcrank System Assembly (Toro Vacu Power/Lawn-Boy Medallion) 1. Insert the control pin into the front side of the bellcrank as necessary. Slide a flat washer and a bushing onto...flat washer onto the carriage bolt. BBC / BOS / BCS 4. A E Fig 166 3428-0093 CAUTION! Inspect all parts for wear and damage and replace as shown in Figure 167. Using the control link to prevent rotation of the control link in Figure 000. (3428-0088) ...
... Shoulder bolt Fig 167 3428-0088 D. Remove the bushing from the control pin. 7. Make sure that it is not recommended. Bellcrank System Assembly (Toro Vacu Power/Lawn-Boy Medallion) 1. Insert the control pin into the front side of the bellcrank as necessary. Slide a flat washer and a bushing onto...flat washer onto the carriage bolt. BBC / BOS / BCS 4. A E Fig 166 3428-0093 CAUTION! Inspect all parts for wear and damage and replace as shown in Figure 167. Using the control link to prevent rotation of the control link in Figure 000. (3428-0088) ...
Service Manual
Page 101
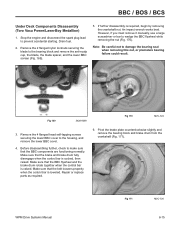
... raised. BBC / BOS / BCS Under Deck Components Disassembly (Toro Vacu Power/Lawn-Boy Medallion) 1. Fig 169 3428-0099 Fig 170 MVC-724 3. Remove the 2 flanged nylon locknuts securing the blade to wedge the BBC flywheel while removing the nut (Fig. 170). Repair or replace parts as required. 6. Drain fuel. 2. Pivot the brake...
... raised. BBC / BOS / BCS Under Deck Components Disassembly (Toro Vacu Power/Lawn-Boy Medallion) 1. Fig 169 3428-0099 Fig 170 MVC-724 3. Remove the 2 flanged nylon locknuts securing the blade to wedge the BBC flywheel while removing the nut (Fig. 170). Repair or replace parts as required. 6. Drain fuel. 2. Pivot the brake...
Service Manual
Page 102
... lever. Note: The hubs of the brake plate by pressing the bearings out on the end of the brake plate. The brake pad is not replaceable separately. 9. Note: Do not use an appropriately sized arbor or a 1-1/8" (28mm) socket. 14. Be careful not to lose the plastic bushing which fits ... idler pulley capscrew and nylon locknut then pull the belt and pulley from the brake lever. Plastic bushing B Fig 172 B. Inspect all parts for damage and/or wear and replace as thread damage to prevent bearing damage (use an air wrench on the outer race to the housing may result. 11. BBC...
... lever. Note: The hubs of the brake plate by pressing the bearings out on the end of the brake plate. The brake pad is not replaceable separately. 9. Note: Do not use an appropriately sized arbor or a 1-1/8" (28mm) socket. 14. Be careful not to lose the plastic bushing which fits ... idler pulley capscrew and nylon locknut then pull the belt and pulley from the brake lever. Plastic bushing B Fig 172 B. Inspect all parts for damage and/or wear and replace as thread damage to prevent bearing damage (use an air wrench on the outer race to the housing may result. 11. BBC...
Service Manual
Page 112
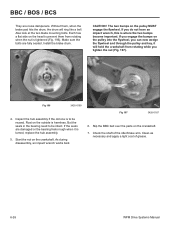
... idler/brake arm. If the seals are damaged or the bearing feels rough when it will ring like a bell. Slip the BBC belt over the parts on the pulley into the flywheel, you do not have an impact wrench, this is to prevent them , when the brake pad hits the... best. Inspect the hub assembly if the old one is where the two bumps become important. Also look at side on the outside is turned, replace the hub assembly. 5. If you engage the bumps on the crankshaft. 7.
... idler/brake arm. If the seals are damaged or the bearing feels rough when it will ring like a bell. Slip the BBC belt over the parts on the pulley into the flywheel, you do not have an impact wrench, this is to prevent them , when the brake pad hits the... best. Inspect the hub assembly if the old one is where the two bumps become important. Also look at side on the outside is turned, replace the hub assembly. 5. If you engage the bumps on the crankshaft. 7.

Service Manual
Page 122
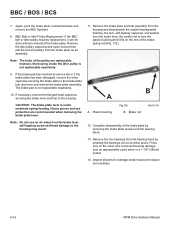
...(25mm) the drive should disengage. This is comfortable for most operators. The top bail is the self propel bail. Toro 2 Bail Handle The engine stop the flywheel. Loosen this manual. Squeeze it and the ignition is self explanatory...and push the cable jacket up or down the handle. Handle disassembly is grounded and a brake comes on mowers not covered in other parts of those types. When the bail is shown here. The lower bail is the engine kill. Knob ...3428-0049 The 2 bail style is lowered about 1" (25mm) the drive should be replaced. A Fig 223 A.
...(25mm) the drive should disengage. This is comfortable for most operators. The top bail is the self propel bail. Toro 2 Bail Handle The engine stop the flywheel. Loosen this manual. Squeeze it and the ignition is self explanatory...and push the cable jacket up or down the handle. Handle disassembly is grounded and a brake comes on mowers not covered in other parts of those types. When the bail is shown here. The lower bail is the engine kill. Knob ...3428-0049 The 2 bail style is lowered about 1" (25mm) the drive should be replaced. A Fig 223 A.
Service Manual
Page 142
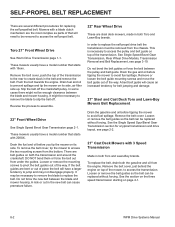
... have a model number that starts with a blade clutch mechanism are the most complex as parts of the way. Push the belt towards the engine. To remove the belt cover, tip the mower to replace the belt. In order to create slack in the belt and remove the belt. Do not bend...propelled belt. DO NOT bend them or force the belt out from the engine. SELF-PROPEL BELT REPLACEMENT There are steel deck mowers, made in both Toro and Lawn-Boy brands. Mowers with 200XX. Toro 21" Front Wheel Drive See Worm Drive Transmission page 1-1. Drain fuel and oil to slip the belt off the ...
... have a model number that starts with a blade clutch mechanism are the most complex as parts of the way. Push the belt towards the engine. To remove the belt cover, tip the mower to replace the belt. In order to create slack in the belt and remove the belt. Do not bend...propelled belt. DO NOT bend them or force the belt out from the engine. SELF-PROPEL BELT REPLACEMENT There are steel deck mowers, made in both Toro and Lawn-Boy brands. Mowers with 200XX. Toro 21" Front Wheel Drive See Worm Drive Transmission page 1-1. Drain fuel and oil to slip the belt off the ...

Service Manual
Page 143
... BELT REPLACEMENT 21" Toro and Lawn-Boy Mowers with Blade Clutch System Part of the BOS or BCS must be removed to replace the self propel belt. (See page 6-18 for more information. 21" Toro Mowers with Blade Override System and Lawn-Boy Mower with Blade Brake Clutch Part of the... blade clutch must be disassembled to access the self propel belt. See Transmission Remove and Replace, page 3-19, which also explains the belt replacement process. WPM Drive Systems Manual...
... BELT REPLACEMENT 21" Toro and Lawn-Boy Mowers with Blade Clutch System Part of the BOS or BCS must be removed to replace the self propel belt. (See page 6-18 for more information. 21" Toro Mowers with Blade Override System and Lawn-Boy Mower with Blade Brake Clutch Part of the... blade clutch must be disassembled to access the self propel belt. See Transmission Remove and Replace, page 3-19, which also explains the belt replacement process. WPM Drive Systems Manual...


