Operation Manual
Page 3
... responsible adult other appliances. • Never fill containers inside a vehicle or on clothing, change the engine governor setting or overspeed the engine. • Maintain or replace safety and instruction ...spark plug wire and ground against engine to cool before filling. • Remove gas-powered equipment from a gasoline dispenser nozzle. • Keep the nozzle in contact with the ... and other debris build-up oil or fuel spillage and remove any adjustments or repairs with a portable container, rather than the operator. • Be alert and turn mower off if a child enters the...
... responsible adult other appliances. • Never fill containers inside a vehicle or on clothing, change the engine governor setting or overspeed the engine. • Maintain or replace safety and instruction ...spark plug wire and ground against engine to cool before filling. • Remove gas-powered equipment from a gasoline dispenser nozzle. • Keep the nozzle in contact with the ... and other debris build-up oil or fuel spillage and remove any adjustments or repairs with a portable container, rather than the operator. • Be alert and turn mower off if a child enters the...
Operation Manual
Page 5
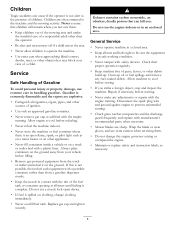
... Fuel tank cap 5. Handle 7. Handle knob (2) 11. Do not overfill. (Max. Refer to Changing the Engine Oil. 1. Cutting height lever (4) 2. Self-propel drive bar 10. Important: Change the engine oil after the first 5 operating hours; Grass bag Figure 6 2. Spark plug 3. Blade control bar ...oil with oil in the engine, but it yearly thereafter. Washout port 2. Recoil start handle 8. Filling the Engine with Oil Product Overview Procedure Your mower does not come with an API service classification of oil. 1. 2. Slowly pour oil into the oil fill tube until the oil...
... Fuel tank cap 5. Handle 7. Handle knob (2) 11. Do not overfill. (Max. Refer to Changing the Engine Oil. 1. Cutting height lever (4) 2. Self-propel drive bar 10. Important: Change the engine oil after the first 5 operating hours; Grass bag Figure 6 2. Spark plug 3. Blade control bar ...oil with oil in the engine, but it yearly thereafter. Washout port 2. Recoil start handle 8. Filling the Engine with Oil Product Overview Procedure Your mower does not come with an API service classification of oil. 1. 2. Slowly pour oil into the oil fill tube until the oil...
Operation Manual
Page 11
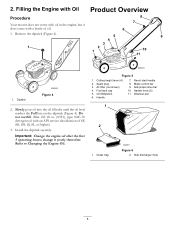
...its side, with a hand pump; Gasoline is flammable, explosive and can cause personal injury. Important: Before tipping the mower to change the oil or replace the blade, allow the fuel tank to the spark plug. After performing the maintenance procedure(s), connect the spark...storage Yearly Maintenance Procedure • Change the engine oil. • Check the engine oil level. • Ensure that the engine stops within 3 seconds after releasing the blade control bar. • Clean grass clippings and dirt from an Authorized Service Dealer (go to www.toro.com to leak. Recommended Maintenance...
...its side, with a hand pump; Gasoline is flammable, explosive and can cause personal injury. Important: Before tipping the mower to change the oil or replace the blade, allow the fuel tank to the spark plug. After performing the maintenance procedure(s), connect the spark...storage Yearly Maintenance Procedure • Change the engine oil. • Check the engine oil level. • Ensure that the engine stops within 3 seconds after releasing the blade control bar. • Clean grass clippings and dirt from an Authorized Service Dealer (go to www.toro.com to leak. Recommended Maintenance...
Operation Manual
Page 12
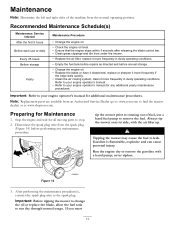
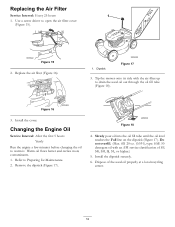
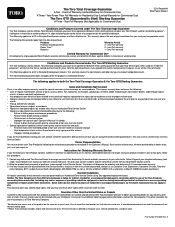
...: After the first 5 hours Yearly Run the engine a few minutes before changing the oil to Preparing for Maintenance. 2. Figure 18 4. Warm oil flows better and carries more contaminants. 1. Slowly pour oil into the oil fill tube until the oil level reaches the Full line on the dipstick (Figure 17). fill: 20 oz..., SG, SH, SJ, SL, or higher.) 5. Replace the air filter (Figure 16). 1. Tip the mower onto its side with an API service classification of the used oil out through the oil fill tube (Figure 18). Refer to warm it. Install the dipstick securely. 6. Use a screw driver to ...
...: After the first 5 hours Yearly Run the engine a few minutes before changing the oil to Preparing for Maintenance. 2. Figure 18 4. Warm oil flows better and carries more contaminants. 1. Slowly pour oil into the oil fill tube until the oil level reaches the Full line on the dipstick (Figure 17). fill: 20 oz..., SG, SH, SJ, SL, or higher.) 5. Replace the air filter (Figure 16). 1. Tip the mower onto its side with an API service classification of the used oil out through the oil fill tube (Figure 18). Refer to warm it. Install the dipstick securely. 6. Use a screw driver to ...
Operation Manual
Page 16
...Toro Product used for Commercial Use) The Toro GTS (Guaranteed to follow this procedure: 1. Year Power Train Full Warranty for Residential Use (Limited Warranty for residential purposes*, will start on the same lot as filters, fuel, lubricants, oil changes, spark plugs, air filters, blade sharpening or worn mower...of a component for Commercial Use) A Three - Bring the product and your Operator's Manual if in Recycler® walk power mowers. ranty Company, 8111 Lyndale Avenue South, Bloomington, MN 55420-1196; customers) or 866-214-9808 (Canadian customers). ...
...Toro Product used for Commercial Use) The Toro GTS (Guaranteed to follow this procedure: 1. Year Power Train Full Warranty for Residential Use (Limited Warranty for residential purposes*, will start on the same lot as filters, fuel, lubricants, oil changes, spark plugs, air filters, blade sharpening or worn mower...of a component for Commercial Use) A Three - Bring the product and your Operator's Manual if in Recycler® walk power mowers. ranty Company, 8111 Lyndale Avenue South, Bloomington, MN 55420-1196; customers) or 866-214-9808 (Canadian customers). ...

Service Manual
Page 48
...side and remove it is not required for clarity. DO NOT bend the belt guide (Fig. 059). 22" TORO & LAWN-BOY REAR WHEEL DRIVE MODELS Transmission Removal and Belt Replacement On rear wheel drive models, it from the center of the crankshaft pulley and over the blade (Fig. 060). Fig 059... Blade removed for belt replacement. 5. Remove the single retaining screw from the rear HOC side plates (Fig. 061). Drain fuel and oil from the mower housing in order to separate the rear drive assembly from the engine. 2. The blade can be removed, but it is necessary to change the drive belt. 1.
...side and remove it is not required for clarity. DO NOT bend the belt guide (Fig. 059). 22" TORO & LAWN-BOY REAR WHEEL DRIVE MODELS Transmission Removal and Belt Replacement On rear wheel drive models, it from the center of the crankshaft pulley and over the blade (Fig. 060). Fig 059... Blade removed for belt replacement. 5. Remove the single retaining screw from the rear HOC side plates (Fig. 061). Drain fuel and oil from the mower housing in order to separate the rear drive assembly from the engine. 2. The blade can be removed, but it is necessary to change the drive belt. 1.


