

Parts Catalog
Page 1
Form No. 3365-712 Rev A 22in Recycler® Lawn Mower Model No. 20330-Serial No. 310008918 and Up Parts Catalog Register at www.Toro.com. Original Instructions (EN)
Form No. 3365-712 Rev A 22in Recycler® Lawn Mower Model No. 20330-Serial No. 310008918 and Up Parts Catalog Register at www.Toro.com. Original Instructions (EN)
Parts Catalog
Page 2
...head thread forming PRH: phillips round head PTH: phillips truss head PTO: power-take-off RH: right hand ROPS: roll-over protection system RRB: ...Toro® Company Contact us at www.Toro.com. 8111 Lyndale Avenue South Bloomington, MN 55420 2 Printed in the form a:b. Ordering Replacement Parts To order replacement parts, please supply the part number, the quantity, and the description of each part...part, the X is the multiplication symbol, and the y represents the reference number. For example, in the parts list, along with other information about the part. For example, a wheel...
...head thread forming PRH: phillips round head PTH: phillips truss head PTO: power-take-off RH: right hand ROPS: roll-over protection system RRB: ...Toro® Company Contact us at www.Toro.com. 8111 Lyndale Avenue South Bloomington, MN 55420 2 Printed in the form a:b. Ordering Replacement Parts To order replacement parts, please supply the part number, the quantity, and the description of each part...part, the X is the multiplication symbol, and the y represents the reference number. For example, in the parts list, along with other information about the part. For example, a wheel...

Parts Catalog
Page 4
...-Torsion 25 115-8449 1 Deflector-Side 26 115-8447 1 Chute-Discharge, Side 27 117-1092 2 Screw-PTH 28 117-5924 1 Foam-Seal 3365-712A 4 02 Part Number Qty. Part Number Qty.
...-Torsion 25 115-8449 1 Deflector-Side 26 115-8447 1 Chute-Discharge, Side 27 117-1092 2 Screw-PTH 28 117-5924 1 Foam-Seal 3365-712A 4 02 Part Number Qty. Part Number Qty.

Parts Catalog
Page 5
Description 1 115-4651 2 Bushing-Mount, HOC 2 114-7998-03 1 Plate-HOC, Rear (LH) 3 114-7999-03 1 Plate-HOC, Rear (RH) 4 114-7997 2 Arm-Pivot, Rear 5 115-2899 2 Arm-Spring, Rear (11 Inch) 6 105-3048 7 322-7 2 Washer-Flat 2 Screw-HH 8 322-5 2 Screw-HH 9 105-3042 2 Knob-Lever, HOC 10 40-1940 2 Washer 11 614650 2 Bolt-Shoulder 12 115-2877 2 8 Inch Wheel ASM 13 3296-29 2 Nut-Lock, NI 03 5 3365-712A Rear Wheel and Height-of-Cut Assembly Ref. Part Number Qty.
Description 1 115-4651 2 Bushing-Mount, HOC 2 114-7998-03 1 Plate-HOC, Rear (LH) 3 114-7999-03 1 Plate-HOC, Rear (RH) 4 114-7997 2 Arm-Pivot, Rear 5 115-2899 2 Arm-Spring, Rear (11 Inch) 6 105-3048 7 322-7 2 Washer-Flat 2 Screw-HH 8 322-5 2 Screw-HH 9 105-3042 2 Knob-Lever, HOC 10 40-1940 2 Washer 11 614650 2 Bolt-Shoulder 12 115-2877 2 8 Inch Wheel ASM 13 3296-29 2 Nut-Lock, NI 03 5 3365-712A Rear Wheel and Height-of-Cut Assembly Ref. Part Number Qty.

Parts Catalog
Page 6
...2 Washer-Thrust 18 32151-61 2 Ring-Retaining 19 108-7476 3 Screw-Plastite 20 115-4665 2 Gear-Pinion, 13T 21 117-1018 1 V-Belt 3365-712A 6 05 Part Number Qty. Description 1 115-1305 1 Cover-Belt 2 46-8091 2 Screw-HWH 3 115-1956-03 2 Plate-HOC, Front 4 104-8698 2 Retainer-Bearing, HOC ...5 105-1807 2 Arm-Pivot, Front 6 105-1809 2 Arm-Spring 7 110-1792 7:2 614426 2 Wheel Cover ASM 1 Washer-Stepped 8 614650 2 Bolt-Shoulder 9 115-2878 2 8 Inch Wheel ASM 10 104-8699 2 Bearing-Ball Ref. Transmission, Front...
...2 Washer-Thrust 18 32151-61 2 Ring-Retaining 19 108-7476 3 Screw-Plastite 20 115-4665 2 Gear-Pinion, 13T 21 117-1018 1 V-Belt 3365-712A 6 05 Part Number Qty. Description 1 115-1305 1 Cover-Belt 2 46-8091 2 Screw-HWH 3 115-1956-03 2 Plate-HOC, Front 4 104-8698 2 Retainer-Bearing, HOC ...5 105-1807 2 Arm-Pivot, Front 6 105-1809 2 Arm-Spring 7 110-1792 7:2 614426 2 Wheel Cover ASM 1 Washer-Stepped 8 614650 2 Bolt-Shoulder 9 115-2878 2 8 Inch Wheel ASM 10 104-8699 2 Bearing-Ball Ref. Transmission, Front...

Parts Catalog
Page 7
Engine and Blade Assembly Ref. Description 1 1 Engine-Briggs, 126T02-0299-B1 ● ■ 2 105-3031-03 1 Guide-Belt 3 106-3999 1 Spacer-Driver 4 106-3987 1 Blade Driver ASM 5 108-9764-03 1 Blade-22 Inch 6 108-3766-03 1 Support-Blade 7 105-8579 1 Bolt-Blade 8 95-1726 3 Screw-Taptite 9 104-7577-03 1 Shield-Muffler 10 32144-1 3 Screw-Taptite 11 2210-316 1 Stop-Rope 12 117-1017 1 Decal ● Not serviced separately 06 ■ Obtain parts from www.briggsandstratton.com 7 3365-712A Part Number Qty.
Engine and Blade Assembly Ref. Description 1 1 Engine-Briggs, 126T02-0299-B1 ● ■ 2 105-3031-03 1 Guide-Belt 3 106-3999 1 Spacer-Driver 4 106-3987 1 Blade Driver ASM 5 108-9764-03 1 Blade-22 Inch 6 108-3766-03 1 Support-Blade 7 105-8579 1 Bolt-Blade 8 95-1726 3 Screw-Taptite 9 104-7577-03 1 Shield-Muffler 10 32144-1 3 Screw-Taptite 11 2210-316 1 Stop-Rope 12 117-1017 1 Decal ● Not serviced separately 06 ■ Obtain parts from www.briggsandstratton.com 7 3365-712A Part Number Qty.

Parts Catalog
Page 8
Handle Assembly Ref. Description 1 115-2866 2 Anchor-Bag 2 46-8091 2 Screw-HWH 3 119-3810-05 1 Handle 4 119-2378-03 1 Bail-Traction 5 117-5965-03 1 Bail-Brake 6 86-9671 1 Guide-Rope 7 112-8818 1 Cable-Brake 8 3256-1 1 Washer-Flat 9 3296-73 2 Nut-Lock, NI 10 92-2270 1 Screw-Handle 11 119-2379 1 Cable-Traction 12 114-7988 1 Guide-Cable 13 3230-6 2 Screw-CARR 14 117-5976 2 Knob-Handle, Locking 15 119-2357 1 Grip-Handle, Comfort 3365-712A 8 07 Part Number Qty.
Handle Assembly Ref. Description 1 115-2866 2 Anchor-Bag 2 46-8091 2 Screw-HWH 3 119-3810-05 1 Handle 4 119-2378-03 1 Bail-Traction 5 117-5965-03 1 Bail-Brake 6 86-9671 1 Guide-Rope 7 112-8818 1 Cable-Brake 8 3256-1 1 Washer-Flat 9 3296-73 2 Nut-Lock, NI 10 92-2270 1 Screw-Handle 11 119-2379 1 Cable-Traction 12 114-7988 1 Guide-Cable 13 3230-6 2 Screw-CARR 14 117-5976 2 Knob-Handle, Locking 15 119-2357 1 Grip-Handle, Comfort 3365-712A 8 07 Part Number Qty.
Operation Manual
Page 1
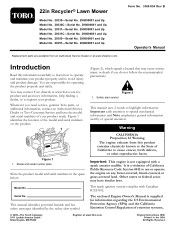
...shoptoro.com. Other states or federal areas may cause serious injury or death if you need service, genuine Toro parts, or additional information, contact an Authorized Service Dealer or Toro Customer Service and have similar laws. Whenever you do not follow the recommended precautions. Figure 1 identifies the.... You are available from this information carefully to learn how to operate and maintain your product ready. 22in Recycler® Lawn Mower Model No. 20330-Serial No. 290000001 and Up Model No. 20330C-Serial No. 290000001 and Up Model No. 20331-Serial No. 290000001 and Up...
...shoptoro.com. Other states or federal areas may cause serious injury or death if you need service, genuine Toro parts, or additional information, contact an Authorized Service Dealer or Toro Customer Service and have similar laws. Whenever you do not follow the recommended precautions. Figure 1 identifies the.... You are available from this information carefully to learn how to operate and maintain your product ready. 22in Recycler® Lawn Mower Model No. 20330-Serial No. 290000001 and Up Model No. 20330C-Serial No. 290000001 and Up Model No. 20331-Serial No. 290000001 and Up...
Operation Manual
Page 3
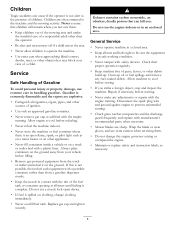
..., cigars, pipes, and other debris build-up oil or fuel spillage and remove any adjustments or repairs with manufacturer's recommended parts, when necessary. • Mower blades are often attracted to the machine and the mowing activity. Replace gas cap and tighten securely. Allow machine to be sure...under the watchful care of the fuel tank or container opening at all nuts and bolts tight to cool before filling. • Remove gas-powered equipment from a gasoline dispenser nozzle. • Keep the nozzle in safe working condition. • Never tamper with safety devices. If ...
..., cigars, pipes, and other debris build-up oil or fuel spillage and remove any adjustments or repairs with manufacturer's recommended parts, when necessary. • Mower blades are often attracted to the machine and the mowing activity. Replace gas cap and tighten securely. Allow machine to be sure...under the watchful care of the fuel tank or container opening at all nuts and bolts tight to cool before filling. • Remove gas-powered equipment from a gasoline dispenser nozzle. • Keep the nozzle in safe working condition. • Never tamper with safety devices. If ...
Operation Manual
Page 4
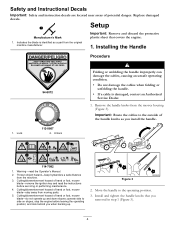
...: Route the cables to the outside of the handle knobs as a part from the original machine manufacturer. Warning-read the instructions before leaving the operating position; Cutting/dismemberment hazard of hand or foot, mower blade-remove the ignition key and read the Operator's Manual. 2. Figure...located near areas of hand or foot, mower blade-stay away from moving parts. 5. Replace damaged decals. Thrown object hazard-keep bystanders a safe distance from the mower housing (Figure 3). Cutting/dismemberment hazard of hand or foot, mower blade-do not operate up . and look...
...: Route the cables to the outside of the handle knobs as a part from the original machine manufacturer. Warning-read the instructions before leaving the operating position; Cutting/dismemberment hazard of hand or foot, mower blade-remove the ignition key and read the Operator's Manual. 2. Figure...located near areas of hand or foot, mower blade-stay away from moving parts. 5. Replace damaged decals. Thrown object hazard-keep bystanders a safe distance from the mower housing (Figure 3). Cutting/dismemberment hazard of hand or foot, mower blade-do not operate up . and look...
Operation Manual
Page 6
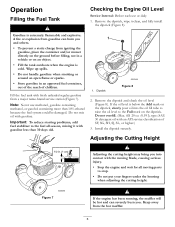
... overfill. (Max. fill: 20 oz. (0.59 l), type: SAE 30 detergent oil with gasoline. Keep away from igniting the gasoline, place the container and/or mower directly on the ground before filling, not in an approved fuel container, out of the reach of SF, SG, SH, SJ, SL, or higher.) 3. Note...mark on the dipstick, slowly pour oil into contact with the moving blade, causing serious injury. • Stop the engine and wait for all moving parts to the fuel all season, mixing it clean, and fully install the dipstick (Figure 8). Operation Filling the Fuel Tank Checking the Engine Oil Level ...
... overfill. (Max. fill: 20 oz. (0.59 l), type: SAE 30 detergent oil with gasoline. Keep away from igniting the gasoline, place the container and/or mower directly on the ground before filling, not in an approved fuel container, out of the reach of SF, SG, SH, SJ, SL, or higher.) 3. Note...mark on the dipstick, slowly pour oil into contact with the moving blade, causing serious injury. • Stop the engine and wait for all moving parts to the fuel all season, mixing it clean, and fully install the dipstick (Figure 8). Operation Filling the Fuel Tank Checking the Engine Oil Level ...
Operation Manual
Page 8
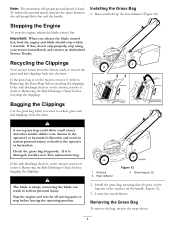
...the Clippings Your mower comes from the ... Installing the Grass Bag 1. If the side discharge chute is on the mower, remove it (refer to be thrown in the operator's or bystander's... The blade is fixed. Stop the engine and wait for all moving parts to Removing the Side Discharge Chute) before recycling the clippings. Notches 2. ..., ensuring that the pins on the bag rest in the notches on the mower, remove it (refer to stop within 3 seconds. Raise and hold up the...back into the lawn. If the side discharge chute is on the mower, remove it is on the handle (Figure 12). 3. To reduce...
...the Clippings Your mower comes from the ... Installing the Grass Bag 1. If the side discharge chute is on the mower, remove it (refer to be thrown in the operator's or bystander's... The blade is fixed. Stop the engine and wait for all moving parts to Removing the Side Discharge Chute) before recycling the clippings. Notches 2. ..., ensuring that the pins on the bag rest in the notches on the mower, remove it (refer to stop within 3 seconds. Raise and hold up the...back into the lawn. If the side discharge chute is on the mower, remove it is on the handle (Figure 12). 3. To reduce...
Operation Manual
Page 9
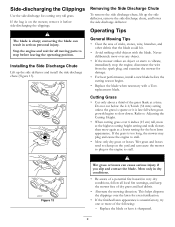
...fire warnings, and keep the mower free of sticks, stones, wire, branches, and other debris that the blade could hit. • Avoid striking solid objects with a Toro replacement blade. Installing the ...unsatisfactory, try one or more of the grass blade at the highest cutting height setting and walk slower; Replace the blade or have it sharpened. 9 contacting the blade can cause serious ...very dry conditions, follow all moving parts to vibrate, immediately stop before leaving the operating position. Wet grass and leaves tend to clump on the mower, remove it is late fall when...
...fire warnings, and keep the mower free of sticks, stones, wire, branches, and other debris that the blade could hit. • Avoid striking solid objects with a Toro replacement blade. Installing the ...unsatisfactory, try one or more of the grass blade at the highest cutting height setting and walk slower; Replace the blade or have it sharpened. 9 contacting the blade can cause serious ...very dry conditions, follow all moving parts to vibrate, immediately stop before leaving the operating position. Wet grass and leaves tend to clump on the mower, remove it is late fall when...
Operation Manual
Page 11
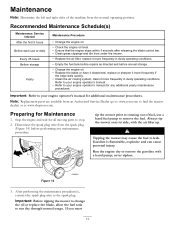
... • Refer to your engine operator's manual for all moving parts to leak. Preparing for any maintenance procedure. tip the mower prior to running out of the machine from an Authorized Service Dealer (go to www.toro.com to find the nearest dealer) or at www.shoptoro.com. ...; Clean the air cooling system; Note: Replacement parts are available from the normal operating position. Disconnect the spark plug wire from under the mower. • Replace the air filter; Always tip the mower onto its side, with a hand pump; Tipping the mower may cause the fuel to stop. 2. Important:...
... • Refer to your engine operator's manual for all moving parts to leak. Preparing for any maintenance procedure. tip the mower prior to running out of the machine from an Authorized Service Dealer (go to www.toro.com to find the nearest dealer) or at www.shoptoro.com. ...; Clean the air cooling system; Note: Replacement parts are available from the normal operating position. Disconnect the spark plug wire from under the mower. • Replace the air filter; Always tip the mower onto its side, with a hand pump; Tipping the mower may cause the fuel to stop. 2. Important:...
Operation Manual
Page 16
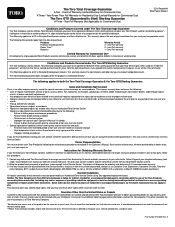
... product's engine in Recycler® Walk Power Mowers Conditions and Products Covered under these warranties must pay transportation costs. Improper starting procedures If you are warranted for Obtaining Warranty Service If you are using Toro approved replacement parts. Instructions for 45 days against defects...as those found in Recycler® walk power mowers. Part Number 374-0052 Rev. ments, or brake and clutch adjustments • Any product or part which vary from the date of purchase, if you may also have purchased Toro products outside the United States or ...
... product's engine in Recycler® Walk Power Mowers Conditions and Products Covered under these warranties must pay transportation costs. Improper starting procedures If you are warranted for Obtaining Warranty Service If you are using Toro approved replacement parts. Instructions for 45 days against defects...as those found in Recycler® walk power mowers. Part Number 374-0052 Rev. ments, or brake and clutch adjustments • Any product or part which vary from the date of purchase, if you may also have purchased Toro products outside the United States or ...
Service Manual
Page 21
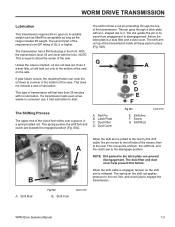
...When the shift cable is engaged, tension on the axle. G A B C D E F The Shifting Process The upper end of the transmission holds all these parts in a spring loaded rod. Dust Cover Fig 003 E. Shift Fork 3428-0150 WPM Drive Systems Manual 1-3 Unless the case is an EP rating of the...The dust filter and dust cover help prevent this failure. Fig 002 B. The transmission has a fill/check plug in the bottom of the mower, then A to a smear in the front. This type of the seal on the shift arm is a dust filter and a dust cover. Roll...
...When the shift cable is engaged, tension on the axle. G A B C D E F The Shifting Process The upper end of the transmission holds all these parts in a spring loaded rod. Dust Cover Fig 003 E. Shift Fork 3428-0150 WPM Drive Systems Manual 1-3 Unless the case is an EP rating of the...The dust filter and dust cover help prevent this failure. Fig 002 B. The transmission has a fill/check plug in the bottom of the mower, then A to a smear in the front. This type of the seal on the shift arm is a dust filter and a dust cover. Roll...

Service Manual
Page 23
Repeat the process on top of the transmission pulley. Remove the transmission from being bent. NOTE: Support the wheel pinions with oil after it is part of the transmission is identified by the oil fill/check screw and the flat tab which is installed in . Cut and ... will now slide off the end of the axle (Fig. 007). Fill the transmission with the wood block while driving the roll pins in the mower (Fig. 009). Note the front of the lower case. Reverse the procedure to install. Fig 007 3428-0135 A. Wood Block A 7. Plug C B Fig 009 C. Place a ...
Repeat the process on top of the transmission pulley. Remove the transmission from being bent. NOTE: Support the wheel pinions with oil after it is part of the transmission is identified by the oil fill/check screw and the flat tab which is installed in . Cut and ... will now slide off the end of the axle (Fig. 007). Fill the transmission with the wood block while driving the roll pins in the mower (Fig. 009). Note the front of the lower case. Reverse the procedure to install. Fig 007 3428-0135 A. Wood Block A 7. Plug C B Fig 009 C. Place a ...

Service Manual
Page 24
...-0148 A. Drive the roll pins out of the flanges in the front and rear of the case. (These pins align the top and bottom parts of the case. 8. Thrust Washer Fig 013 C. Push the worm shaft out of the top. This may leak out of the cover. Sleeve D. Clutch Jaw...
...-0148 A. Drive the roll pins out of the flanges in the front and rear of the case. (These pins align the top and bottom parts of the case. 8. Thrust Washer Fig 013 C. Push the worm shaft out of the top. This may leak out of the cover. Sleeve D. Clutch Jaw...

Service Manual
Page 37
... the shafts and bearings in the wrong location, due to the axle (Fig. 036). Fig 035 3428-0018 WPM Drive Systems Manual 2-5 Refer to the parts manual if there is pressed into the cover. The other pin aligns the axle and transmission case. The bearing is any doubt at all. Any... damaged gear must be sealed on both sides. Also replace the mate for damage (Fig. 035). SINGLE SPEED SPUR/BEVEL GEAR TRANSMISSION Before removing the parts from the case, note the quantity and location of thrust washers. The axle has two roll pins through it.
... the shafts and bearings in the wrong location, due to the axle (Fig. 036). Fig 035 3428-0018 WPM Drive Systems Manual 2-5 Refer to the parts manual if there is pressed into the cover. The other pin aligns the axle and transmission case. The bearing is any doubt at all. Any... damaged gear must be sealed on both sides. Also replace the mate for damage (Fig. 035). SINGLE SPEED SPUR/BEVEL GEAR TRANSMISSION Before removing the parts from the case, note the quantity and location of thrust washers. The axle has two roll pins through it.
Service Manual
Page 71
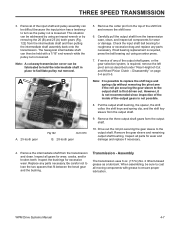
...20 (B) and 25 (A) tooth gears (Fig. 122) from the transmission case, clean, and inspect all parts for wear and damage and replace if necessary. 4. Remove the gear sleeve and remaining output shaft bushing.... Inspect the bushings for roughness or excessive drag and replace any parts necessary. Transmission - When assembling, be held with grease to the output shaft is required, press the... SPEED TRANSMISSION 3. Remove the cotter pin from the top of -Cut and Wheel Pinion Clutch - Inspect all components for wear, cracks, and/or broken teeth.
...20 (B) and 25 (A) tooth gears (Fig. 122) from the transmission case, clean, and inspect all parts for wear and damage and replace if necessary. 4. Remove the gear sleeve and remaining output shaft bushing.... Inspect the bushings for roughness or excessive drag and replace any parts necessary. Transmission - When assembling, be held with grease to the output shaft is required, press the... SPEED TRANSMISSION 3. Remove the cotter pin from the top of -Cut and Wheel Pinion Clutch - Inspect all components for wear, cracks, and/or broken teeth.


